
Want to track what people do on your website? If you need to understand how visitors found you, what pages they visit, or where they drop off, you need two essential tools: Google Analytics 4 (GA4) and Google Tag Manager (GTM).
Google Analytics helps you understand your visitors’ behavior. Google Tag Manager makes it easy to add tracking codes (or “tags”) without constantly modifying your website’s code.
In this step-by-step guide, I’ll walk you through:
What You Will Learn

You don’t need any coding skills—just follow along with the screenshots.
How to Create a Google Analytics Account?
First things first. At the very beginning, you need a Google Analytics account to start the show!
To create a Google Analytics account, follow these steps:
Step 1: Get Started
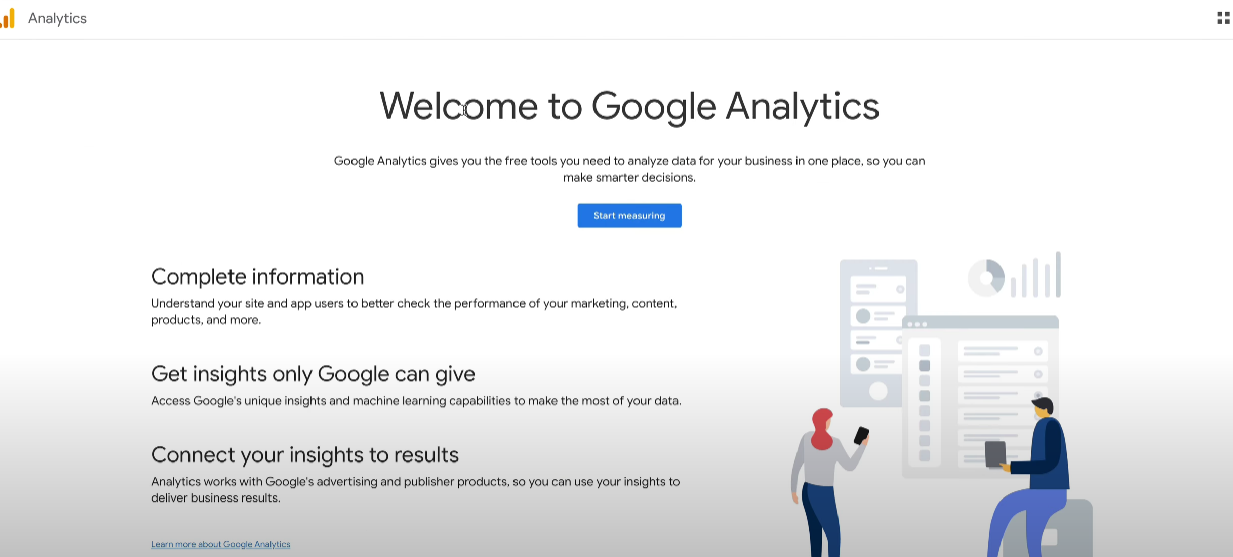
First, go to analytics.google.com. (If you’re not logged into your Google account, you’ll need to sign in with your email and password.)
If you haven’t created a Google Analytics account before, you’ll see the following interface. Simply click the blue “Start measuring” button
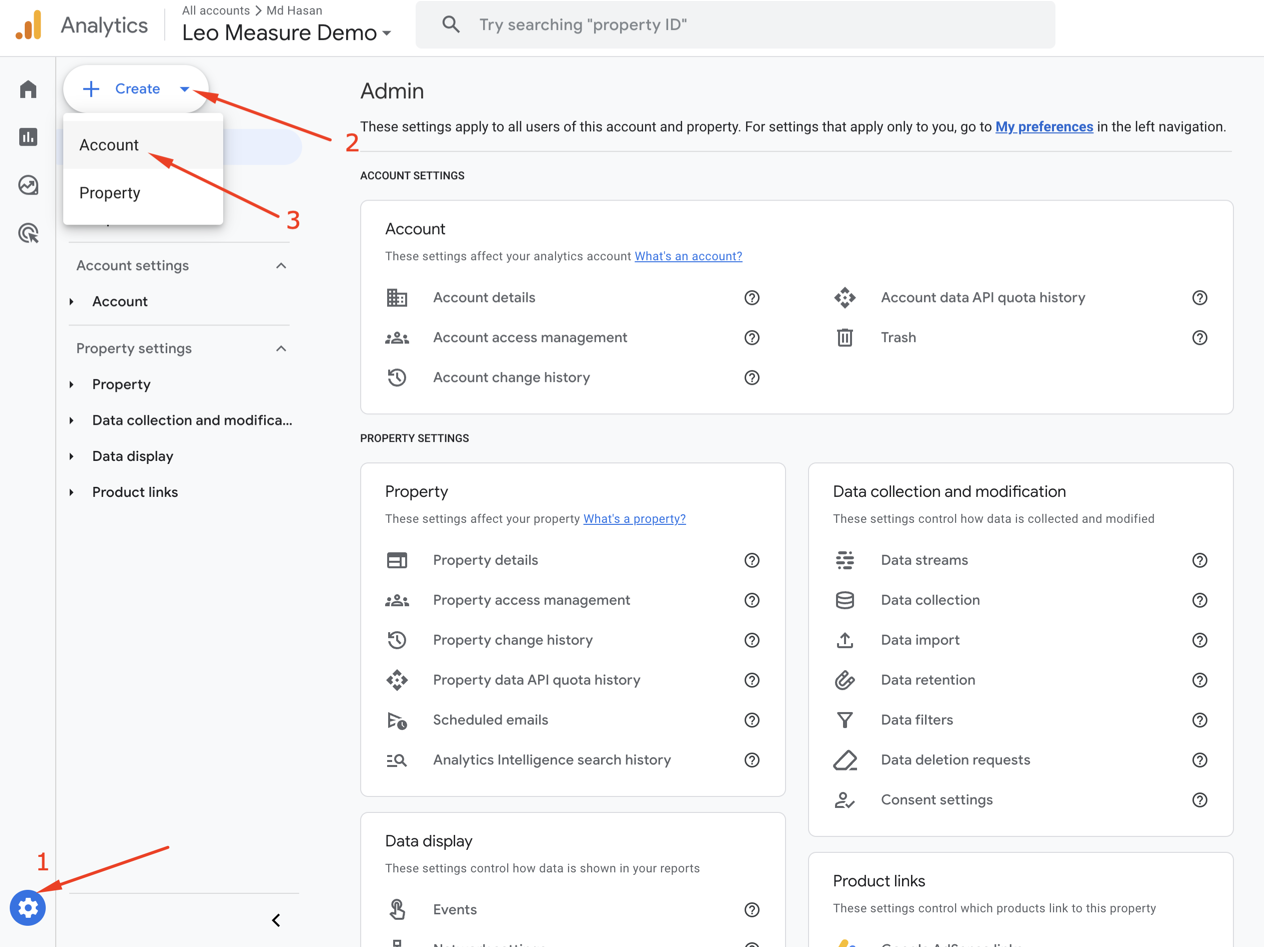
If you already have a Google Analytics account, you will see one of your Google Analytics dashboards. From the Dashboard, click the Admin icon in the very bottom left corner to create a new Google Analytics account as shown in the following screenshot:
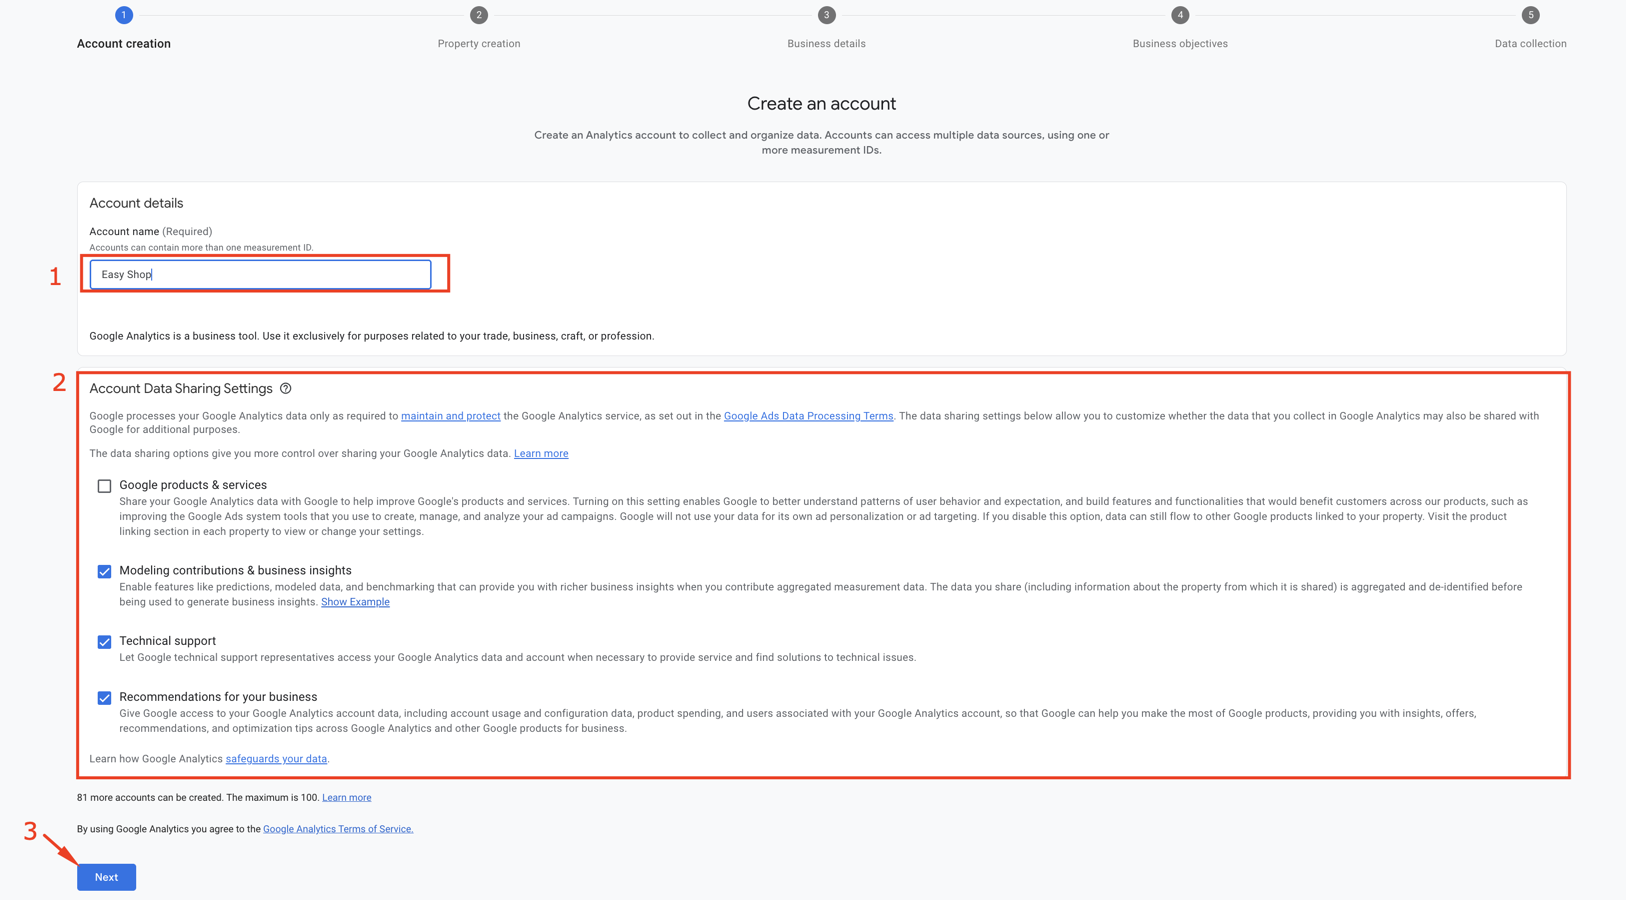
Step 2: Account Creation
In this step, you’ll see the following interface. Enter your business/company name (or any name you prefer) as the account name. You can review the “Account Data Sharing Settings” and select which data you’d like to share. If you prefer, you can keep the default settings for this section. Then click the blue “Next” button to proceed to the next step.
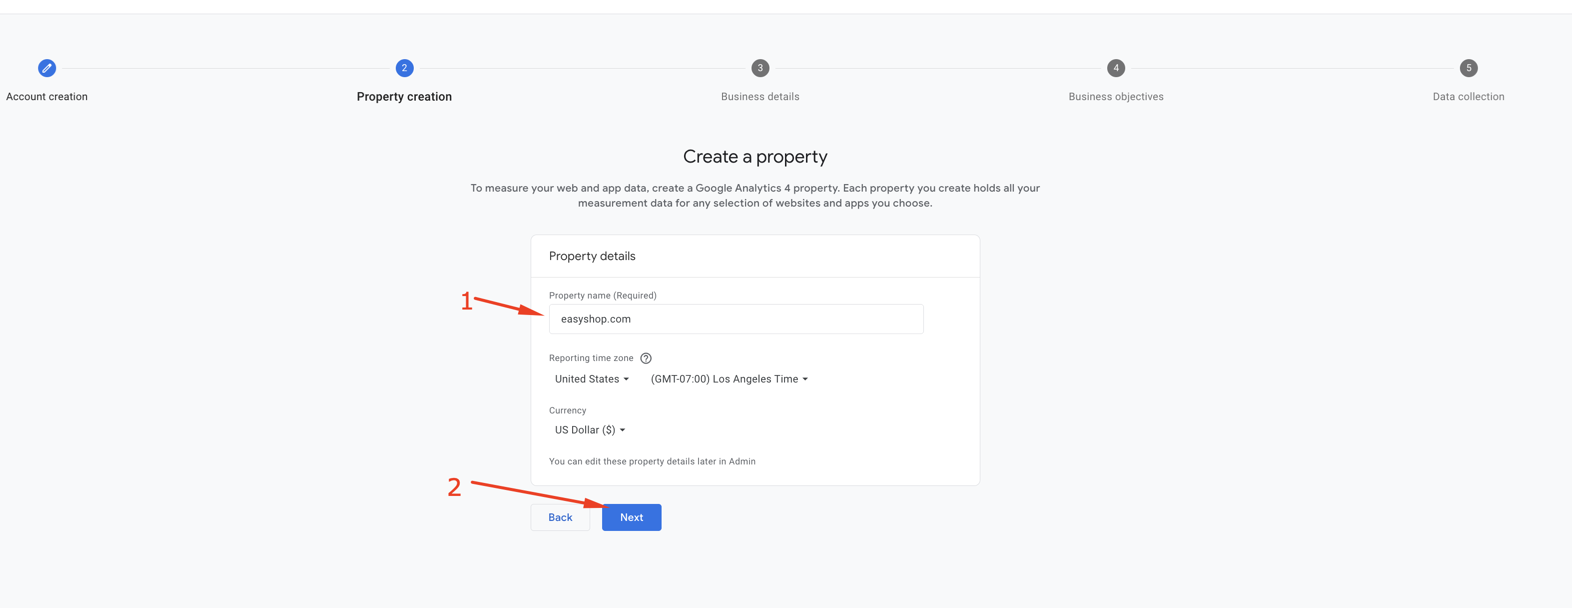
Step 3: Property Creation
In Google Analytics, a property is where your website data gets collected and reported.
In this step, you need to enter a property name and click the Next button as shown in the following example. You can use your website name as the property name. You can also change the reporting time zone and currency if they don’t match your website’s settings.
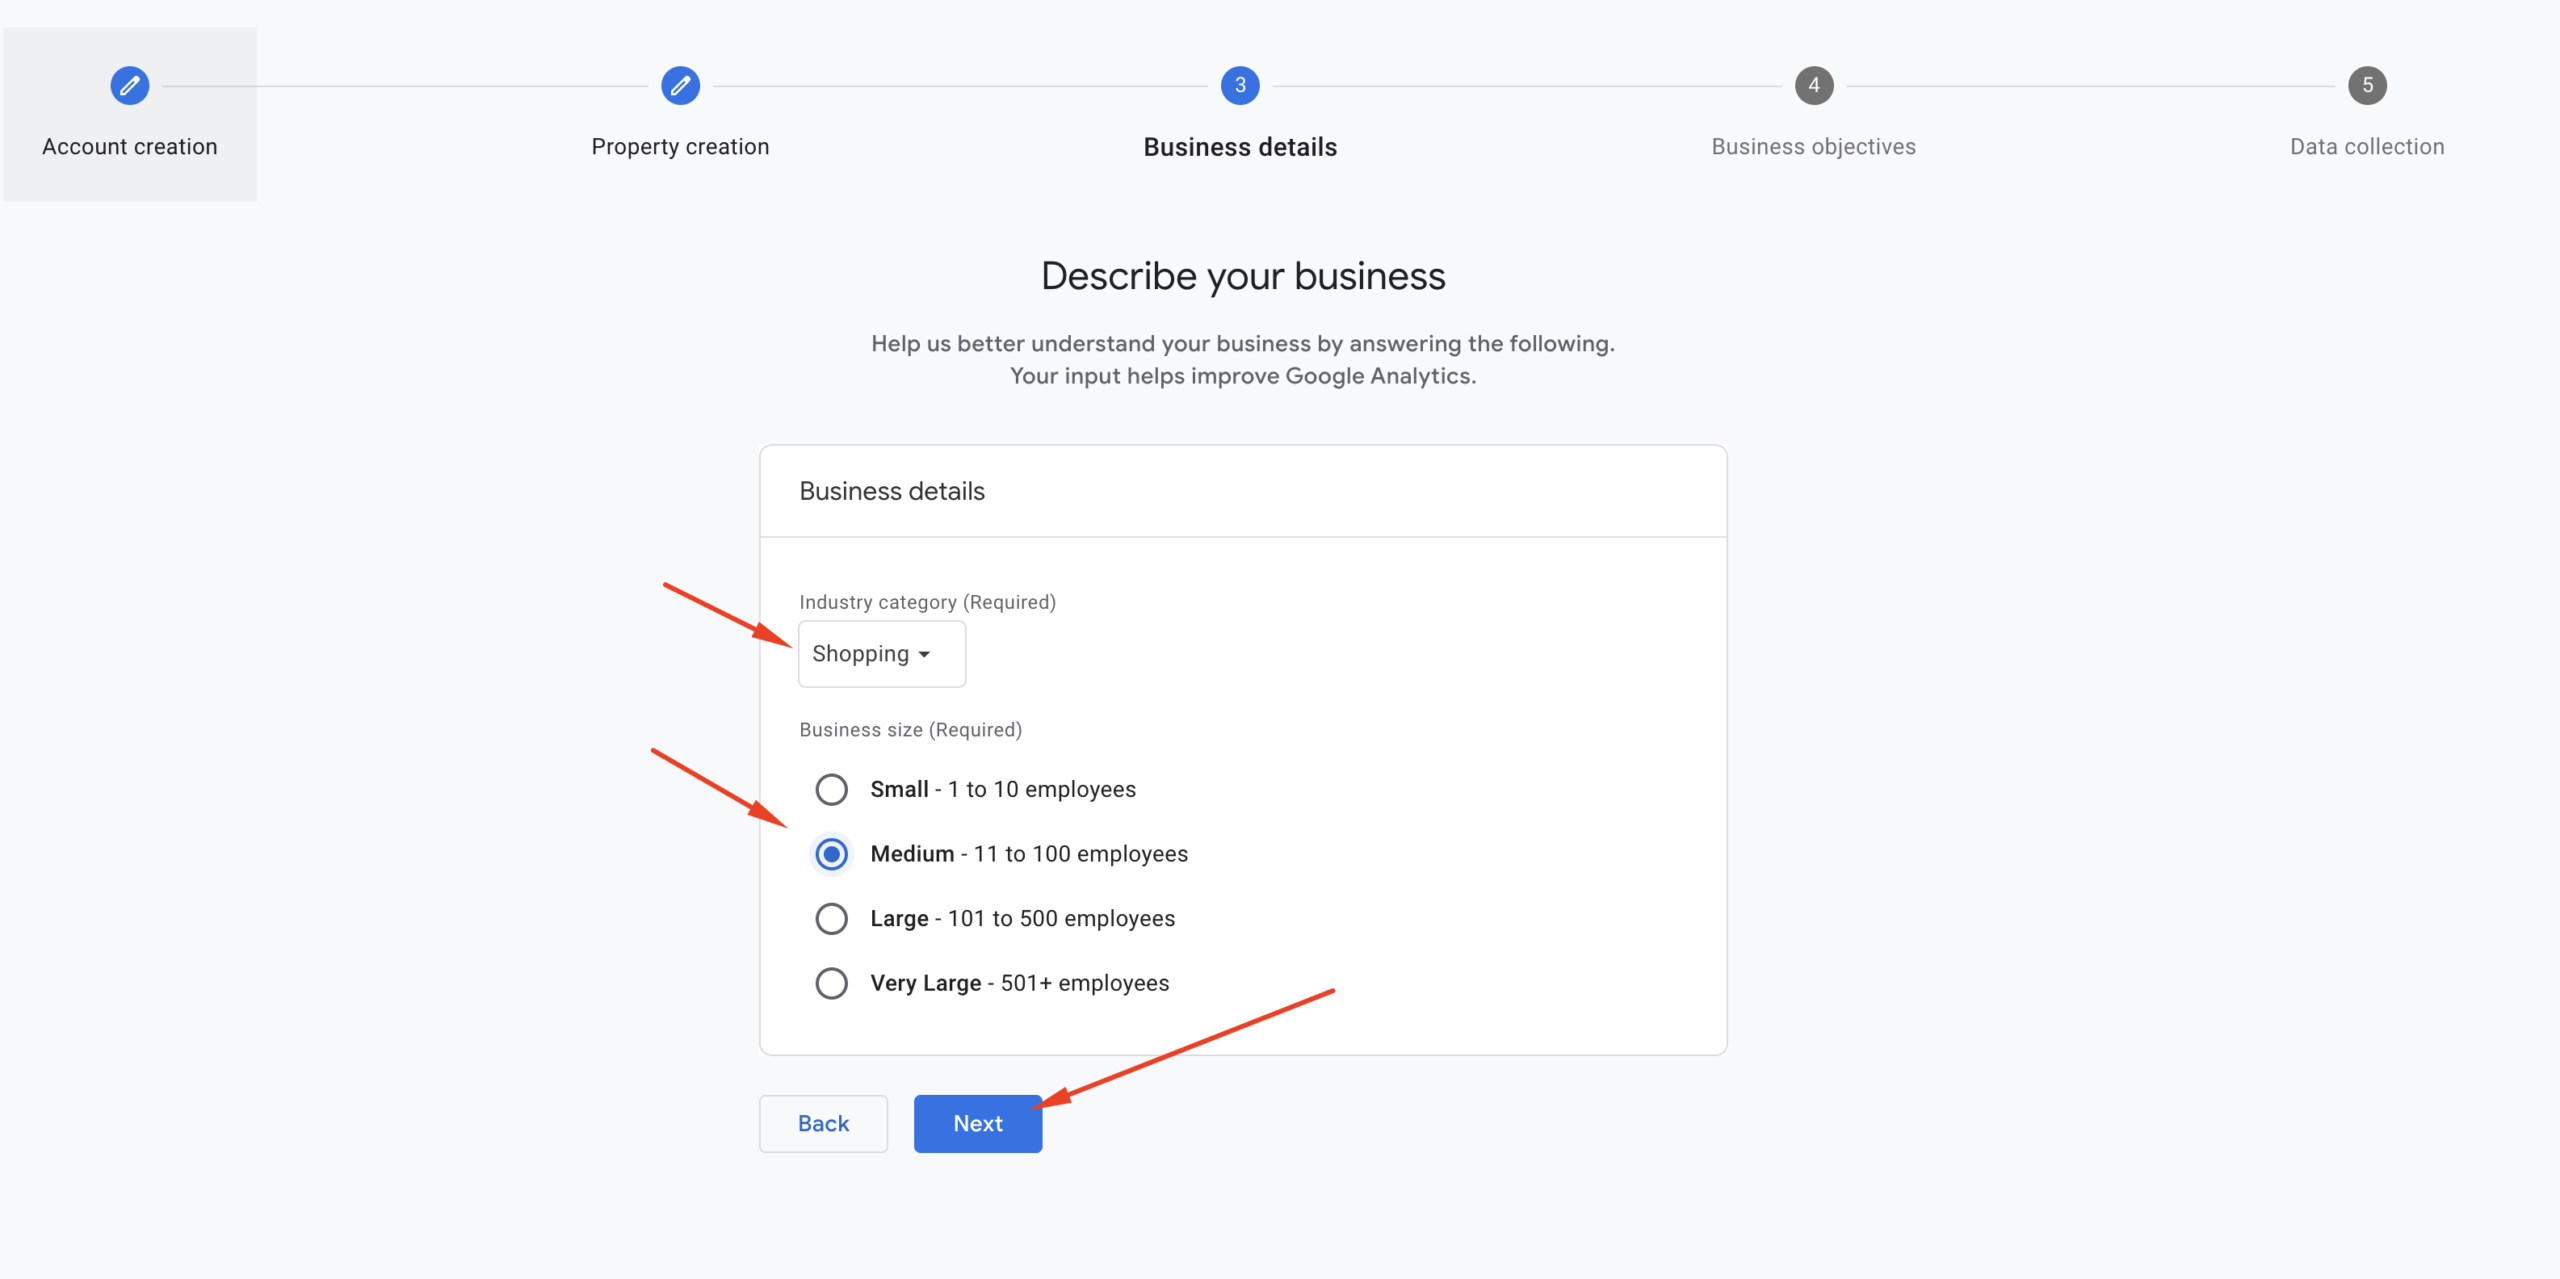
Step 4: Business Details
When setting up your GA4 property in step 3, Google asks for your Business Details. This includes:
- Industry category: Helps Google suggest useful reports based on your niche (e.g., eCommerce, Education, Finance).
- Business size: Just for informational purposes—won’t affect your tracking.
Note: These settings don’t impact your data collection, but they help tailor the experience inside GA4.
Simply select your industry category and business size, then click the Next button.
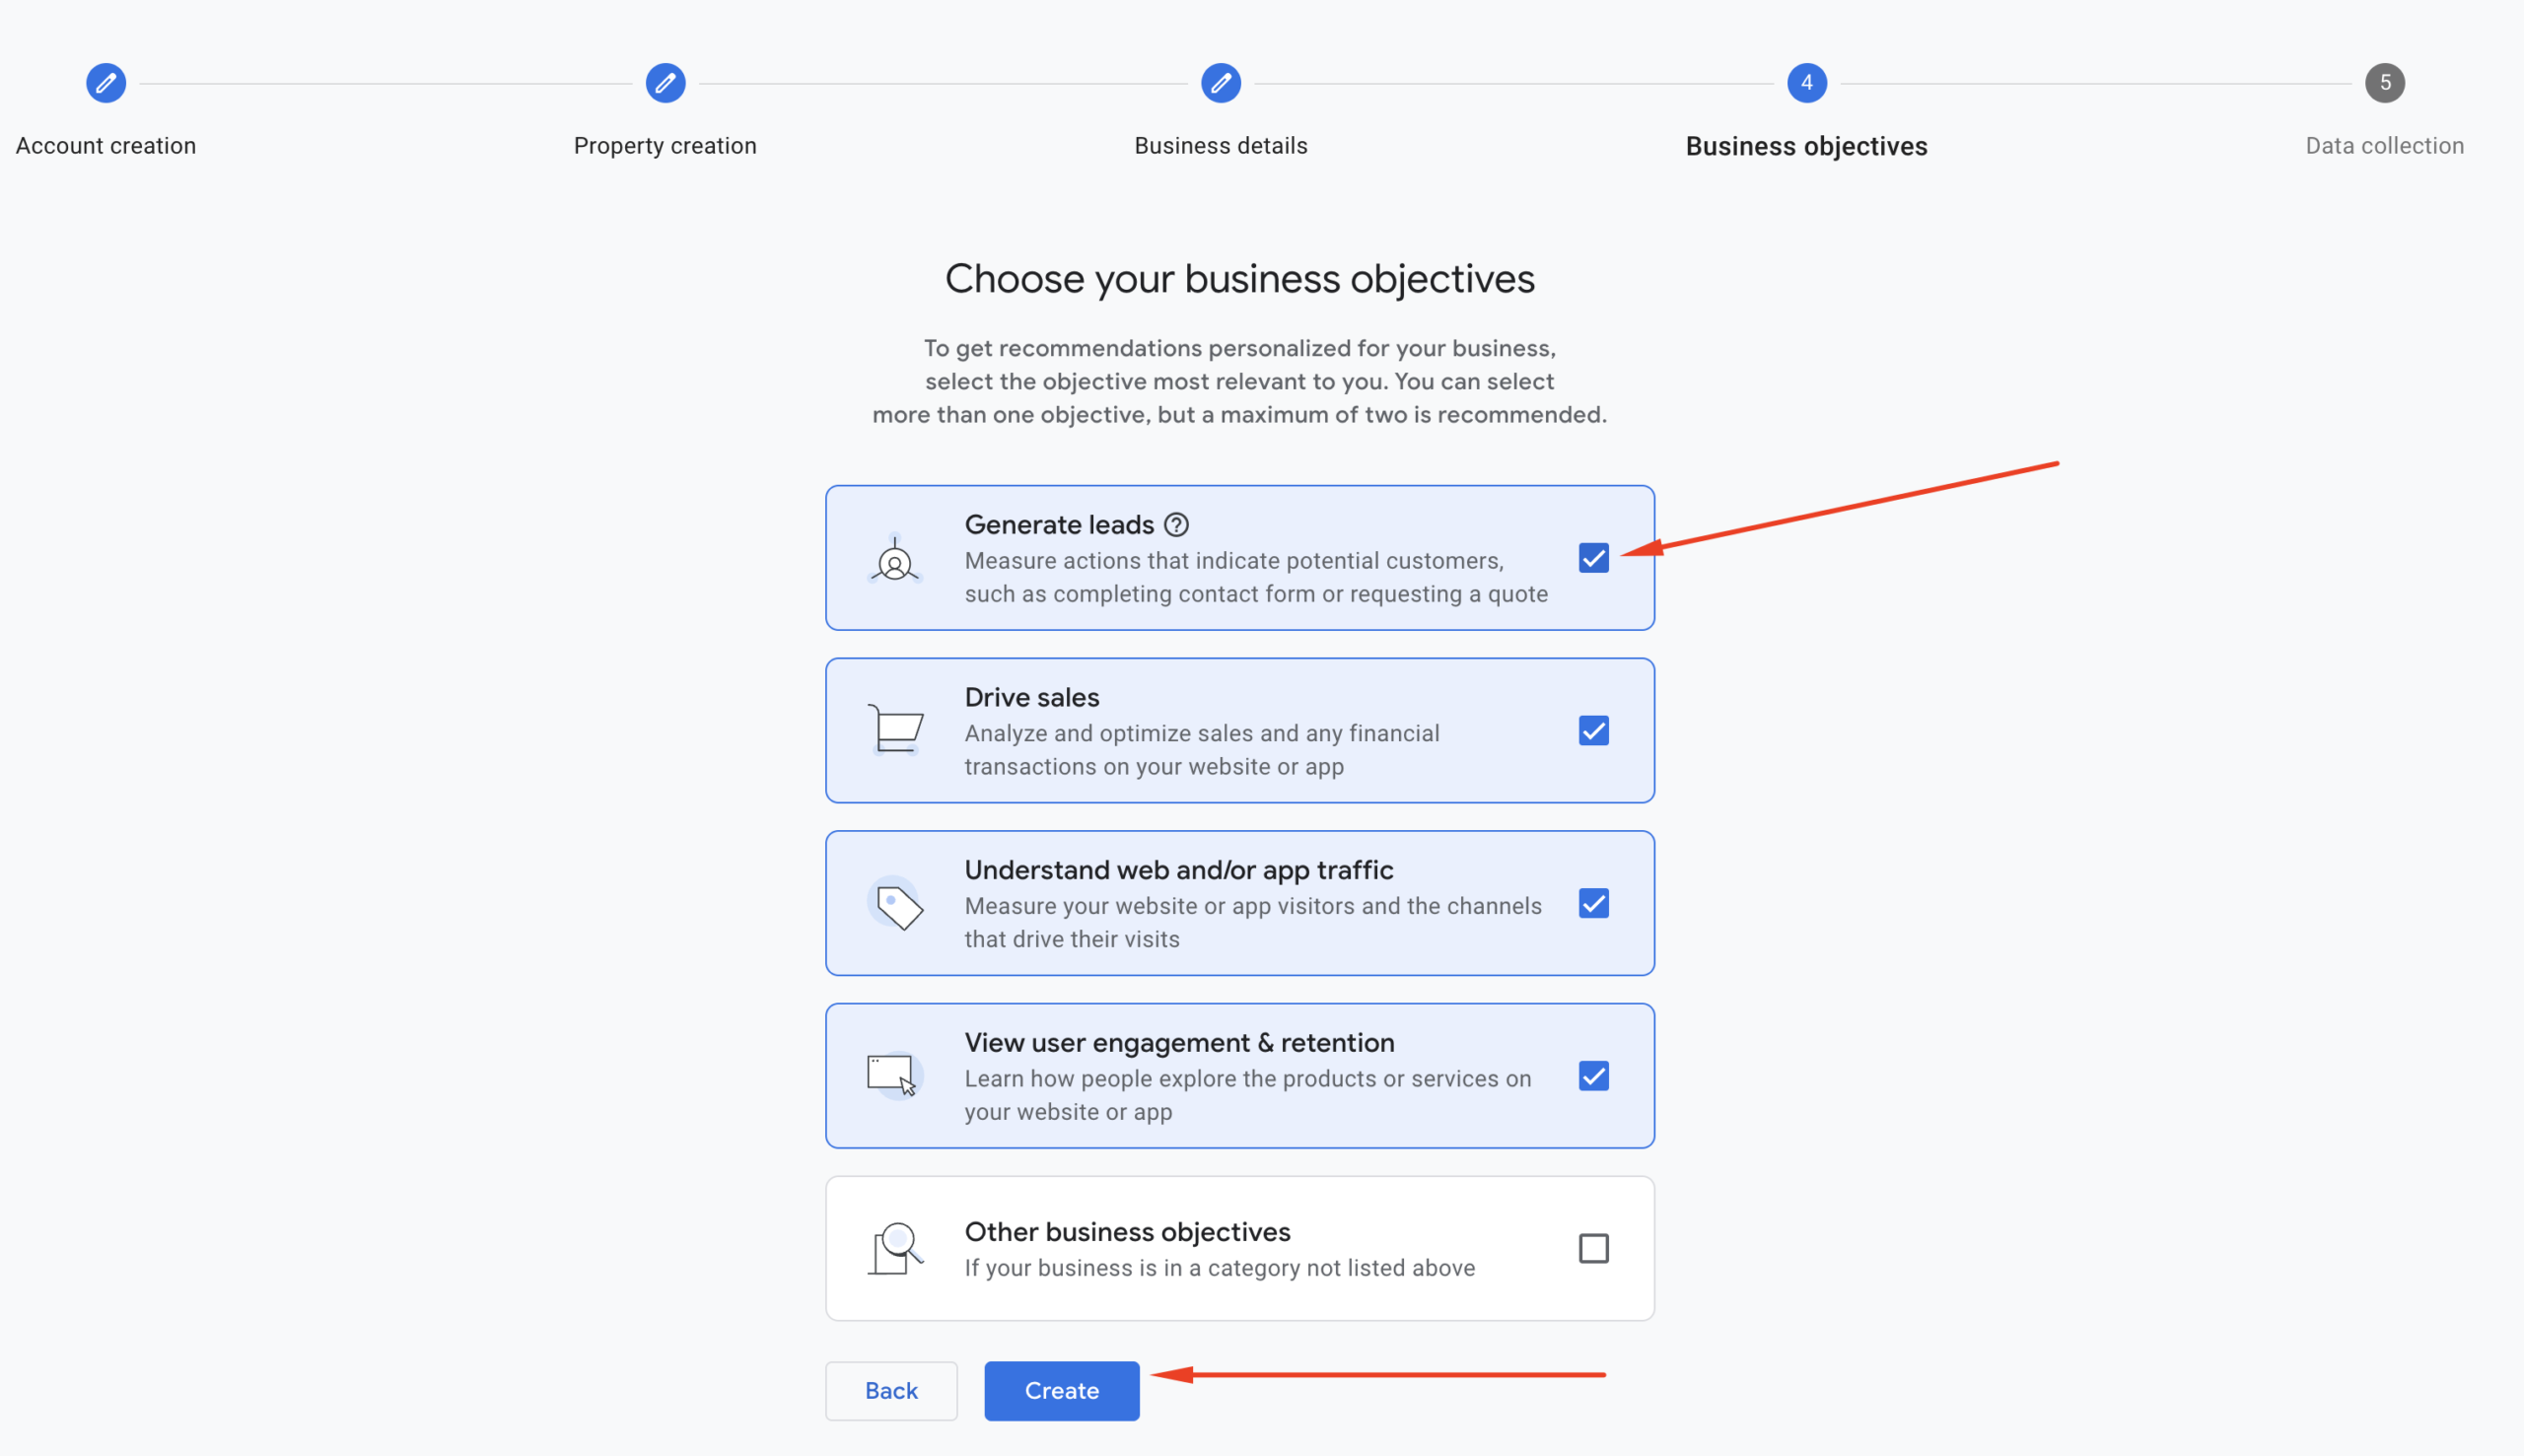
Step 5: Business Objectives
During setup, Google Analytics will ask you to choose your Business Objectives. These selections help Google customize your dashboard with relevant reports and suggestions.
You’ll see options like:
- Generate leads
- Drive online sales
- Raise brand awareness
- Get customer engagement
- Measure app installs
- Examine user behavior
Tip: Select the options that match your website goals. You can choose multiple objectives if needed.
For example, if you run a blog or service-based website, you might choose “Generate leads” or “Engage customers.”
Don’t worry—these choices won’t limit what GA4 tracks. You can still customize everything later.
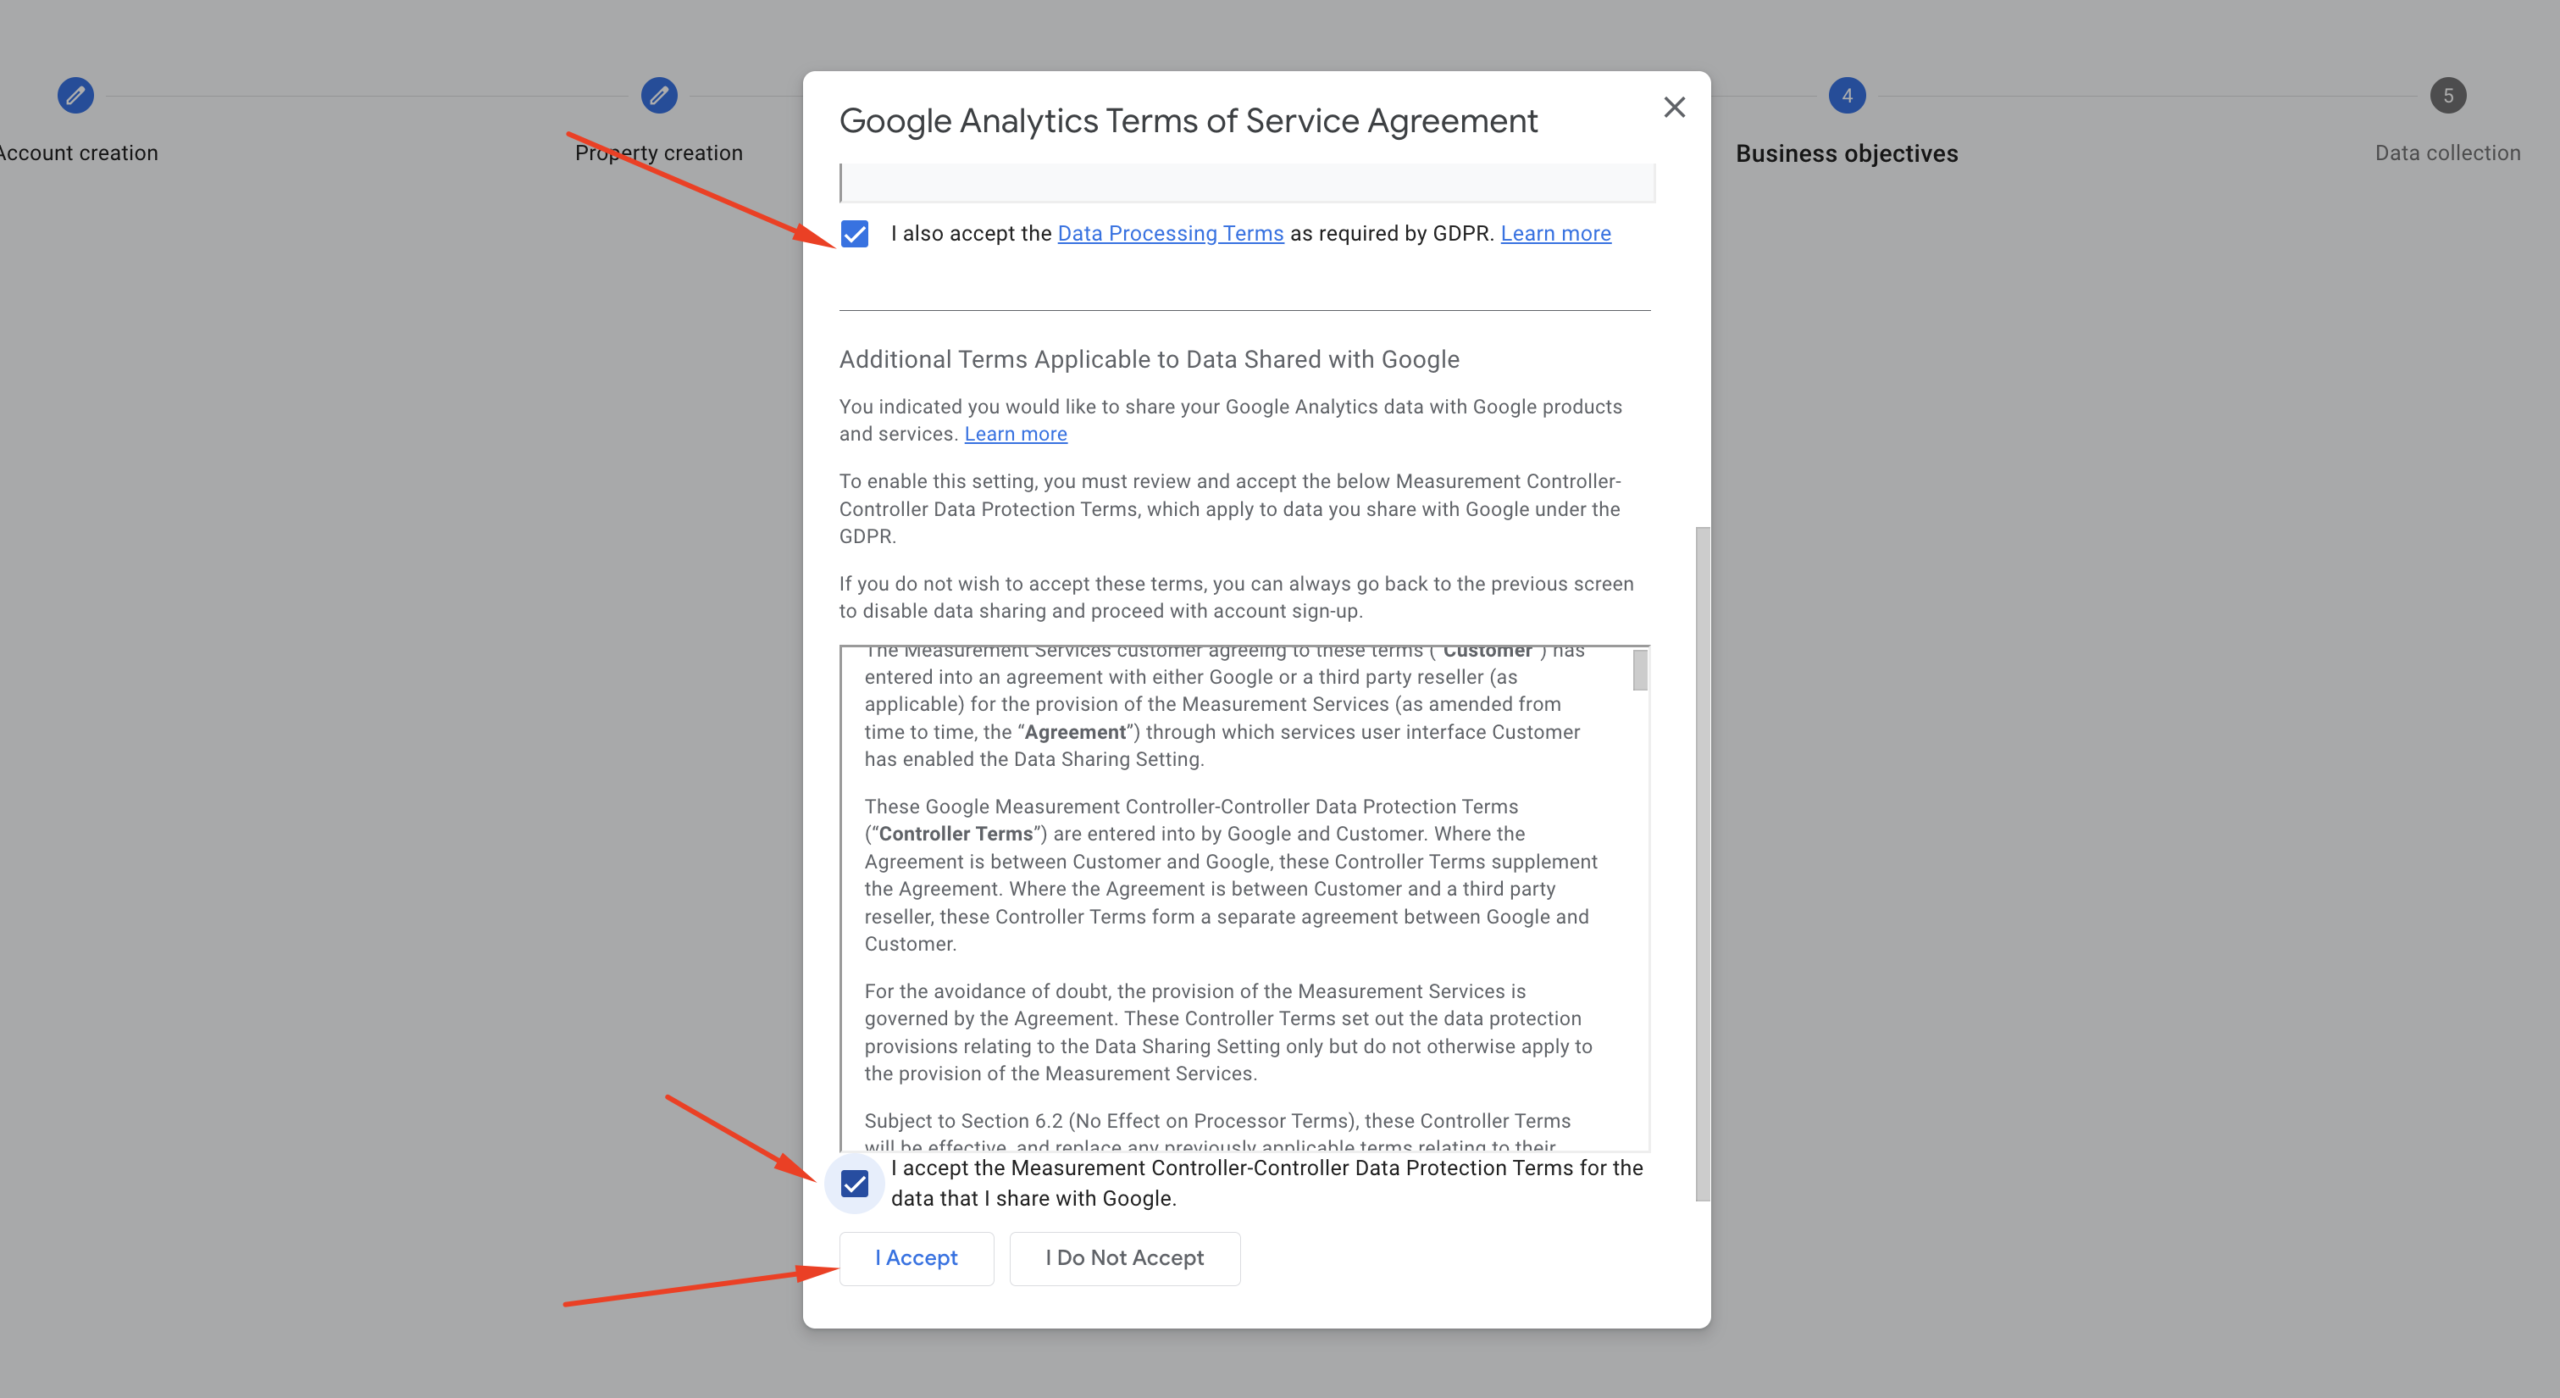
Step 6: Terms of Service Agreement:
After choosing your business objectives and clicking the “Create” button in step 5, you’ll see a pop-up with the Google Analytics Terms of Service Agreement. Read the terms of service, check the agreement checkboxes, and click the “I Accept” button as shown in the screenshot.
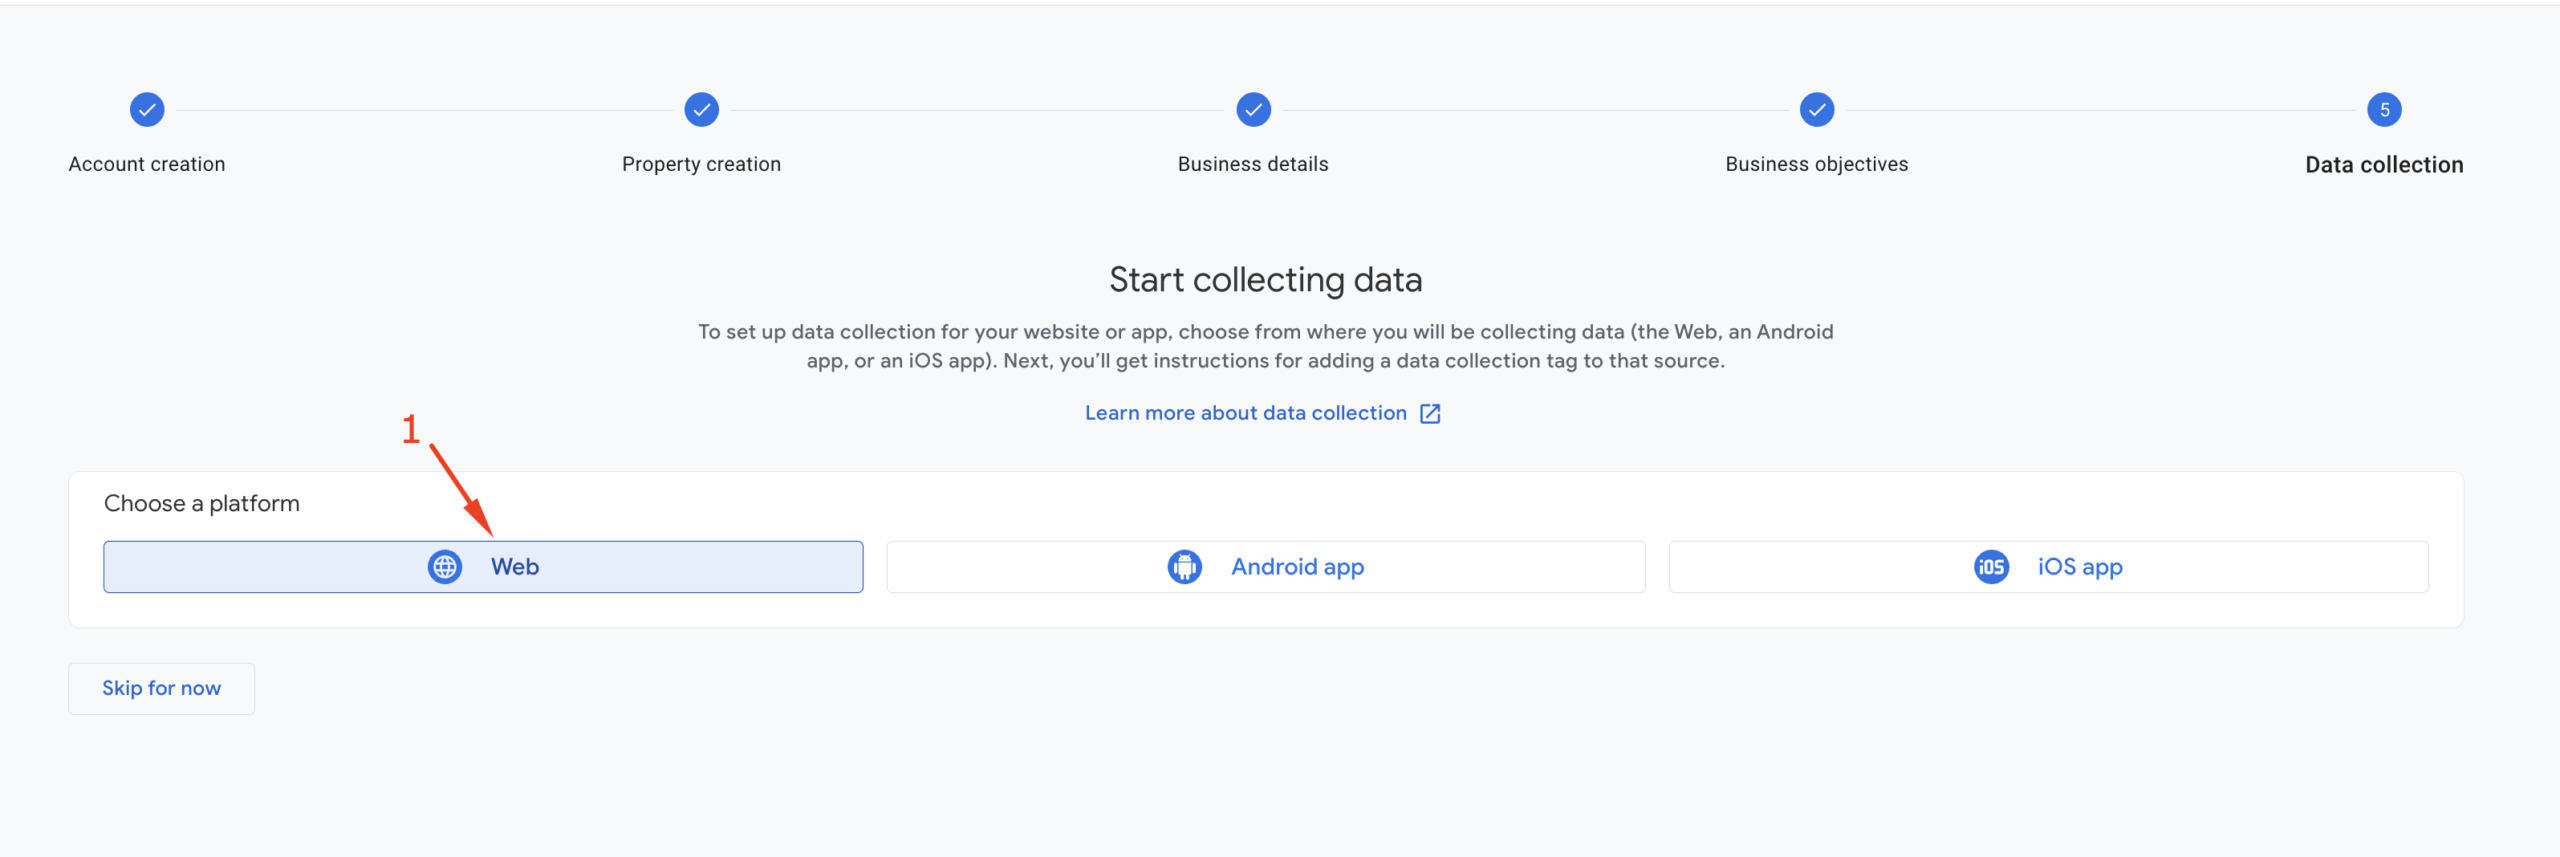
Step 7: Data Collection
In this step, we need to select the right platform from which we’ll collect data. You’ll see 3 options:
Web – For tracking websites
Android app – For tracking Android apps
iOS app – For tracking iPhone/iPad apps
Since we’re working to integrate Google Analytics with a website, we need to select Web as shown in the following screenshot.
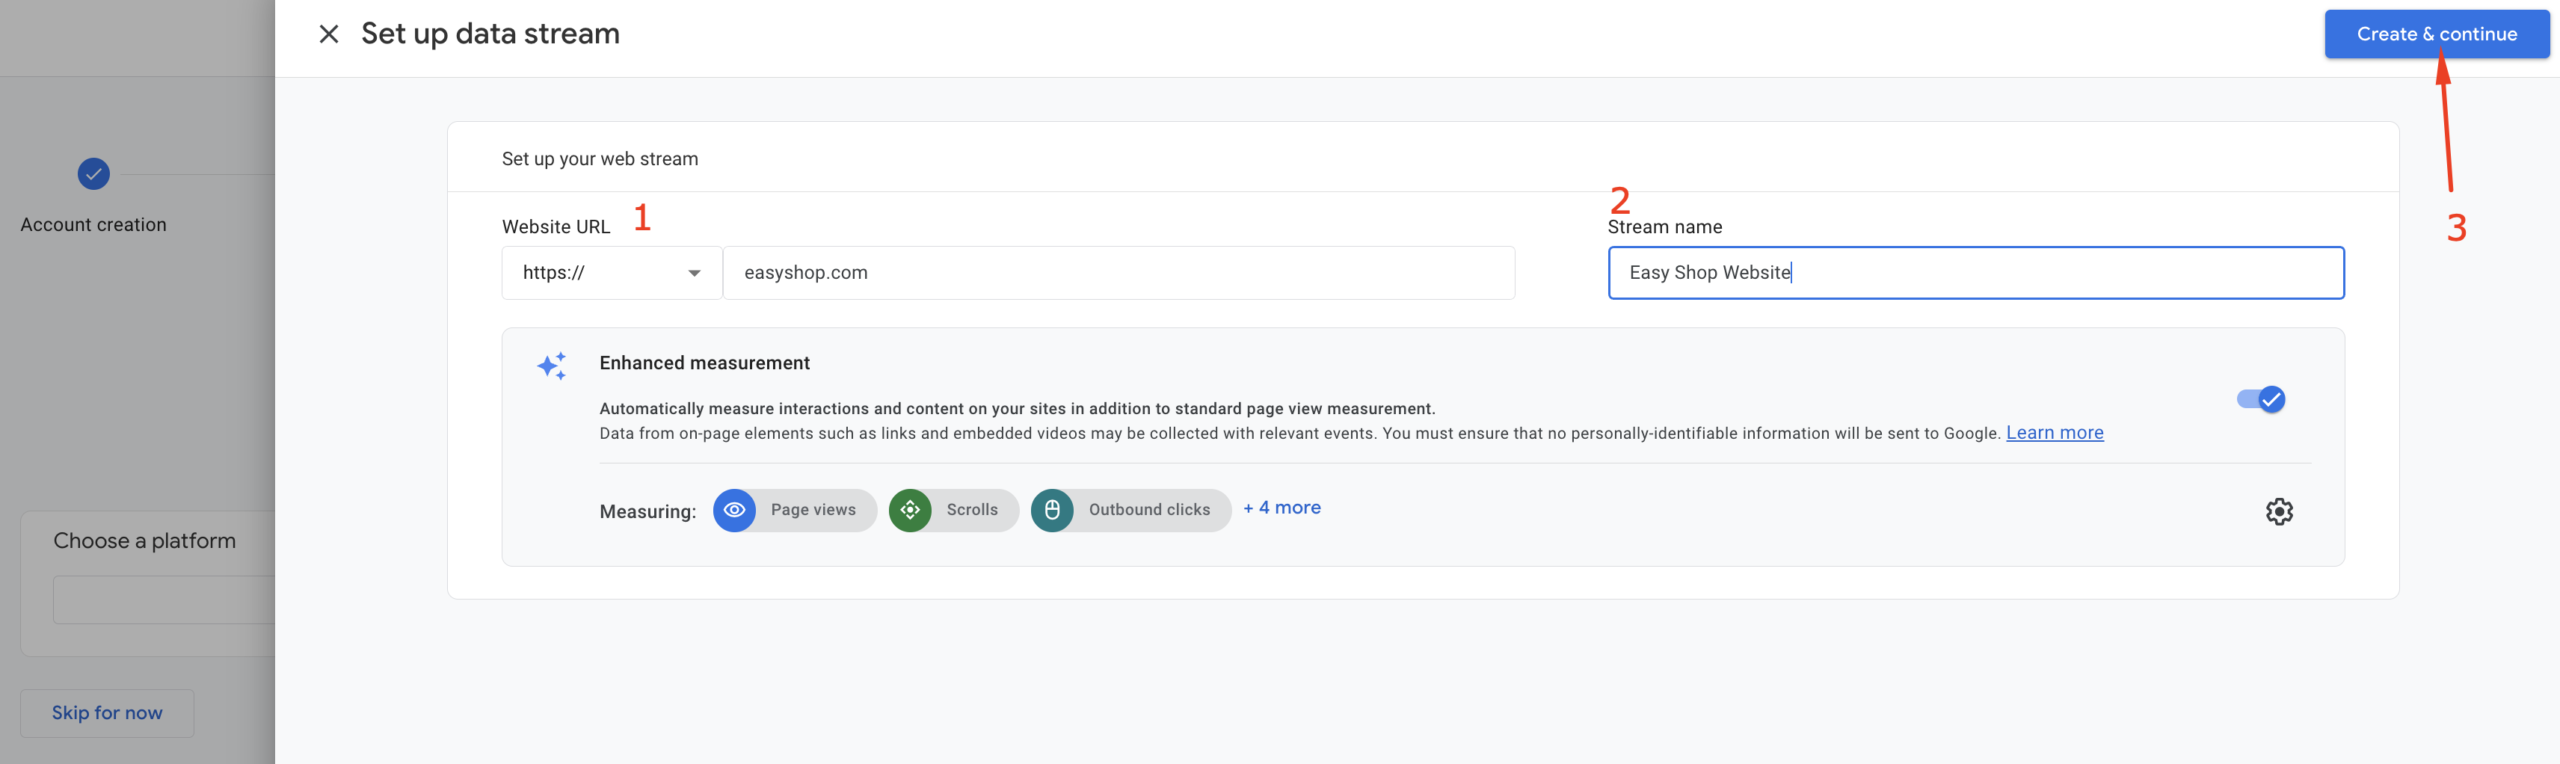
After selecting “Web” as your platform, you’ll see a pop-up for additional settings. Enter your website address, provide a stream name, and click the “Create & continue” button as shown in the screenshot.
You’ll then see a pop-up for “Set up a Google Tag.” Simply close this and click the Next button, as we’ll be integrating Google Tag with Google Tag Manager instead.

You may see a few other pop-ups—simply ignore them. Click the “Continue to Home” button, which will

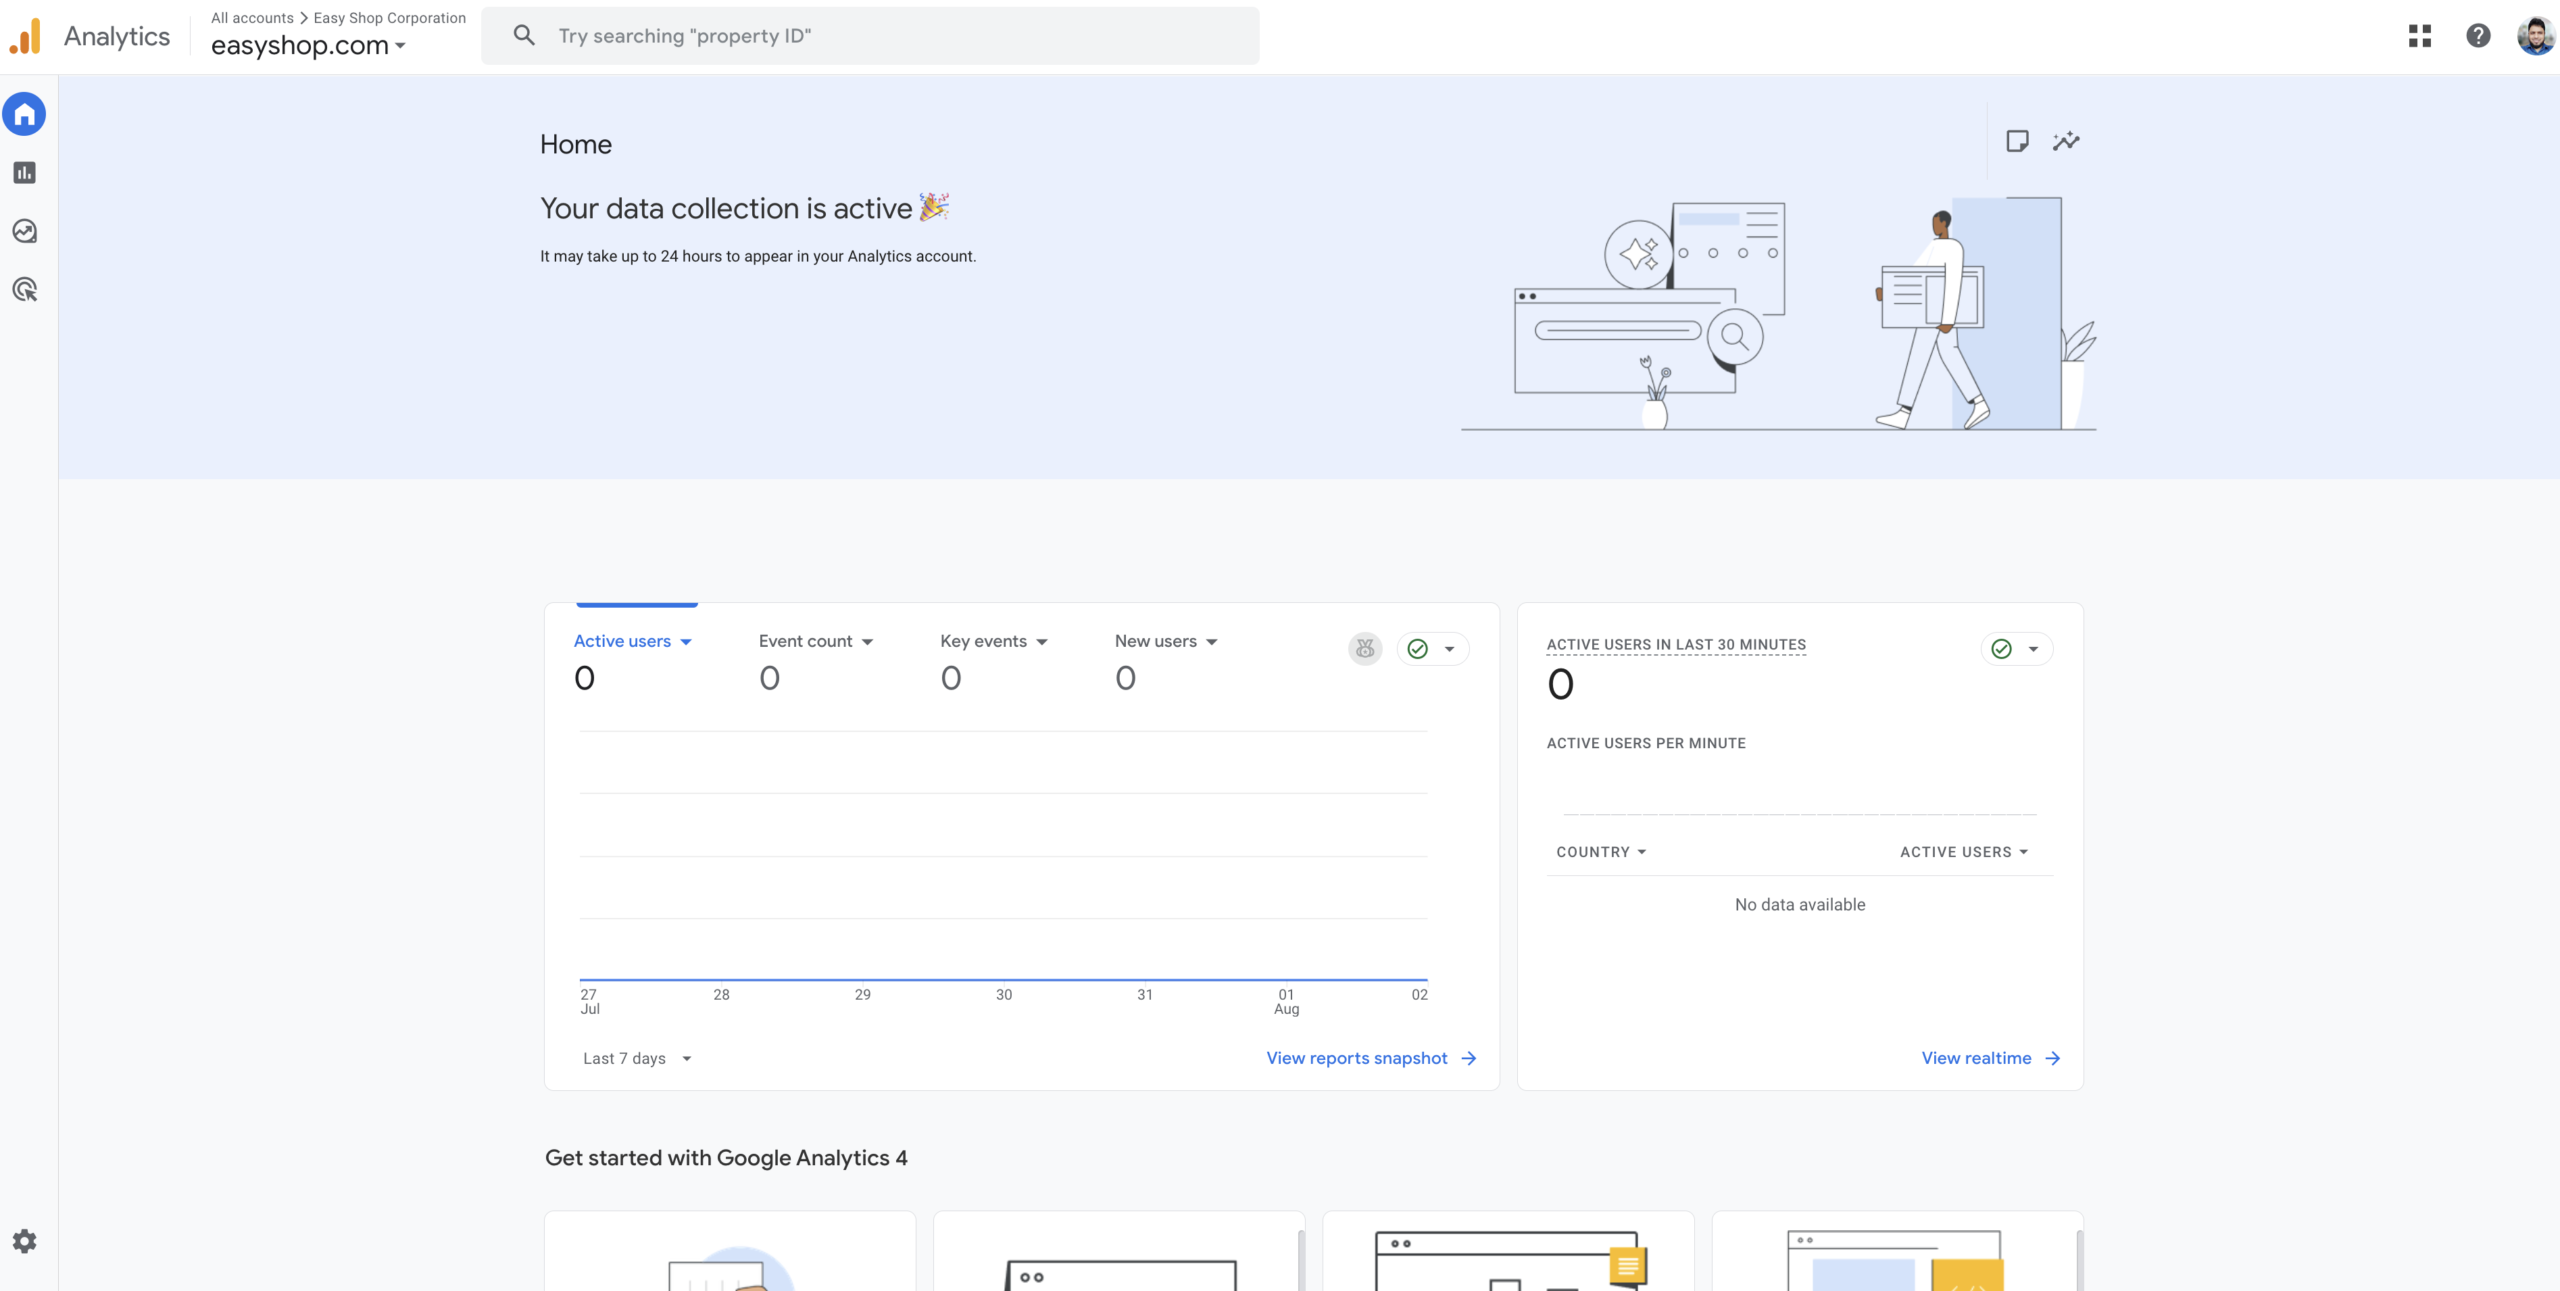
Finally, you will land on your brand new Google Analytics Dashboard. Of course, there is no data to preview yet because our website hasn’t been connected with Google Analytics.
How to Create a Google Tag Manager Account?
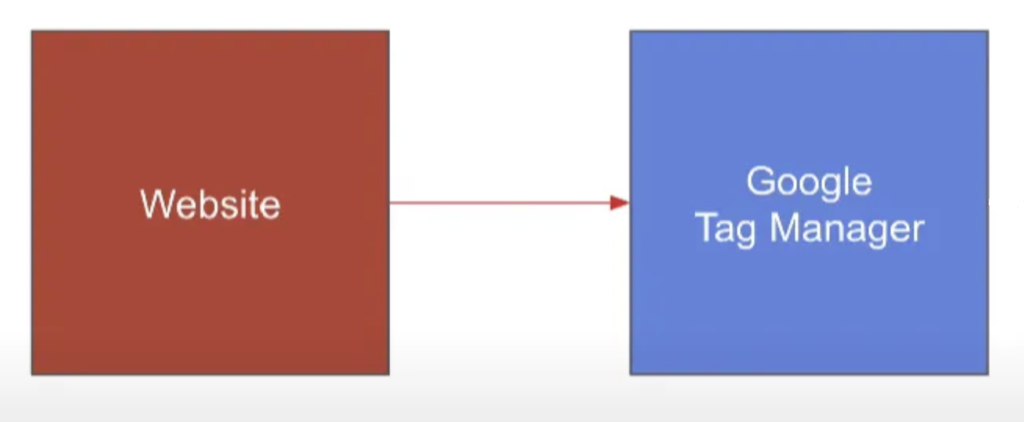
In the previous section, we successfully created a Google Analytics account and property. To connect our website with Google Analytics, we’ll use an intermediary platform called Google Tag Manager.
GTM provides flexibility for managing Google Analytics and other tracking platforms we might need for our website. Let’s create a Google Tag Manager account.
Step 1: Get Started
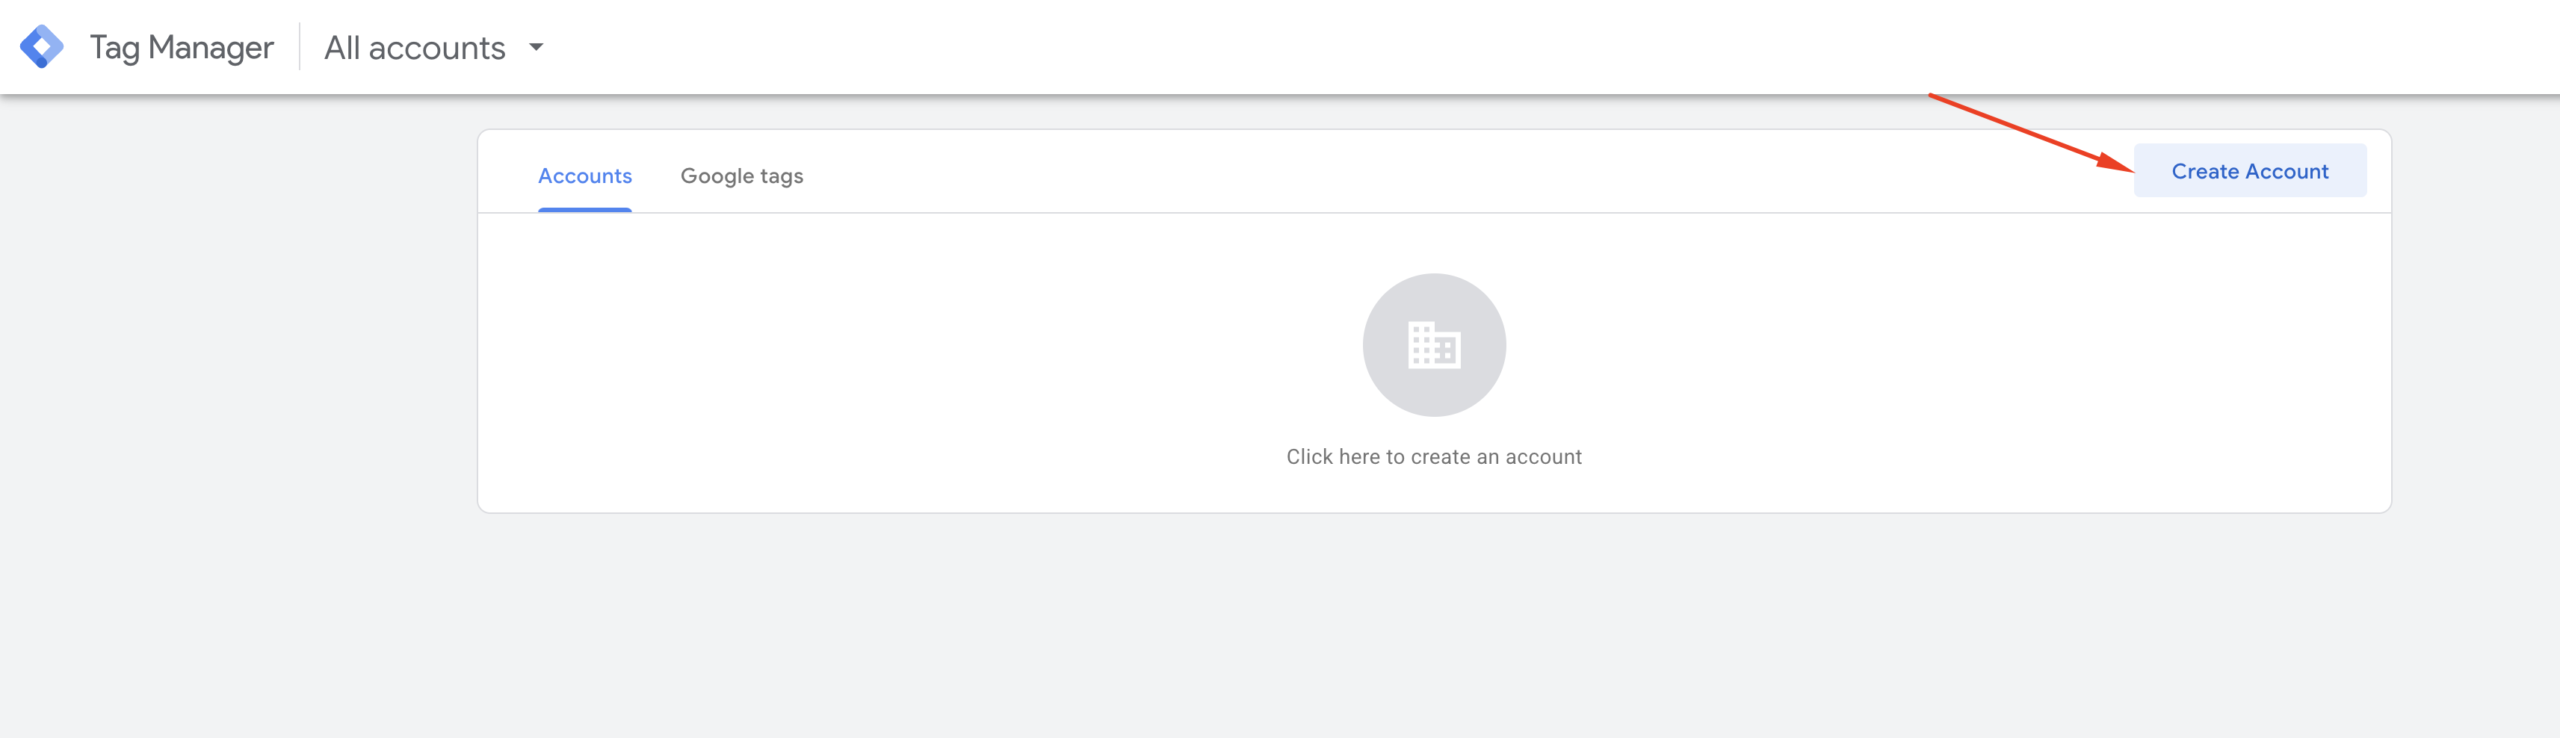
Go to tagmanager.google.com. You will see the following interface. Click the “Create Account” button in the top right corner to create a new Google Tag Manager account.
Step 2: Create GTM Account & Container
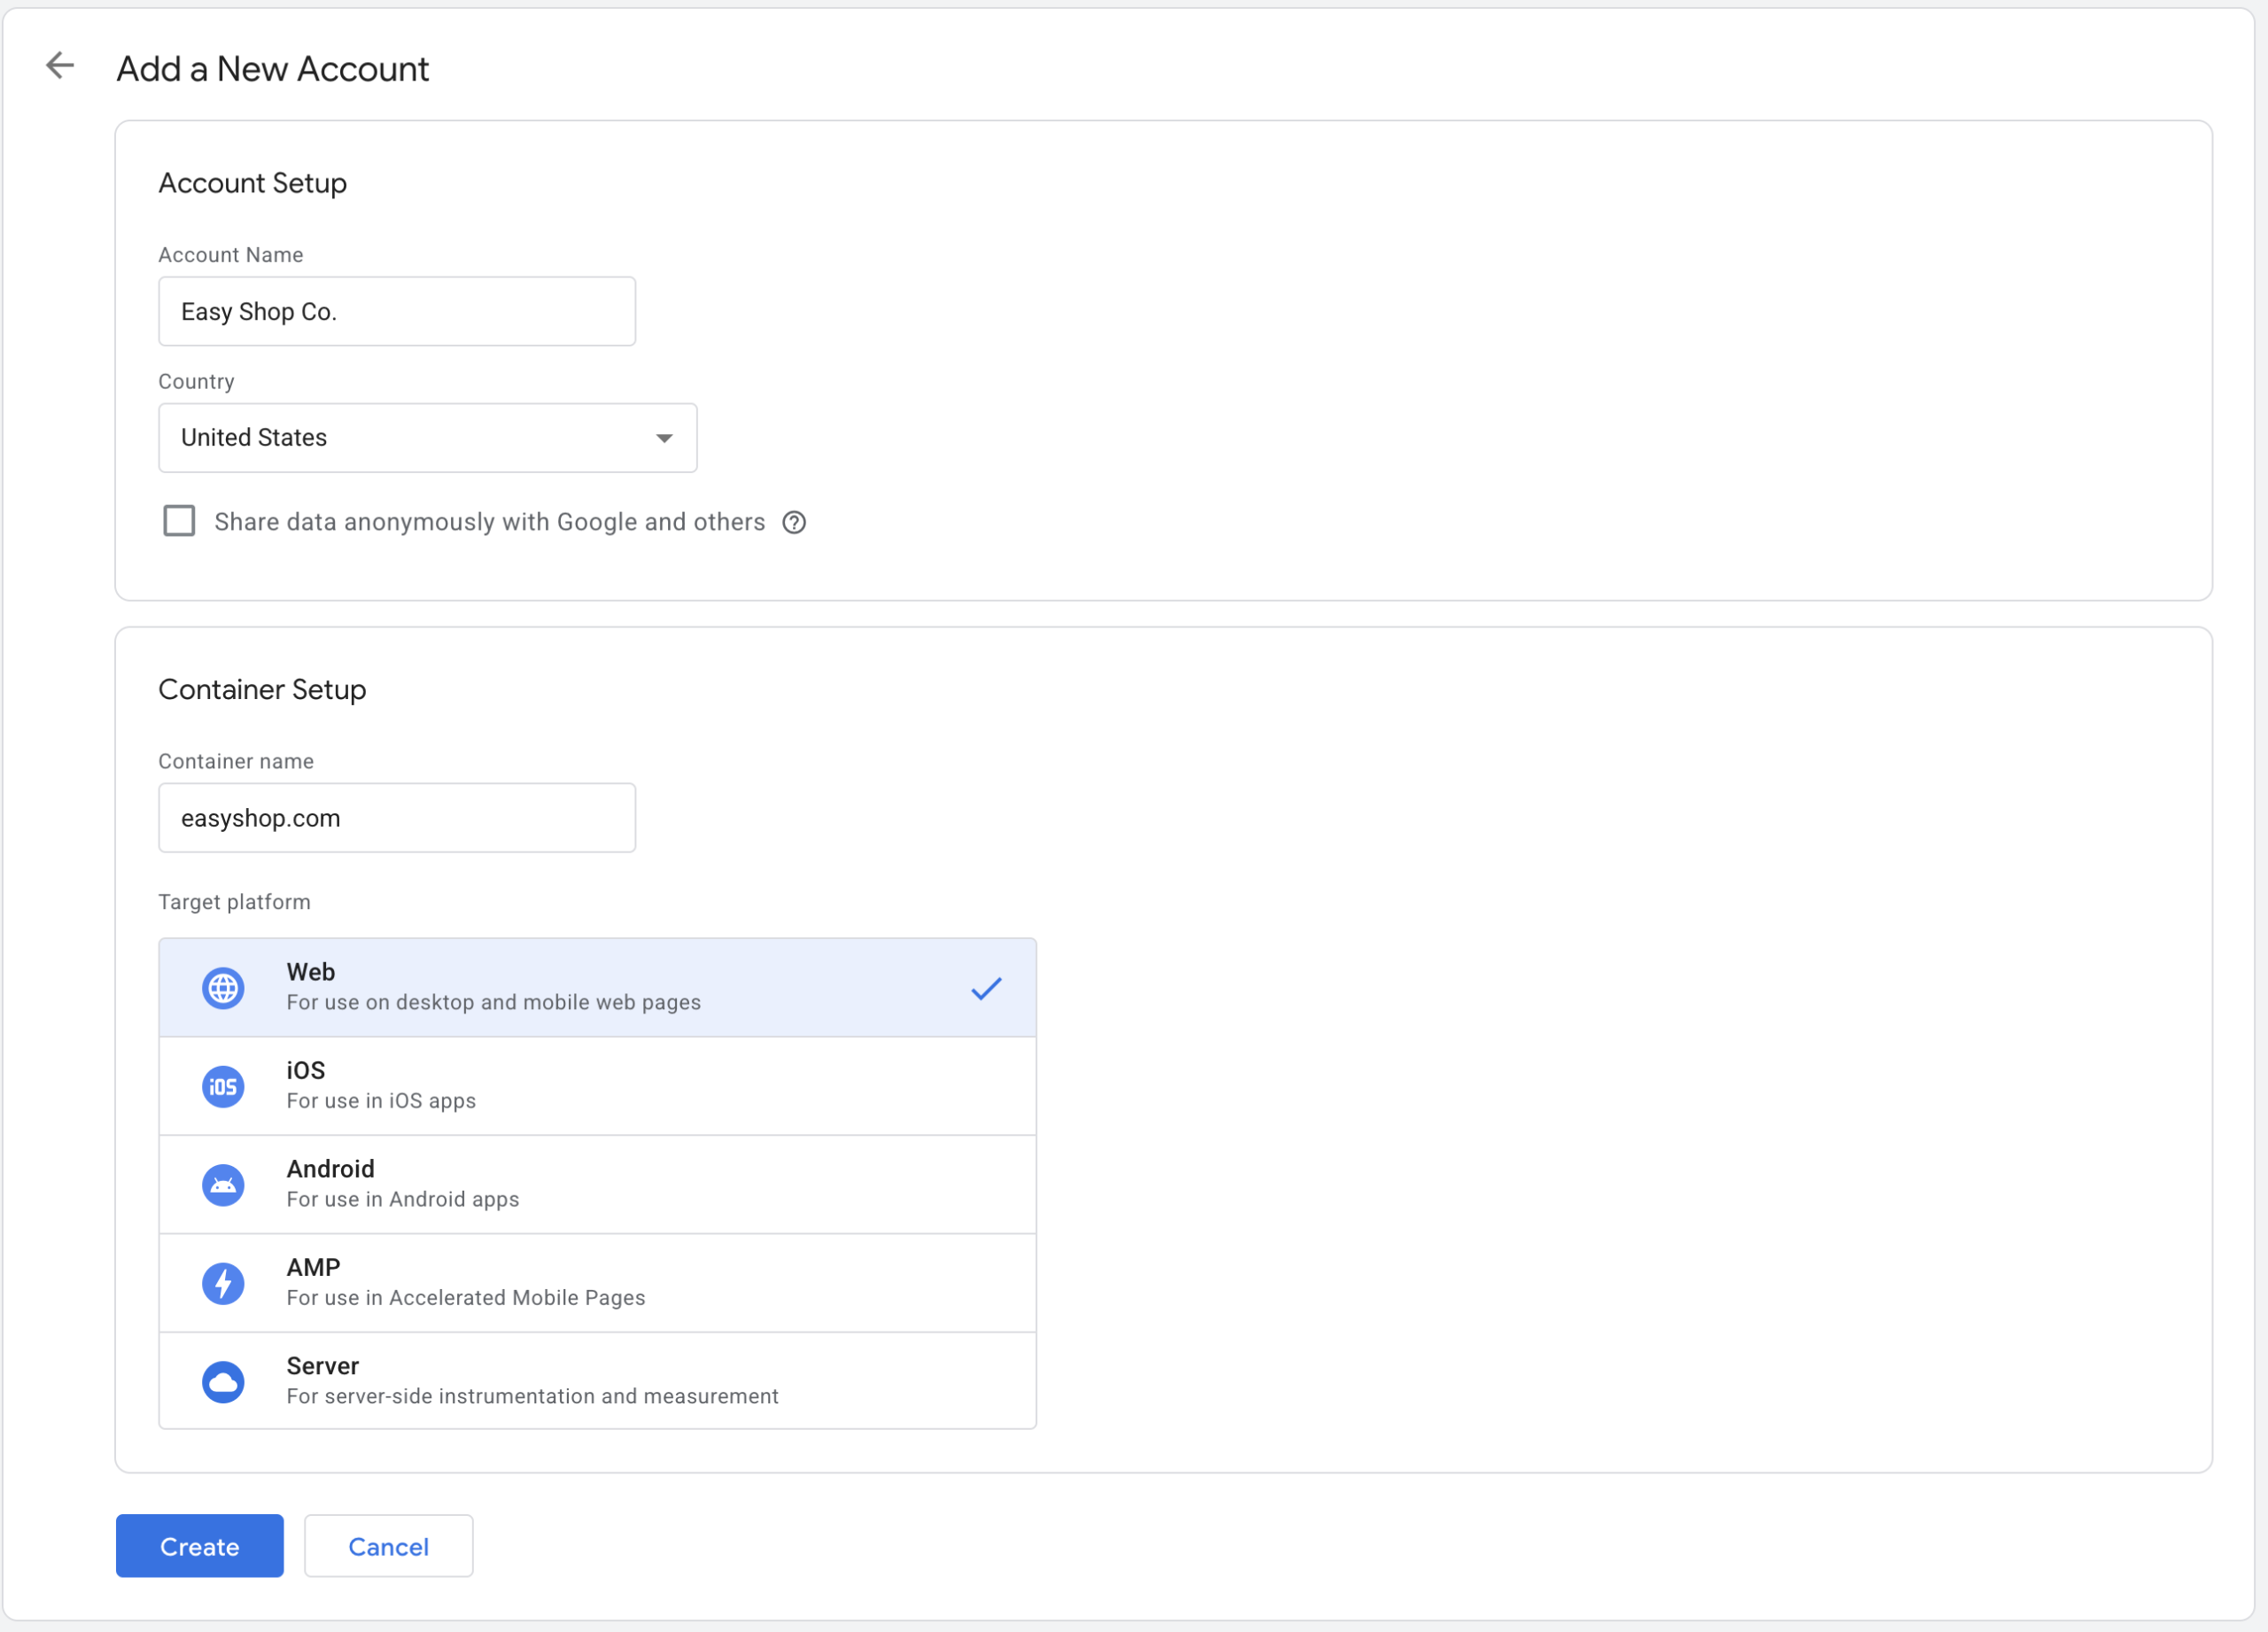
Enter an account name and select your country in the “Account Setup” section. In the Container Setup section, provide a container name. You can typically use your website address as the container name. For the Target platform settings, select “Web” as shown in the following screenshot, then click the “Create” button.
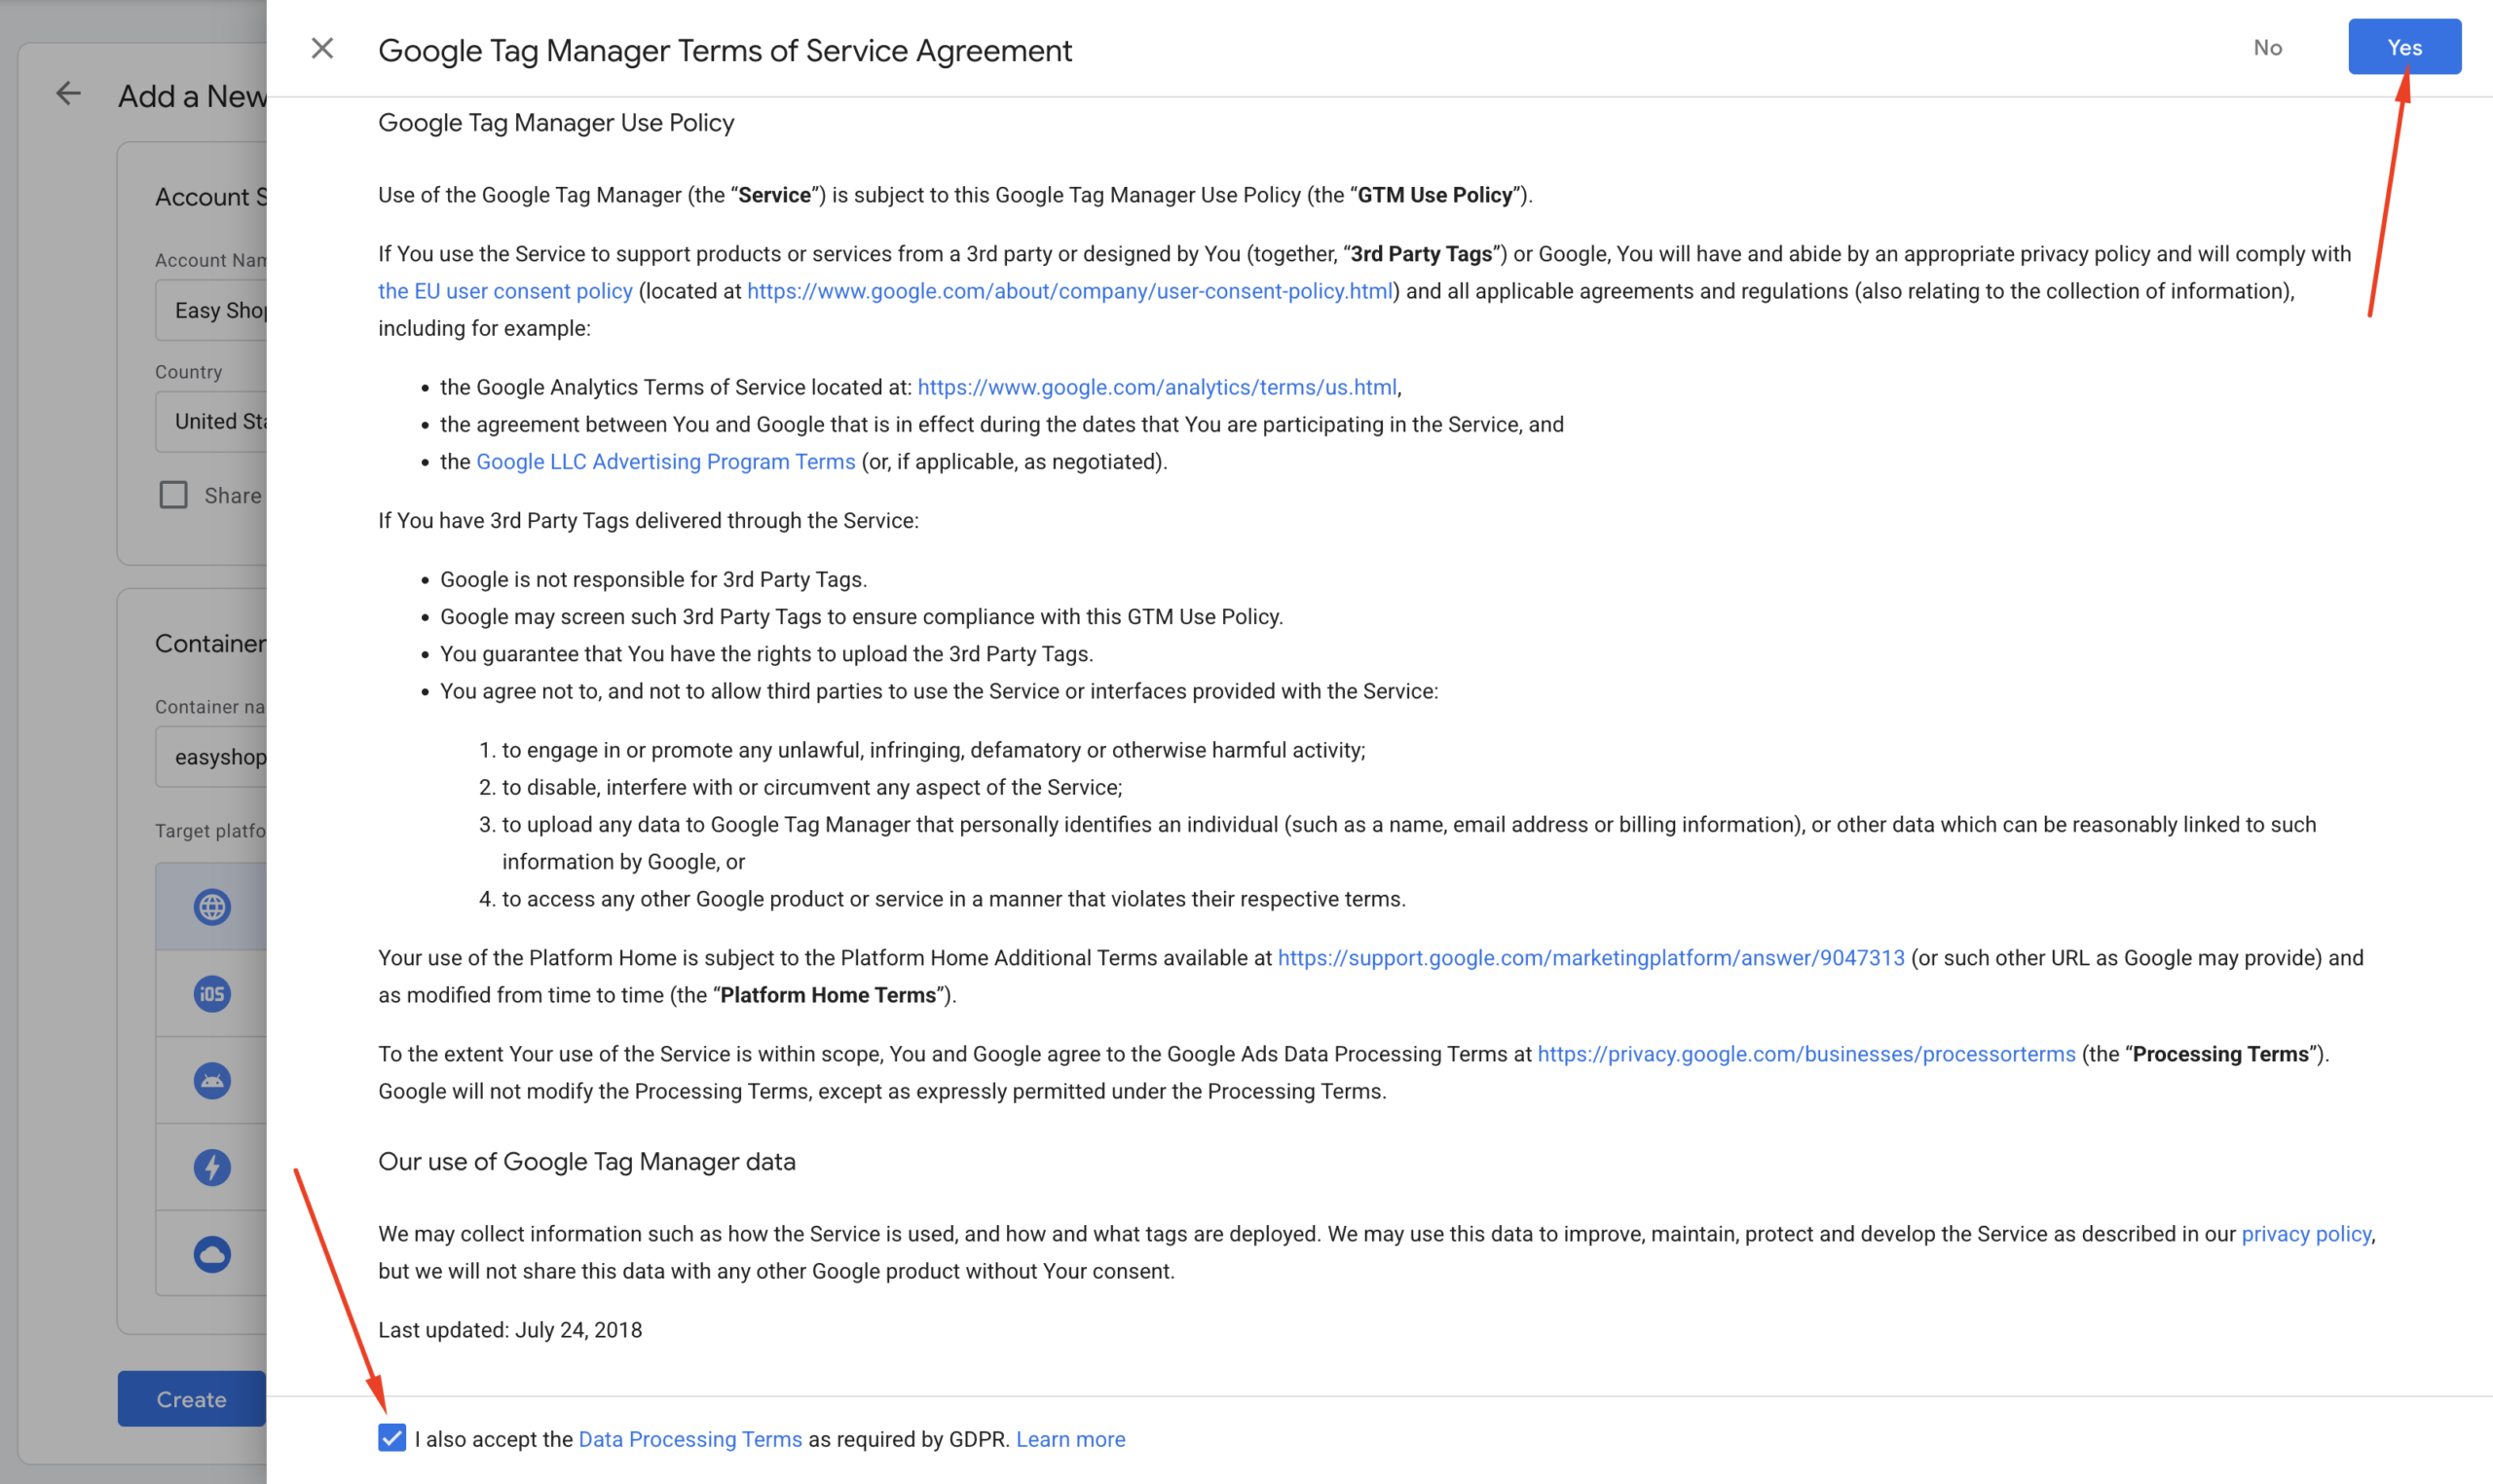
Step 3: Accept the GTM Terms of Service Agreement
After clicking the create button in step 2, a pop-up will appear as shown in the following screenshot. Read the Terms of Service Agreement and click the “Yes” button in the top right corner to accept it.
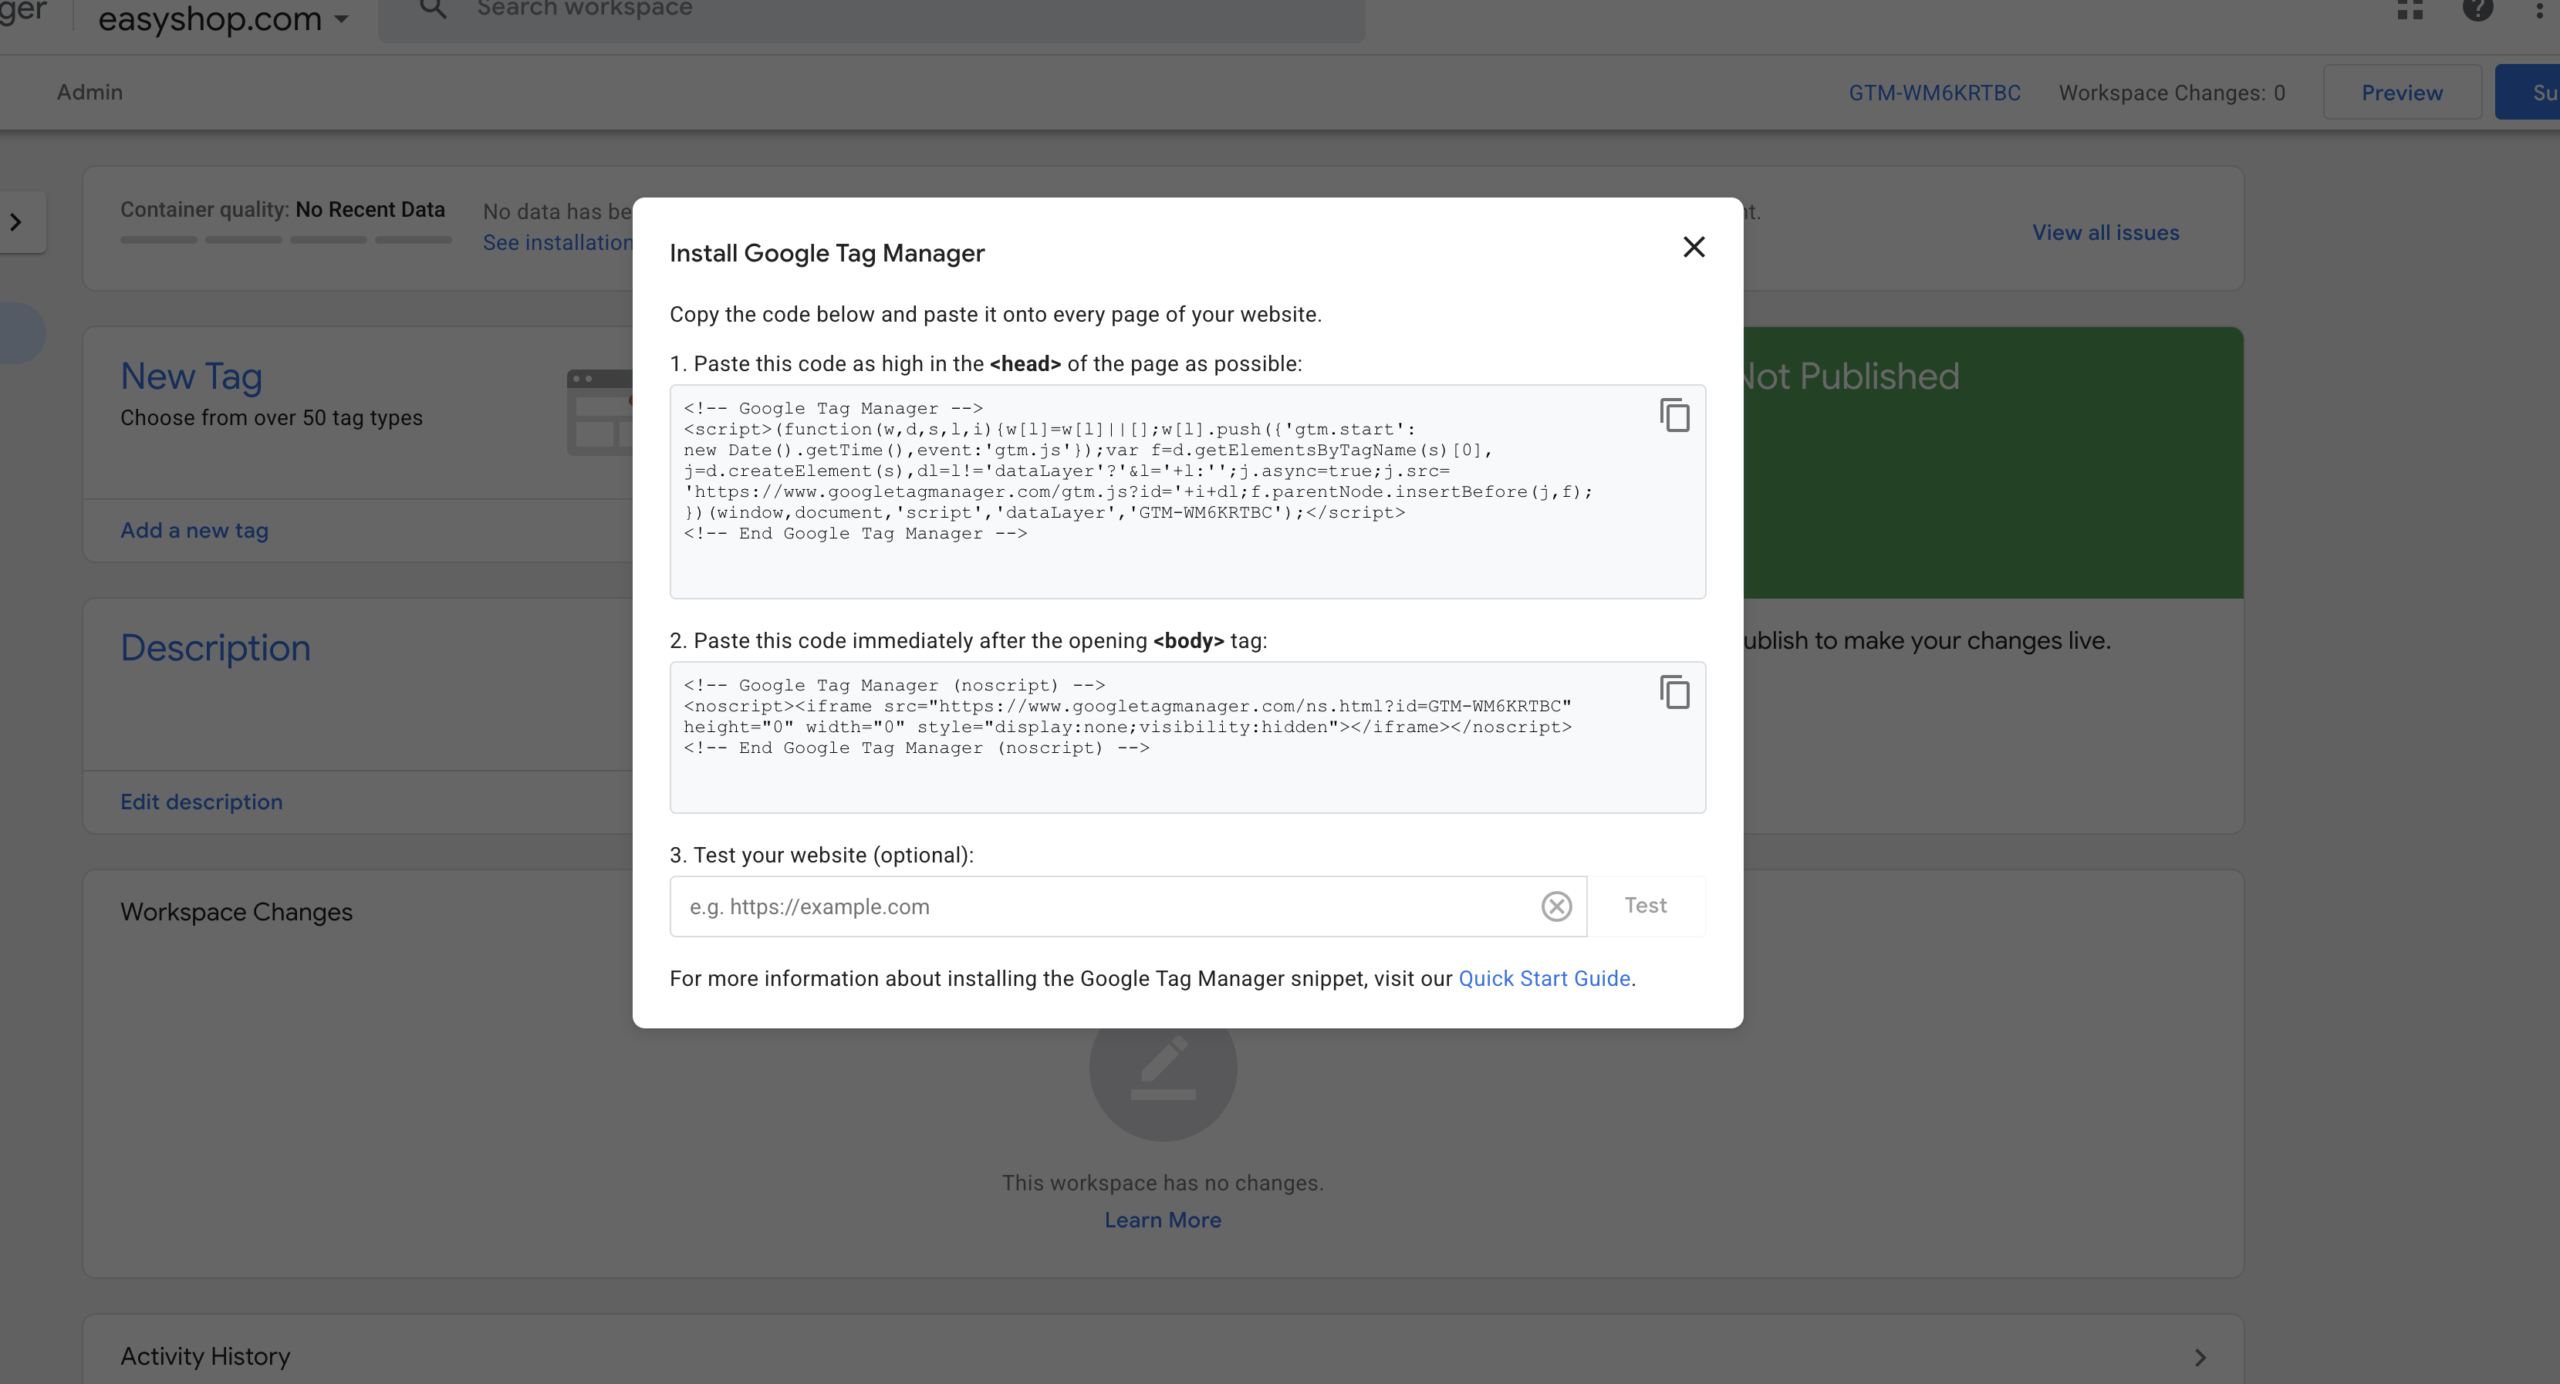
Step 4: Complete Google Tag Manager Setup
After clicking the “Yes” button in step 3, your Google Tag Manager account and container are fully set up. You’ll see a pop-up containing two code snippets. One needs to be inserted in your website’s <head> tag, and the other needs to be inserted in your website’s <body> tag.
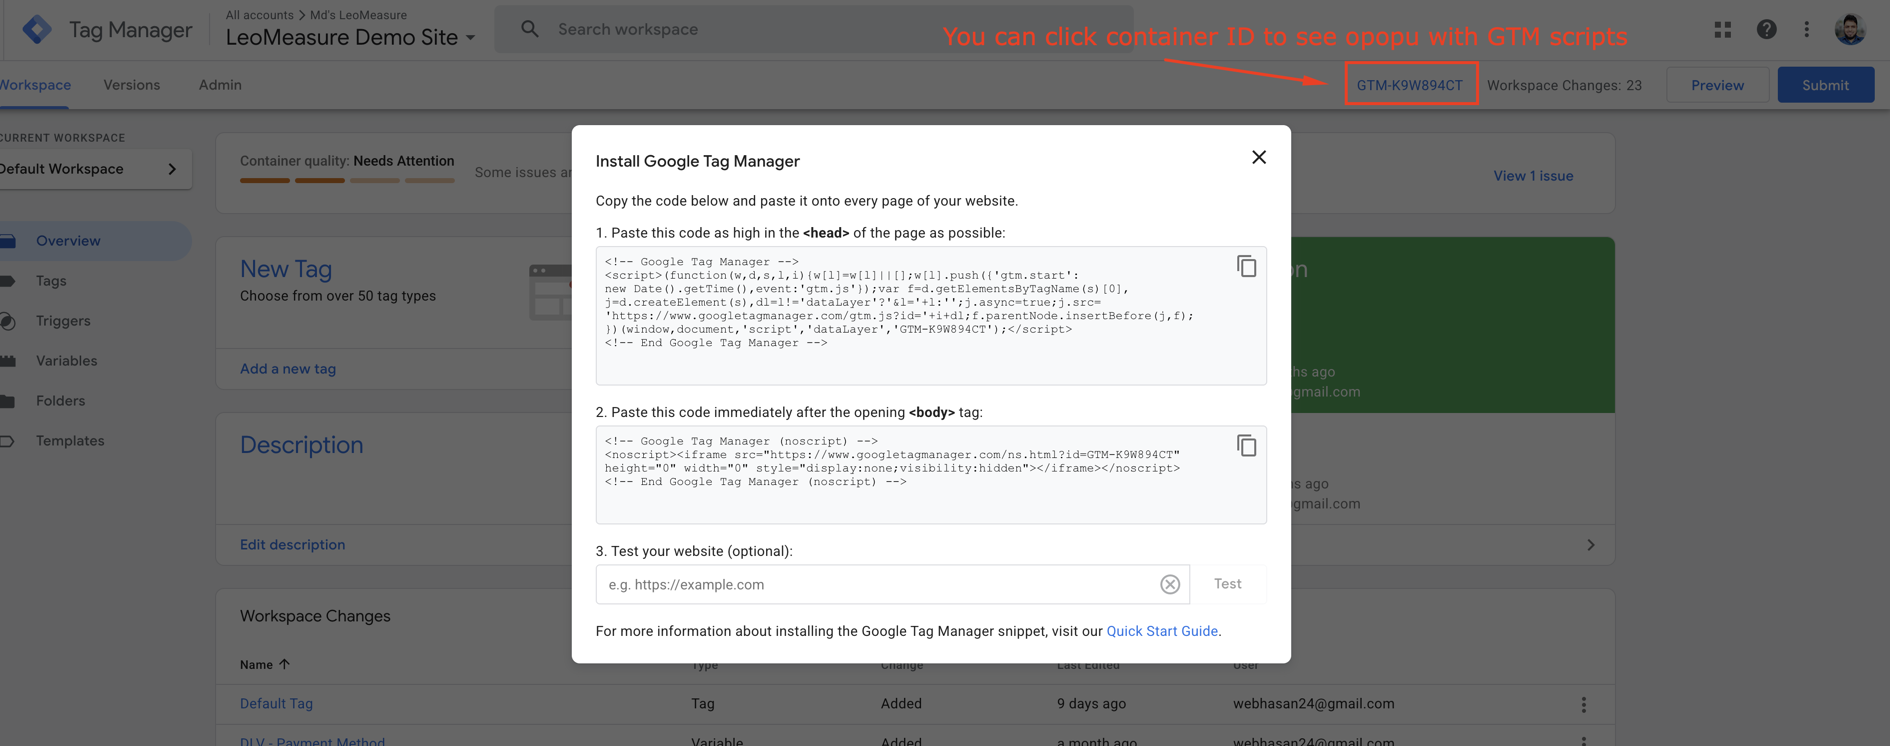
If you close this pop-up, you can access it again by clicking your GTM container ID in the top bar.
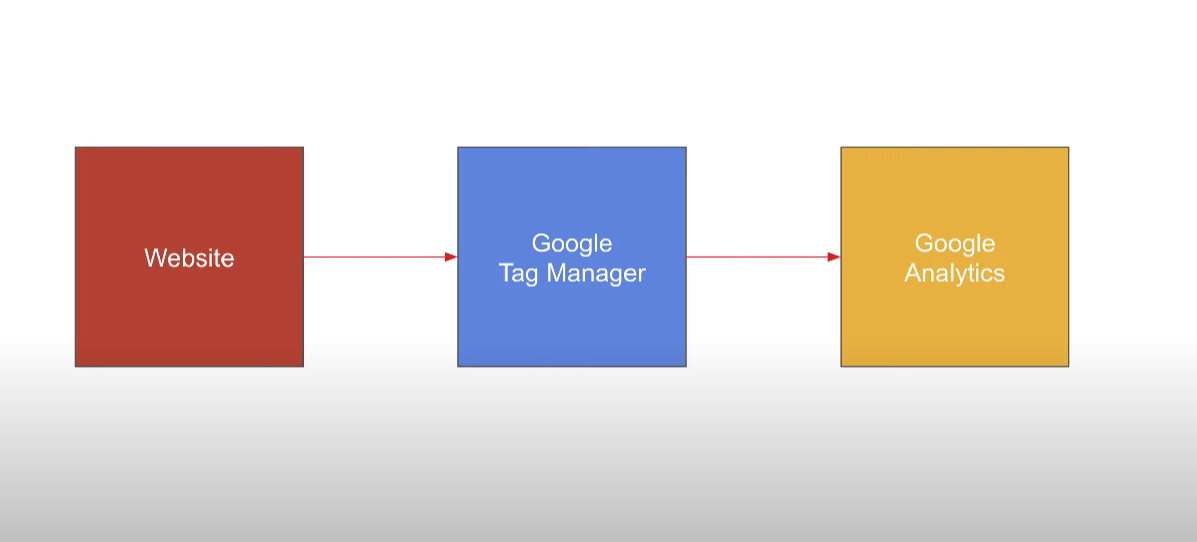
At this stage, our three components (our website, Google Tag Manager, and Google Analytics) are ready. Now it’s time to connect everything to collect analytics data from our website in Google Analytics.
How to Connect Google Tag Manager with the Website?
Step 1: Insert Google Tag Manager code for Head:
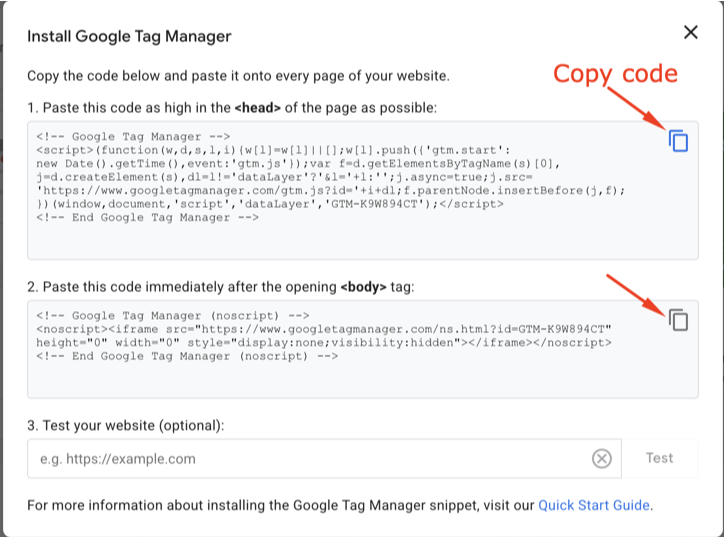
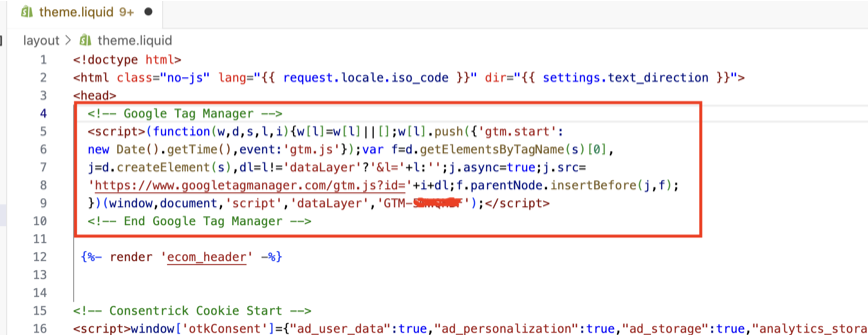
As we saw earlier, Google Tag Manager provides us with two code snippets to insert into our website. First, copy the code for <head> by clicking the copy icon.
Now access your website’s code and insert the code block right after the <head> tag. The method to access your code depends on your platform:
Shopify: For Shopify, go to your theme’s edit code section and open the theme.liquid file located in the layout folder. Look for the HTML <head> tag and paste the code you copied from Google Tag Manager.
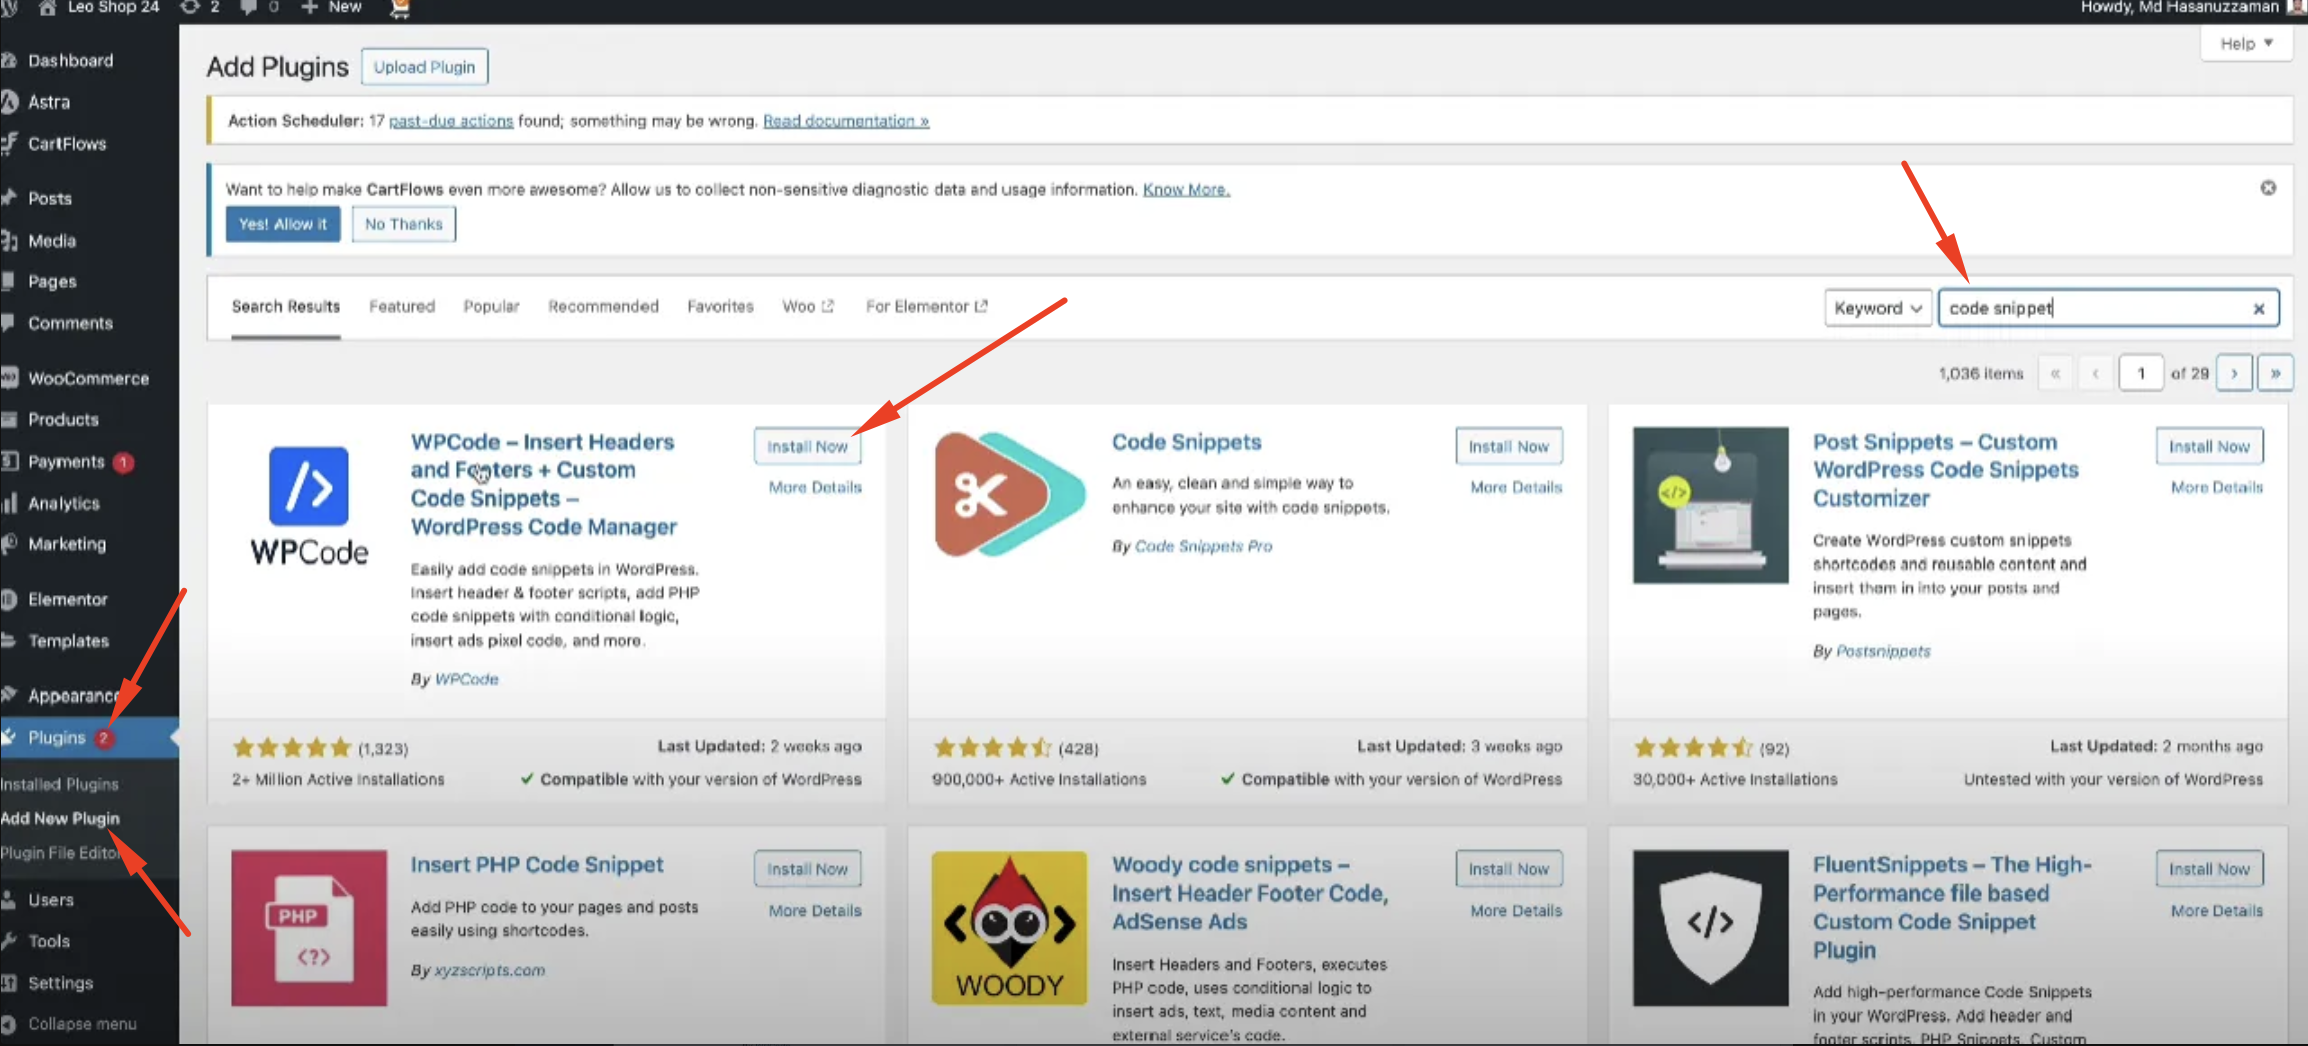
WordPress: For WordPress, you can edit the header.php file and insert the code inside the head tag. However, it’s recommended to use a child theme so that the code doesn’t get removed during updates. If you prefer an easier solution, you can use a plugin and set it up as shown in the following screenshot.

Other Website: For other CMS or custom websites, you need to insert the code in the <head> section. If you experience any difficulty, you can ask a developer for help or contact LeoMeasure support for assistance.
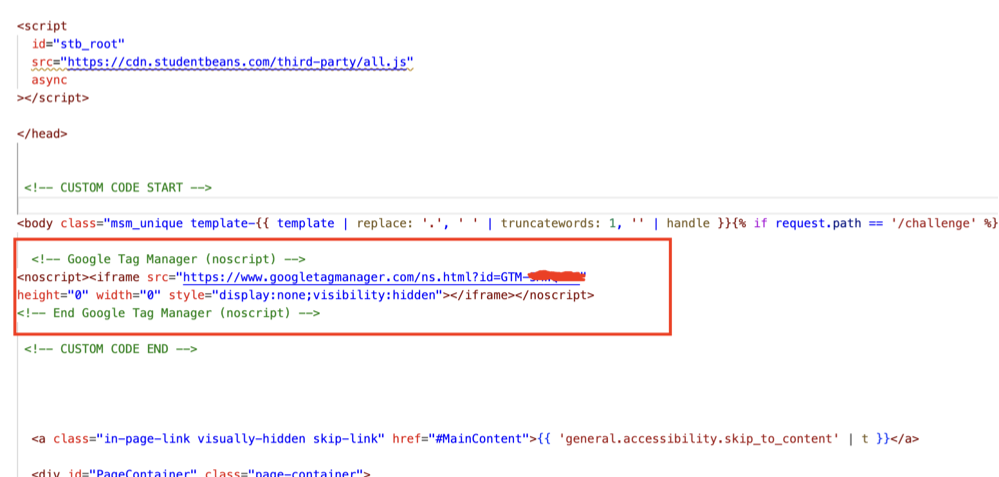
Step 2: Insert Google Tag Manager Code for Body:
This step is optional but recommended. Similar to the previous step, copy the second code snippet and insert it just inside your website’s <body> tag.
Now your website is successfully connected with Google Tag Manager.
How to Connect Google Tag Manager with Google Analytics?
At this stage, our website is connected with Google Tag Manager. Now we need to connect Google Tag Manager with Google Analytics. To connect our Google Analytics 4 (GA4) property with Google Tag Manager (GTM), follow these steps:
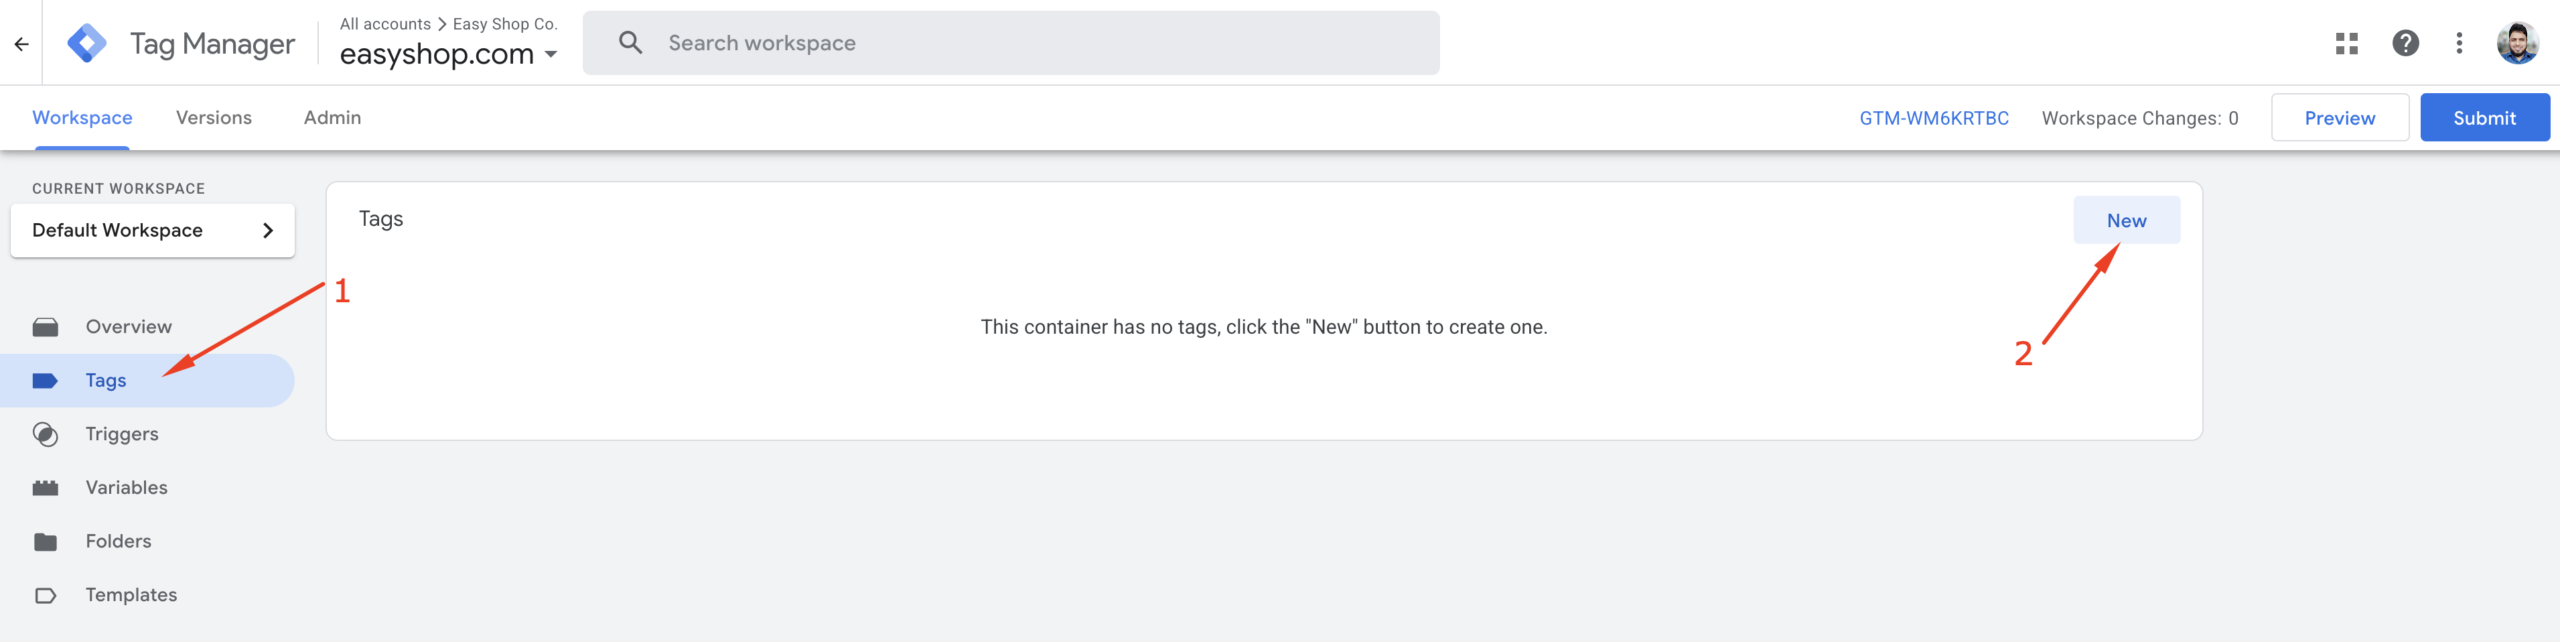
Step 1:
Open your Google Tag Manager account and click on the “Tags” option from the left-hand sidebar. In the Tags panel, click the “New” button as shown in the screenshot below:
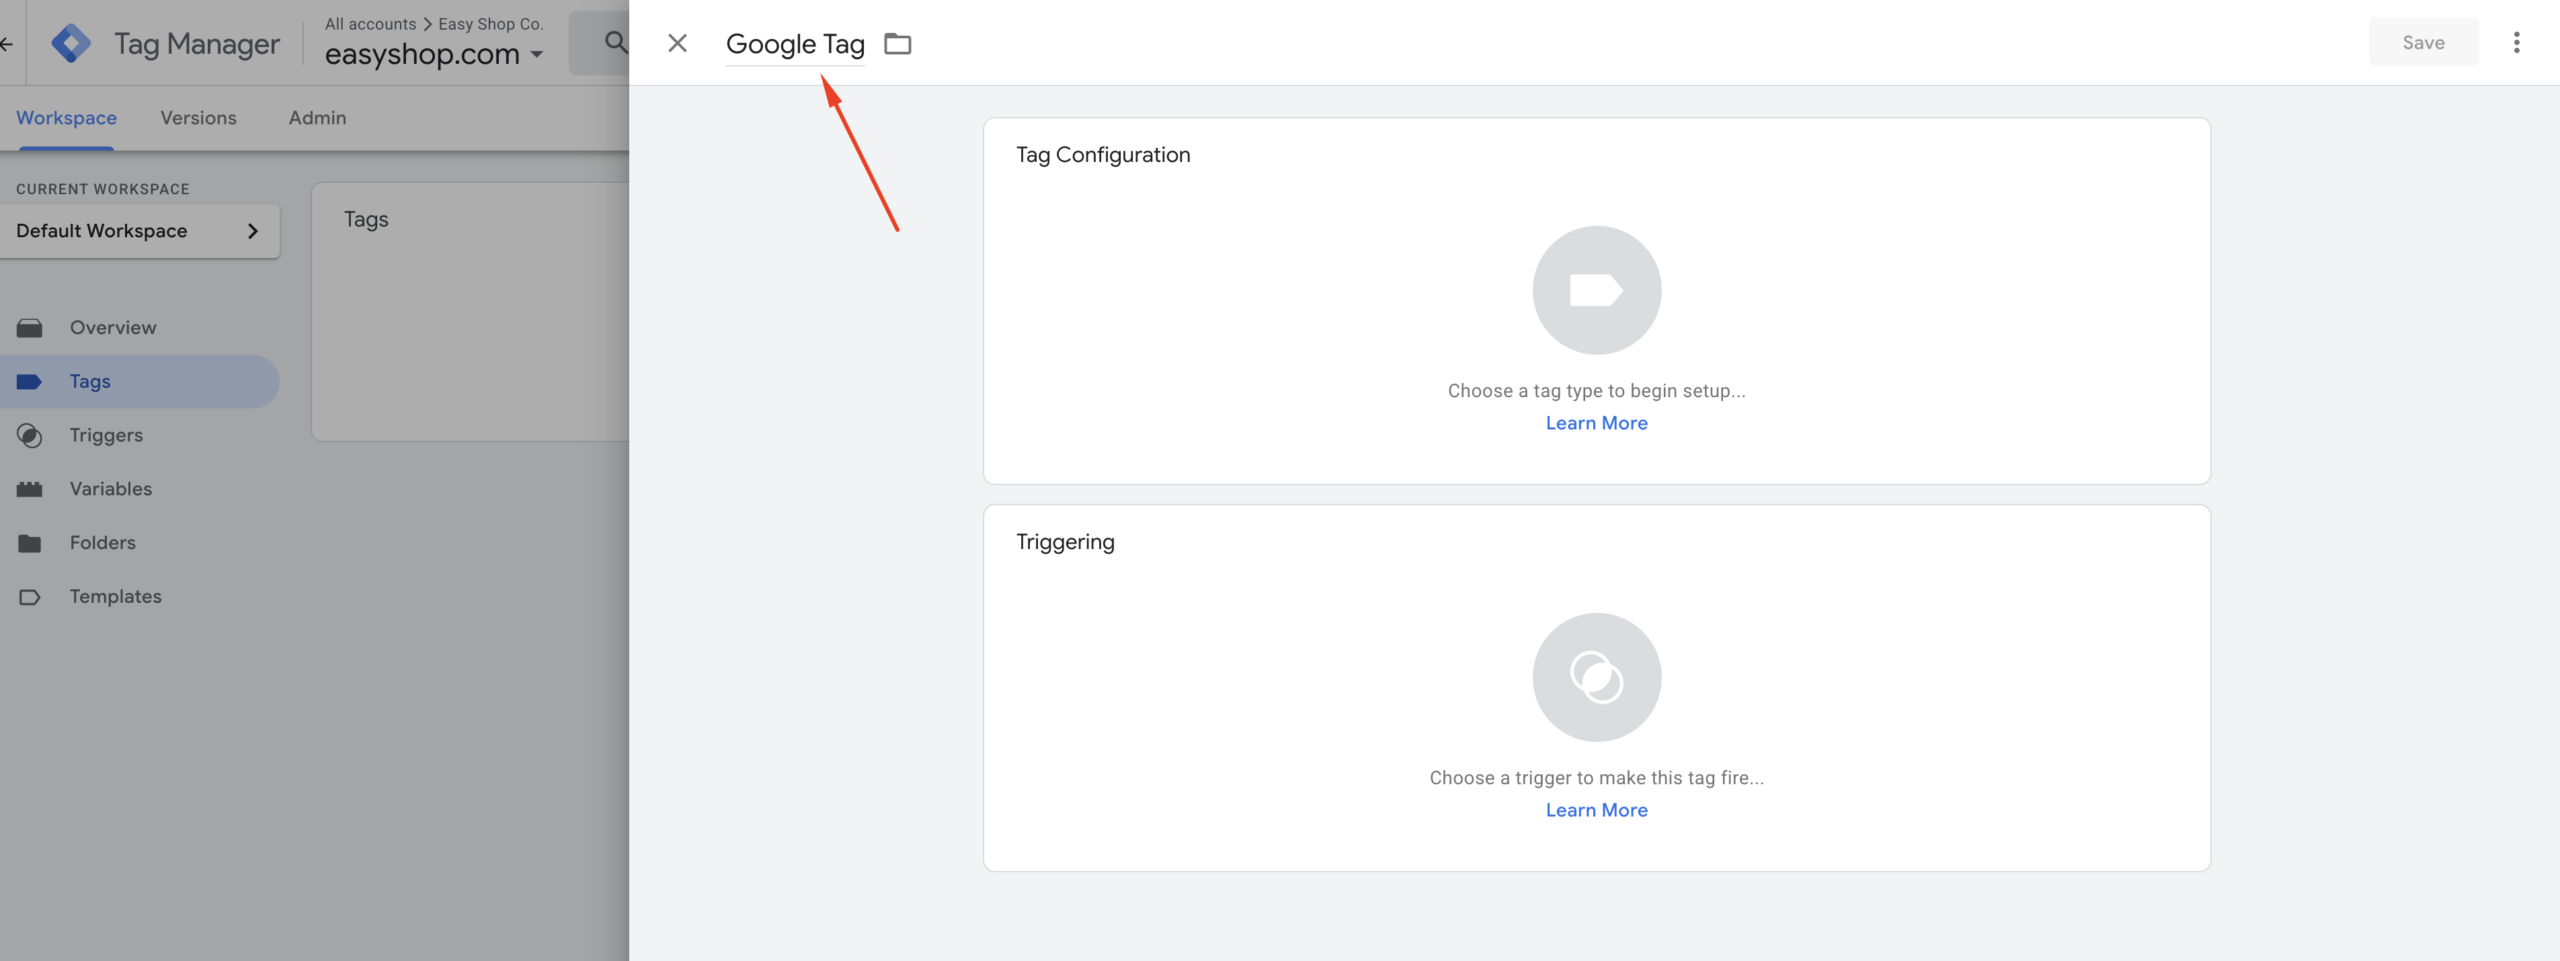
Step 2:
A side panel will appear, like in the following screenshot. Give your tag a name — for example, “Google Tag.”
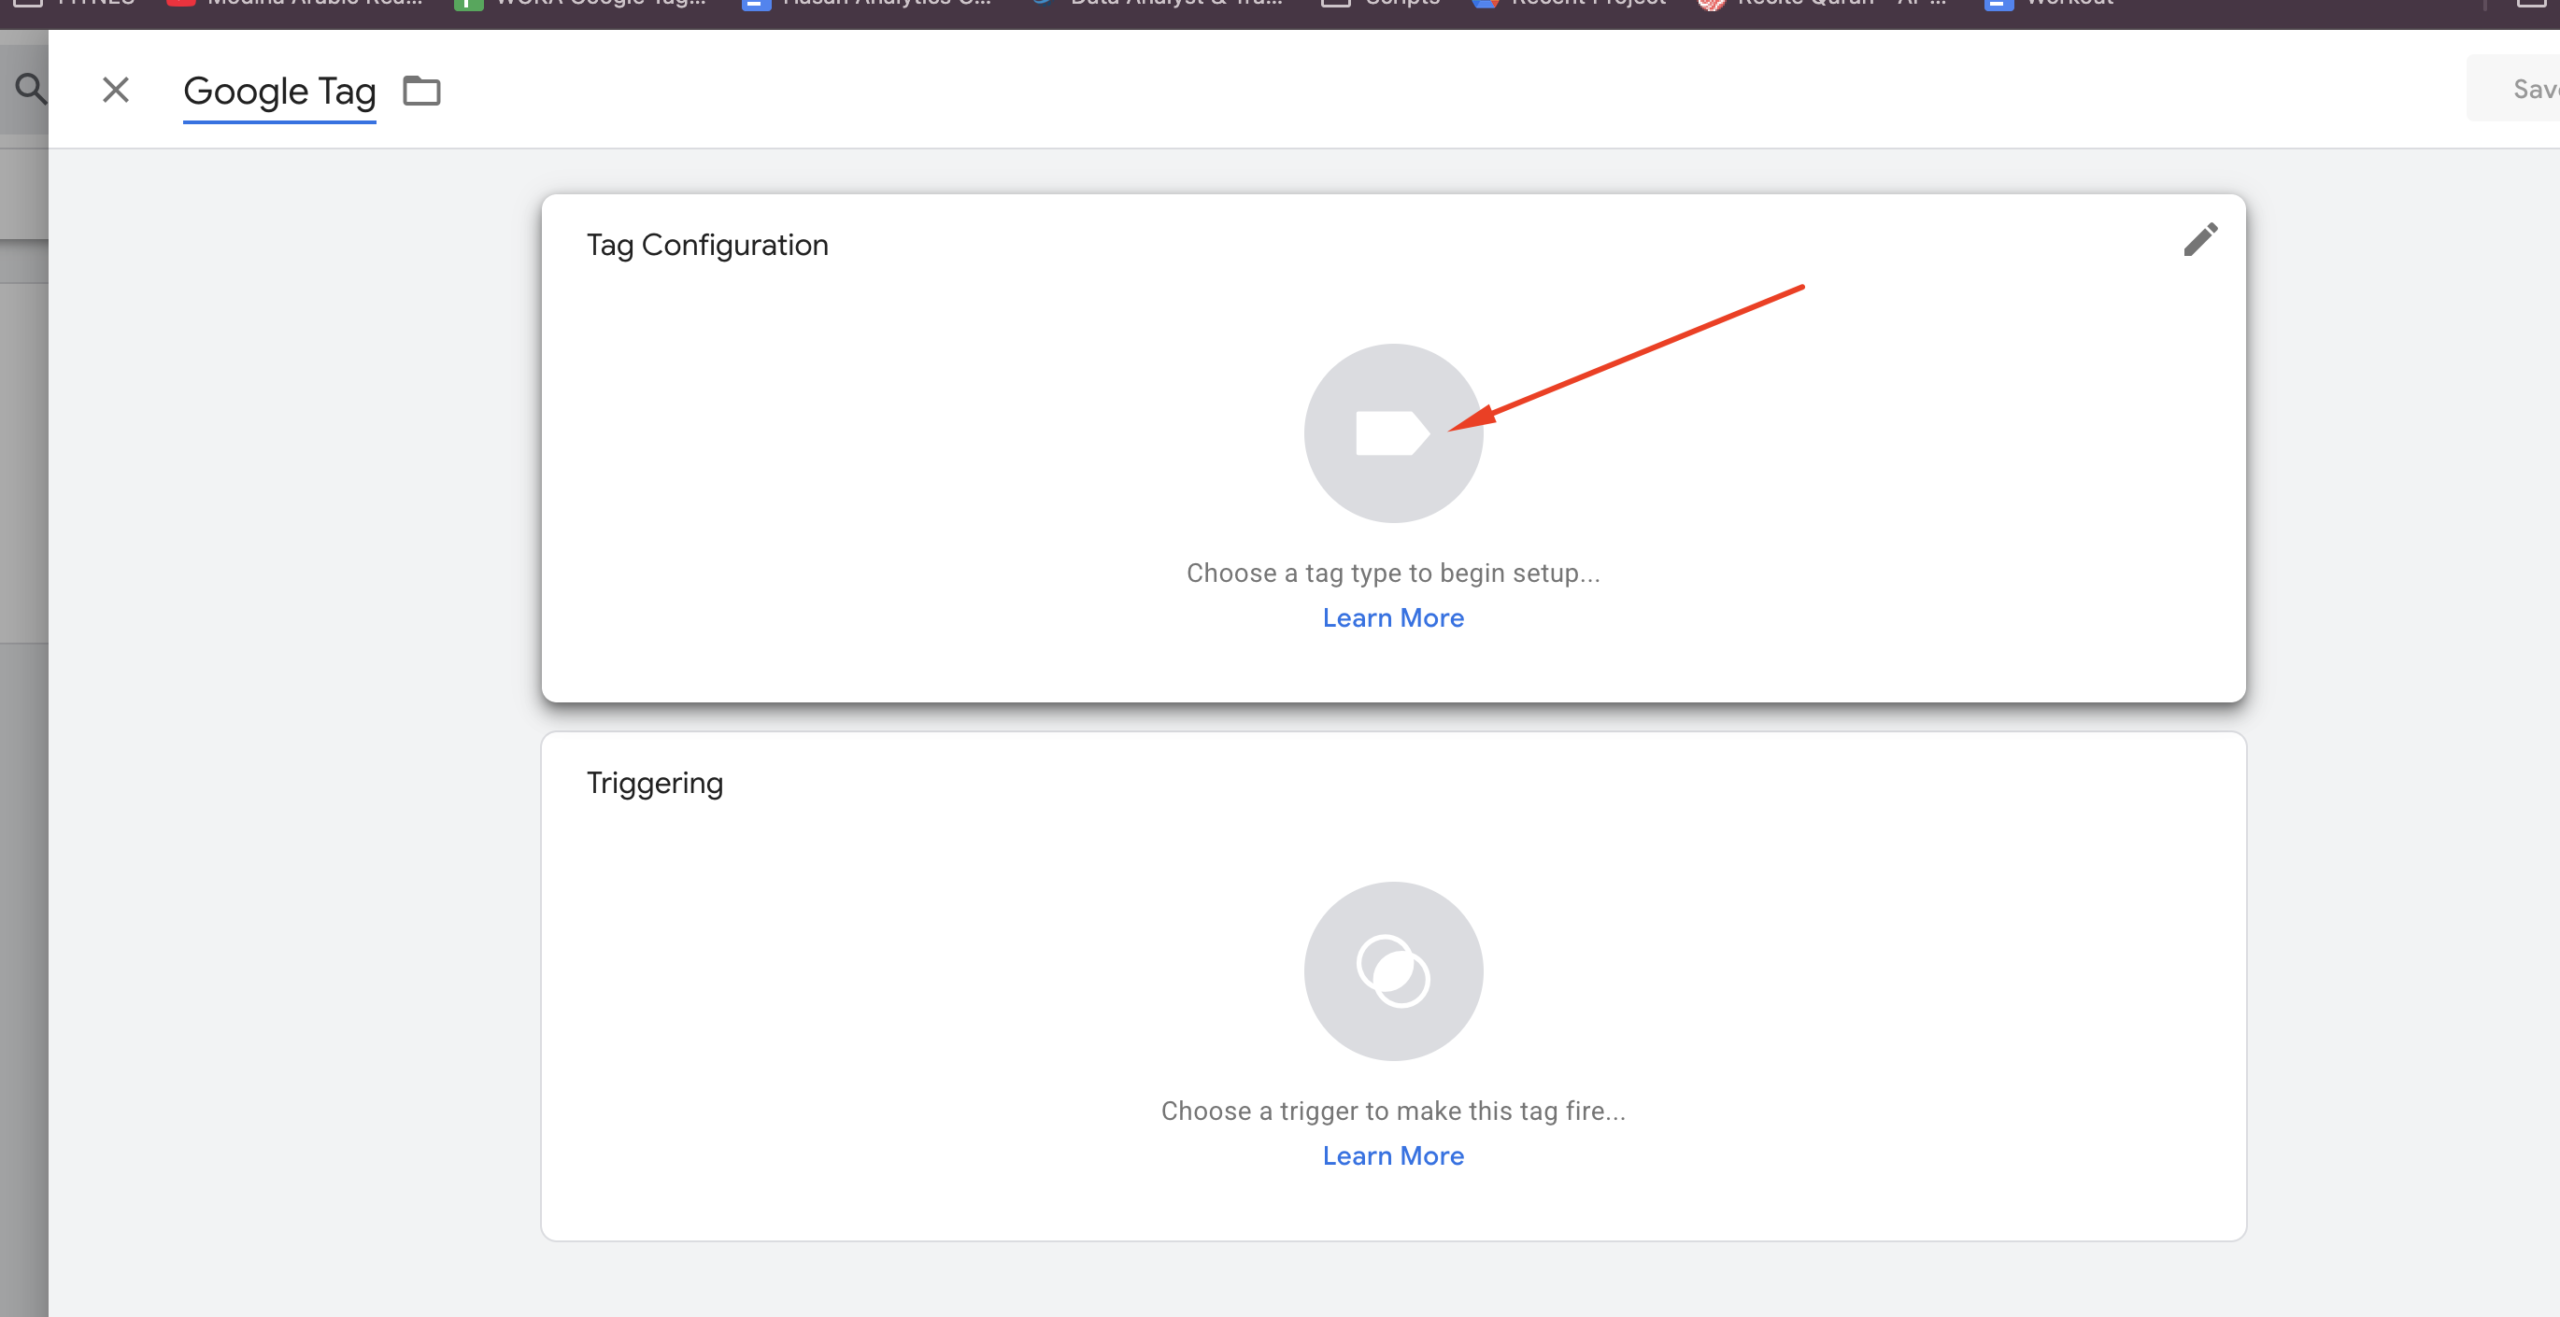
Step 3:
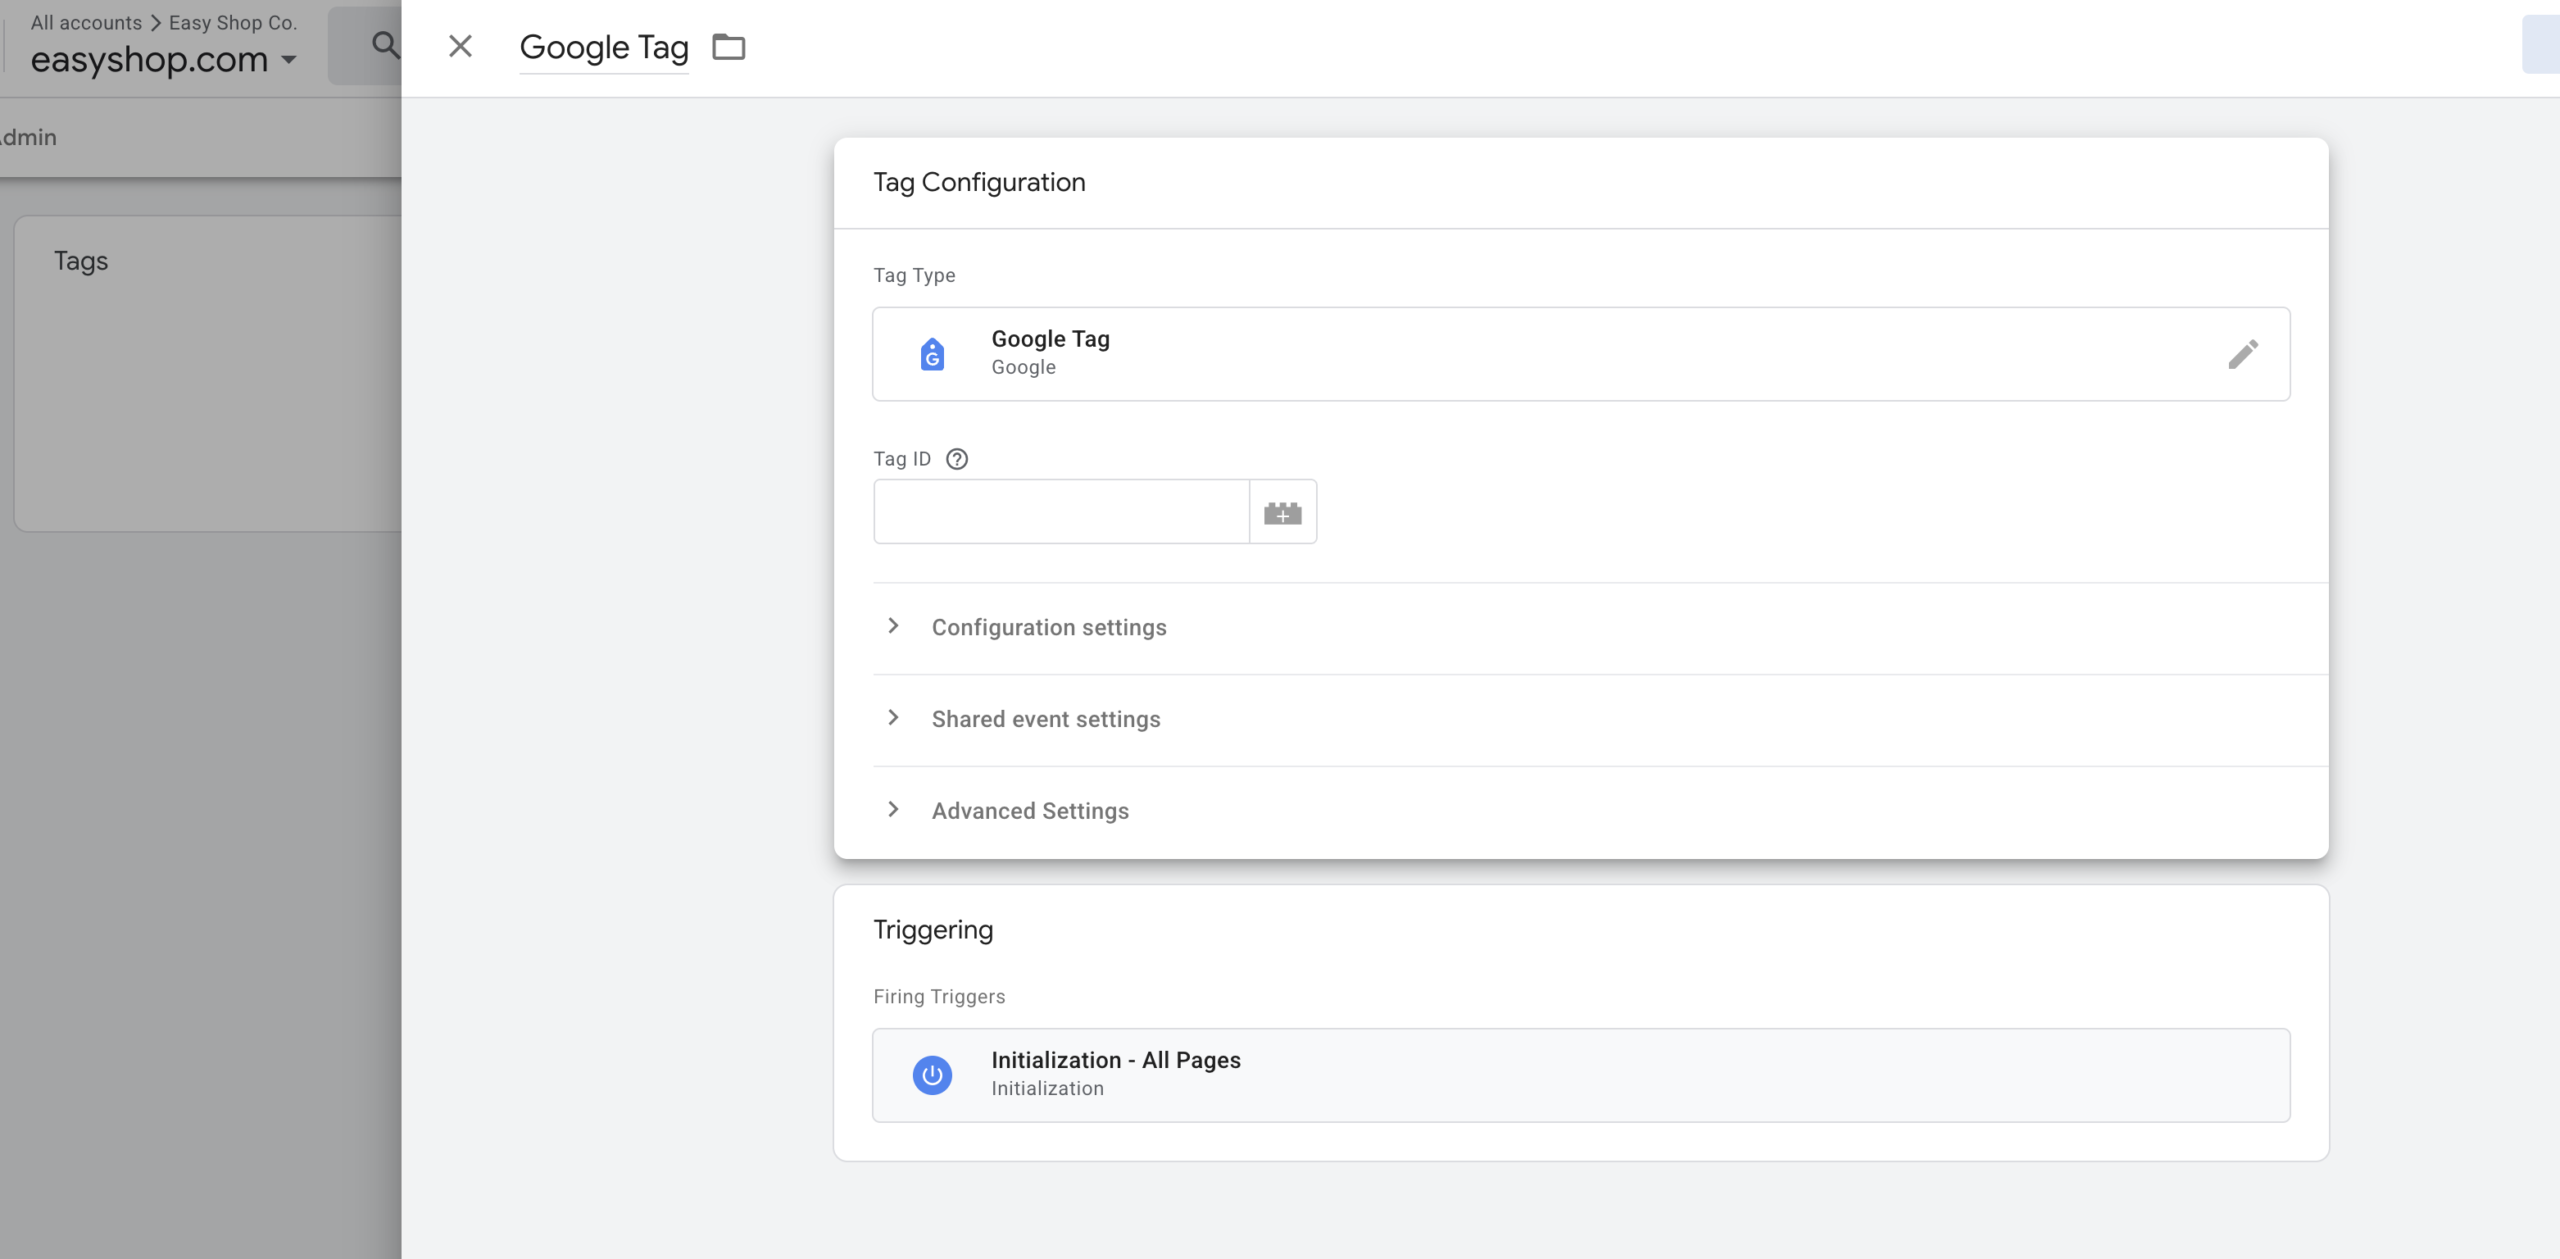
Click anywhere inside the “Tag Configuration” area. A pop-up will appear, like in the screenshot below. From this list, select “Google Tag.”
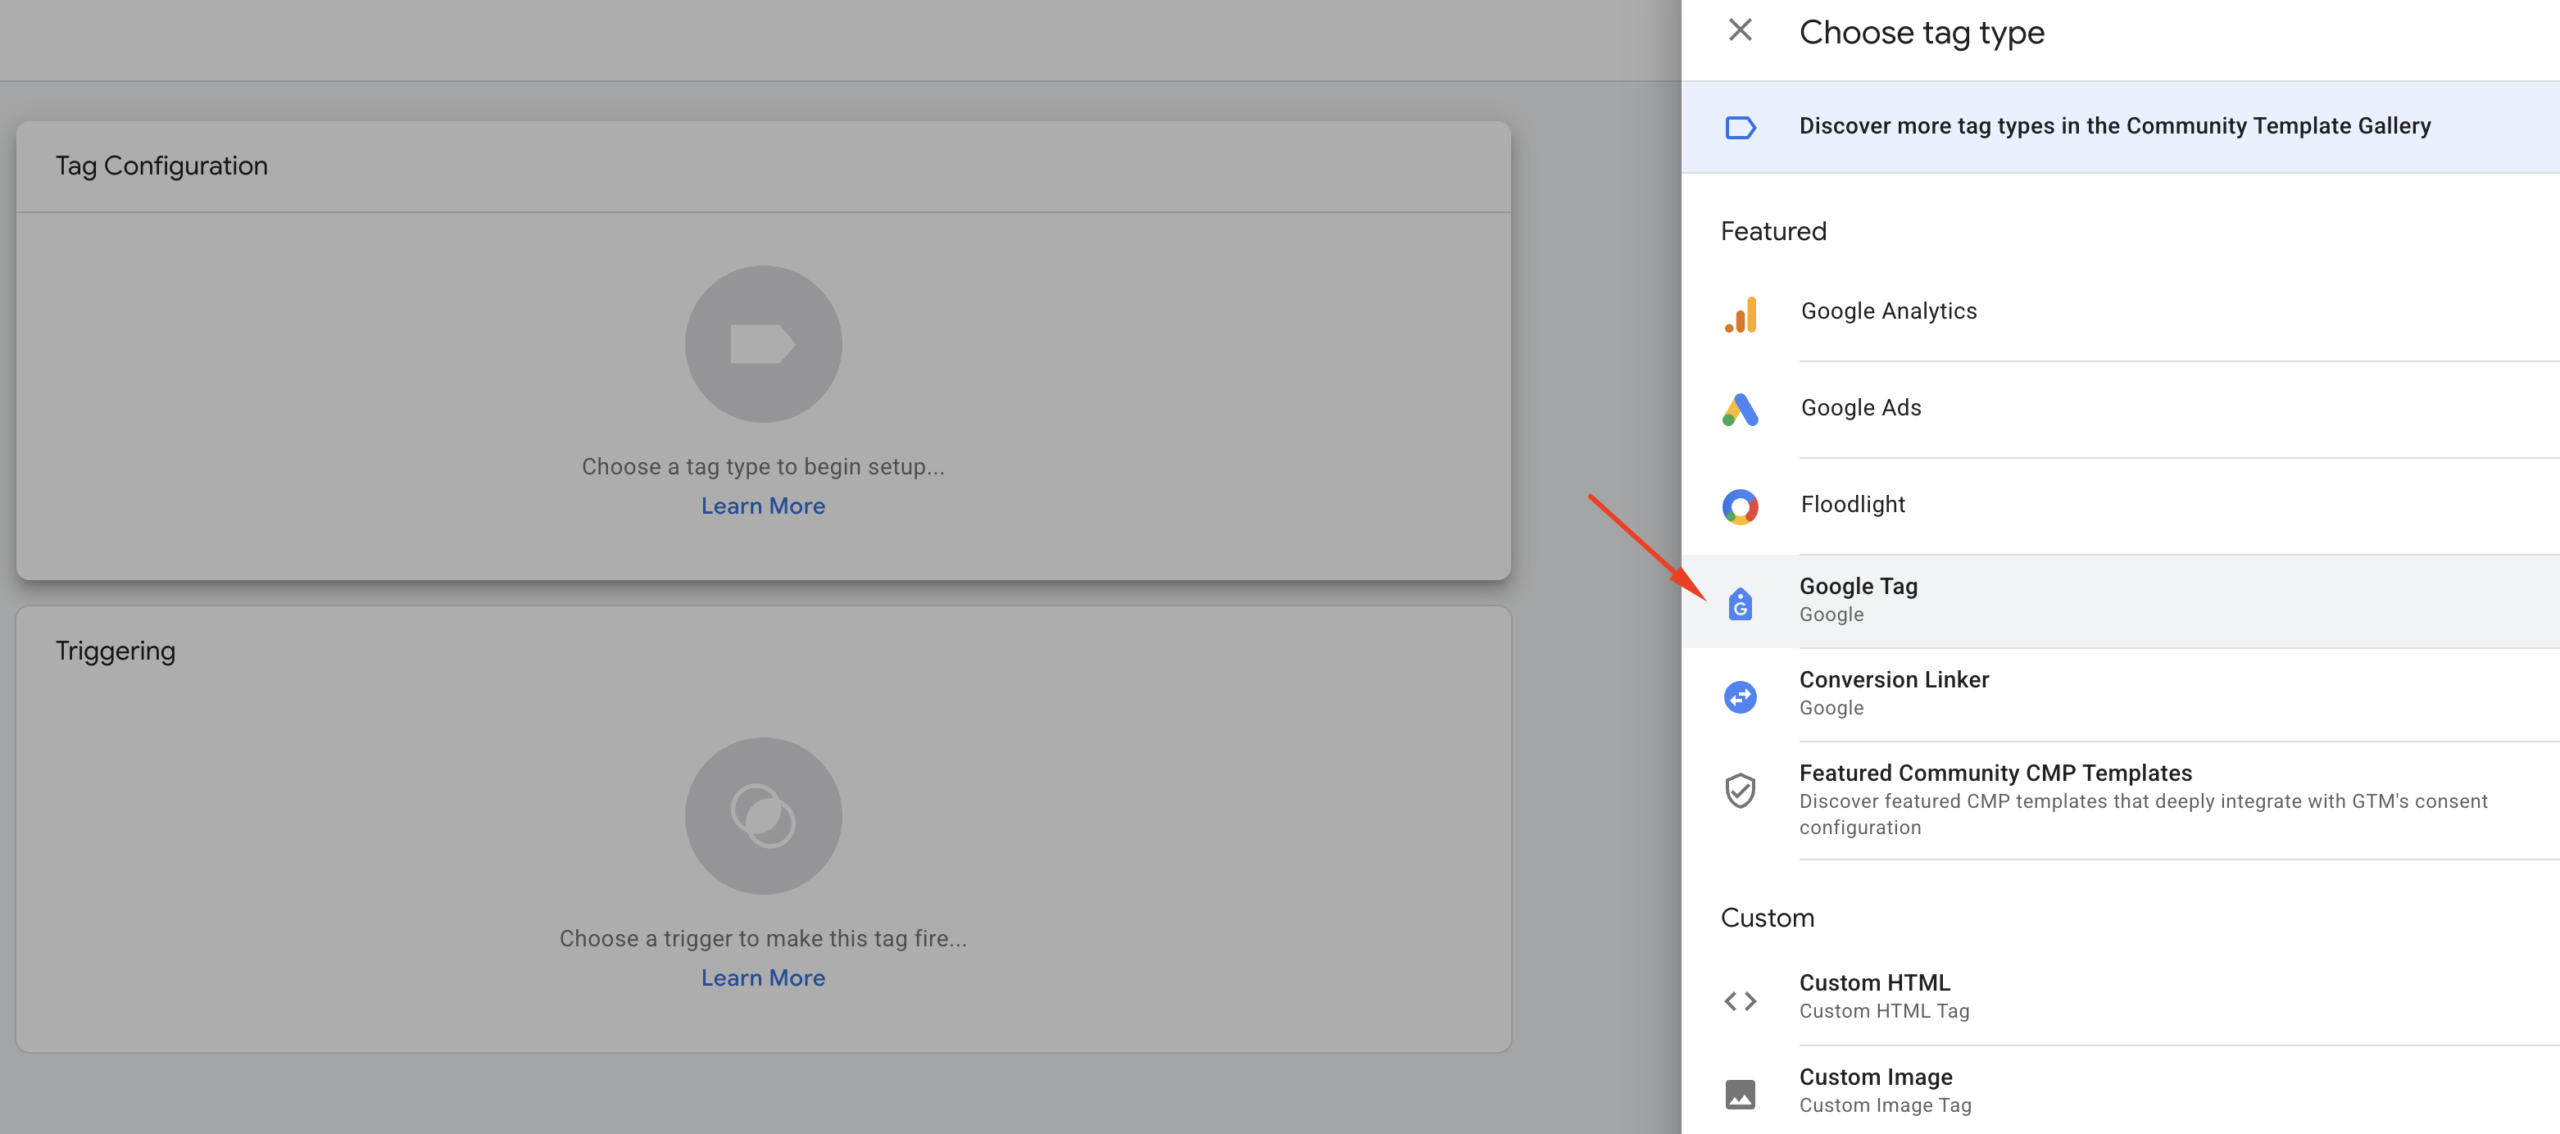
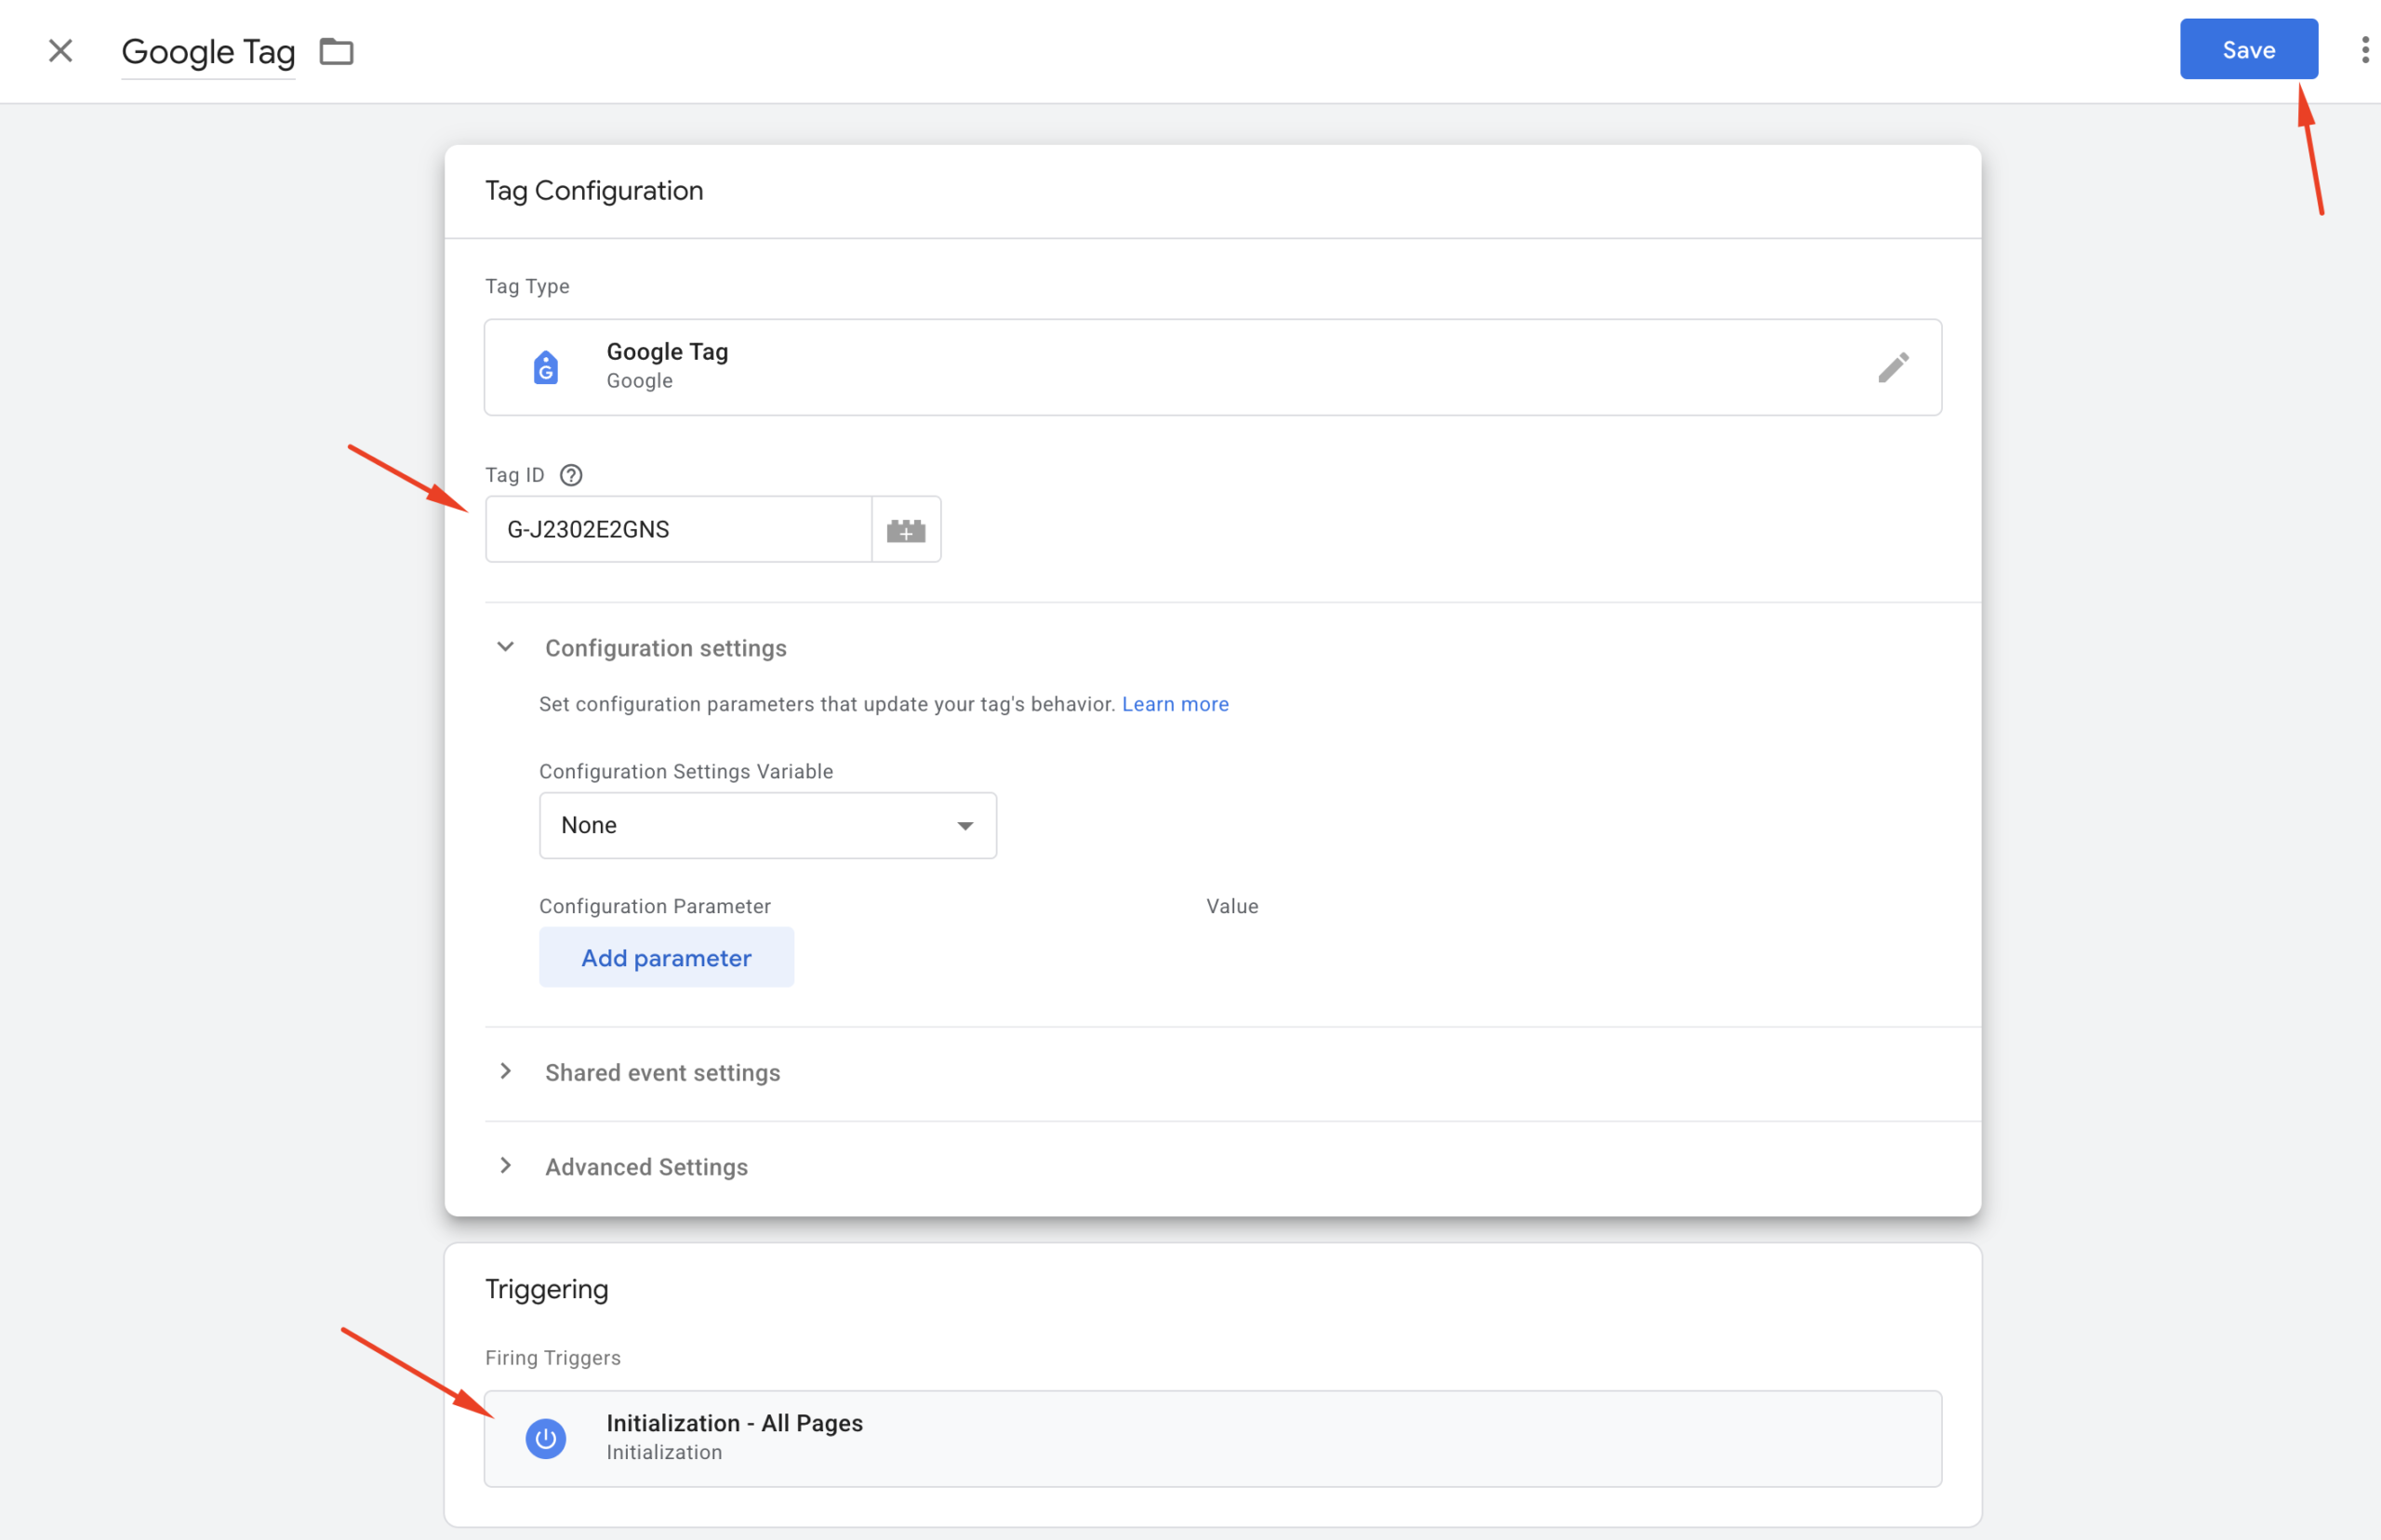
Once you select “Google Tag,” you’ll see the following interface:
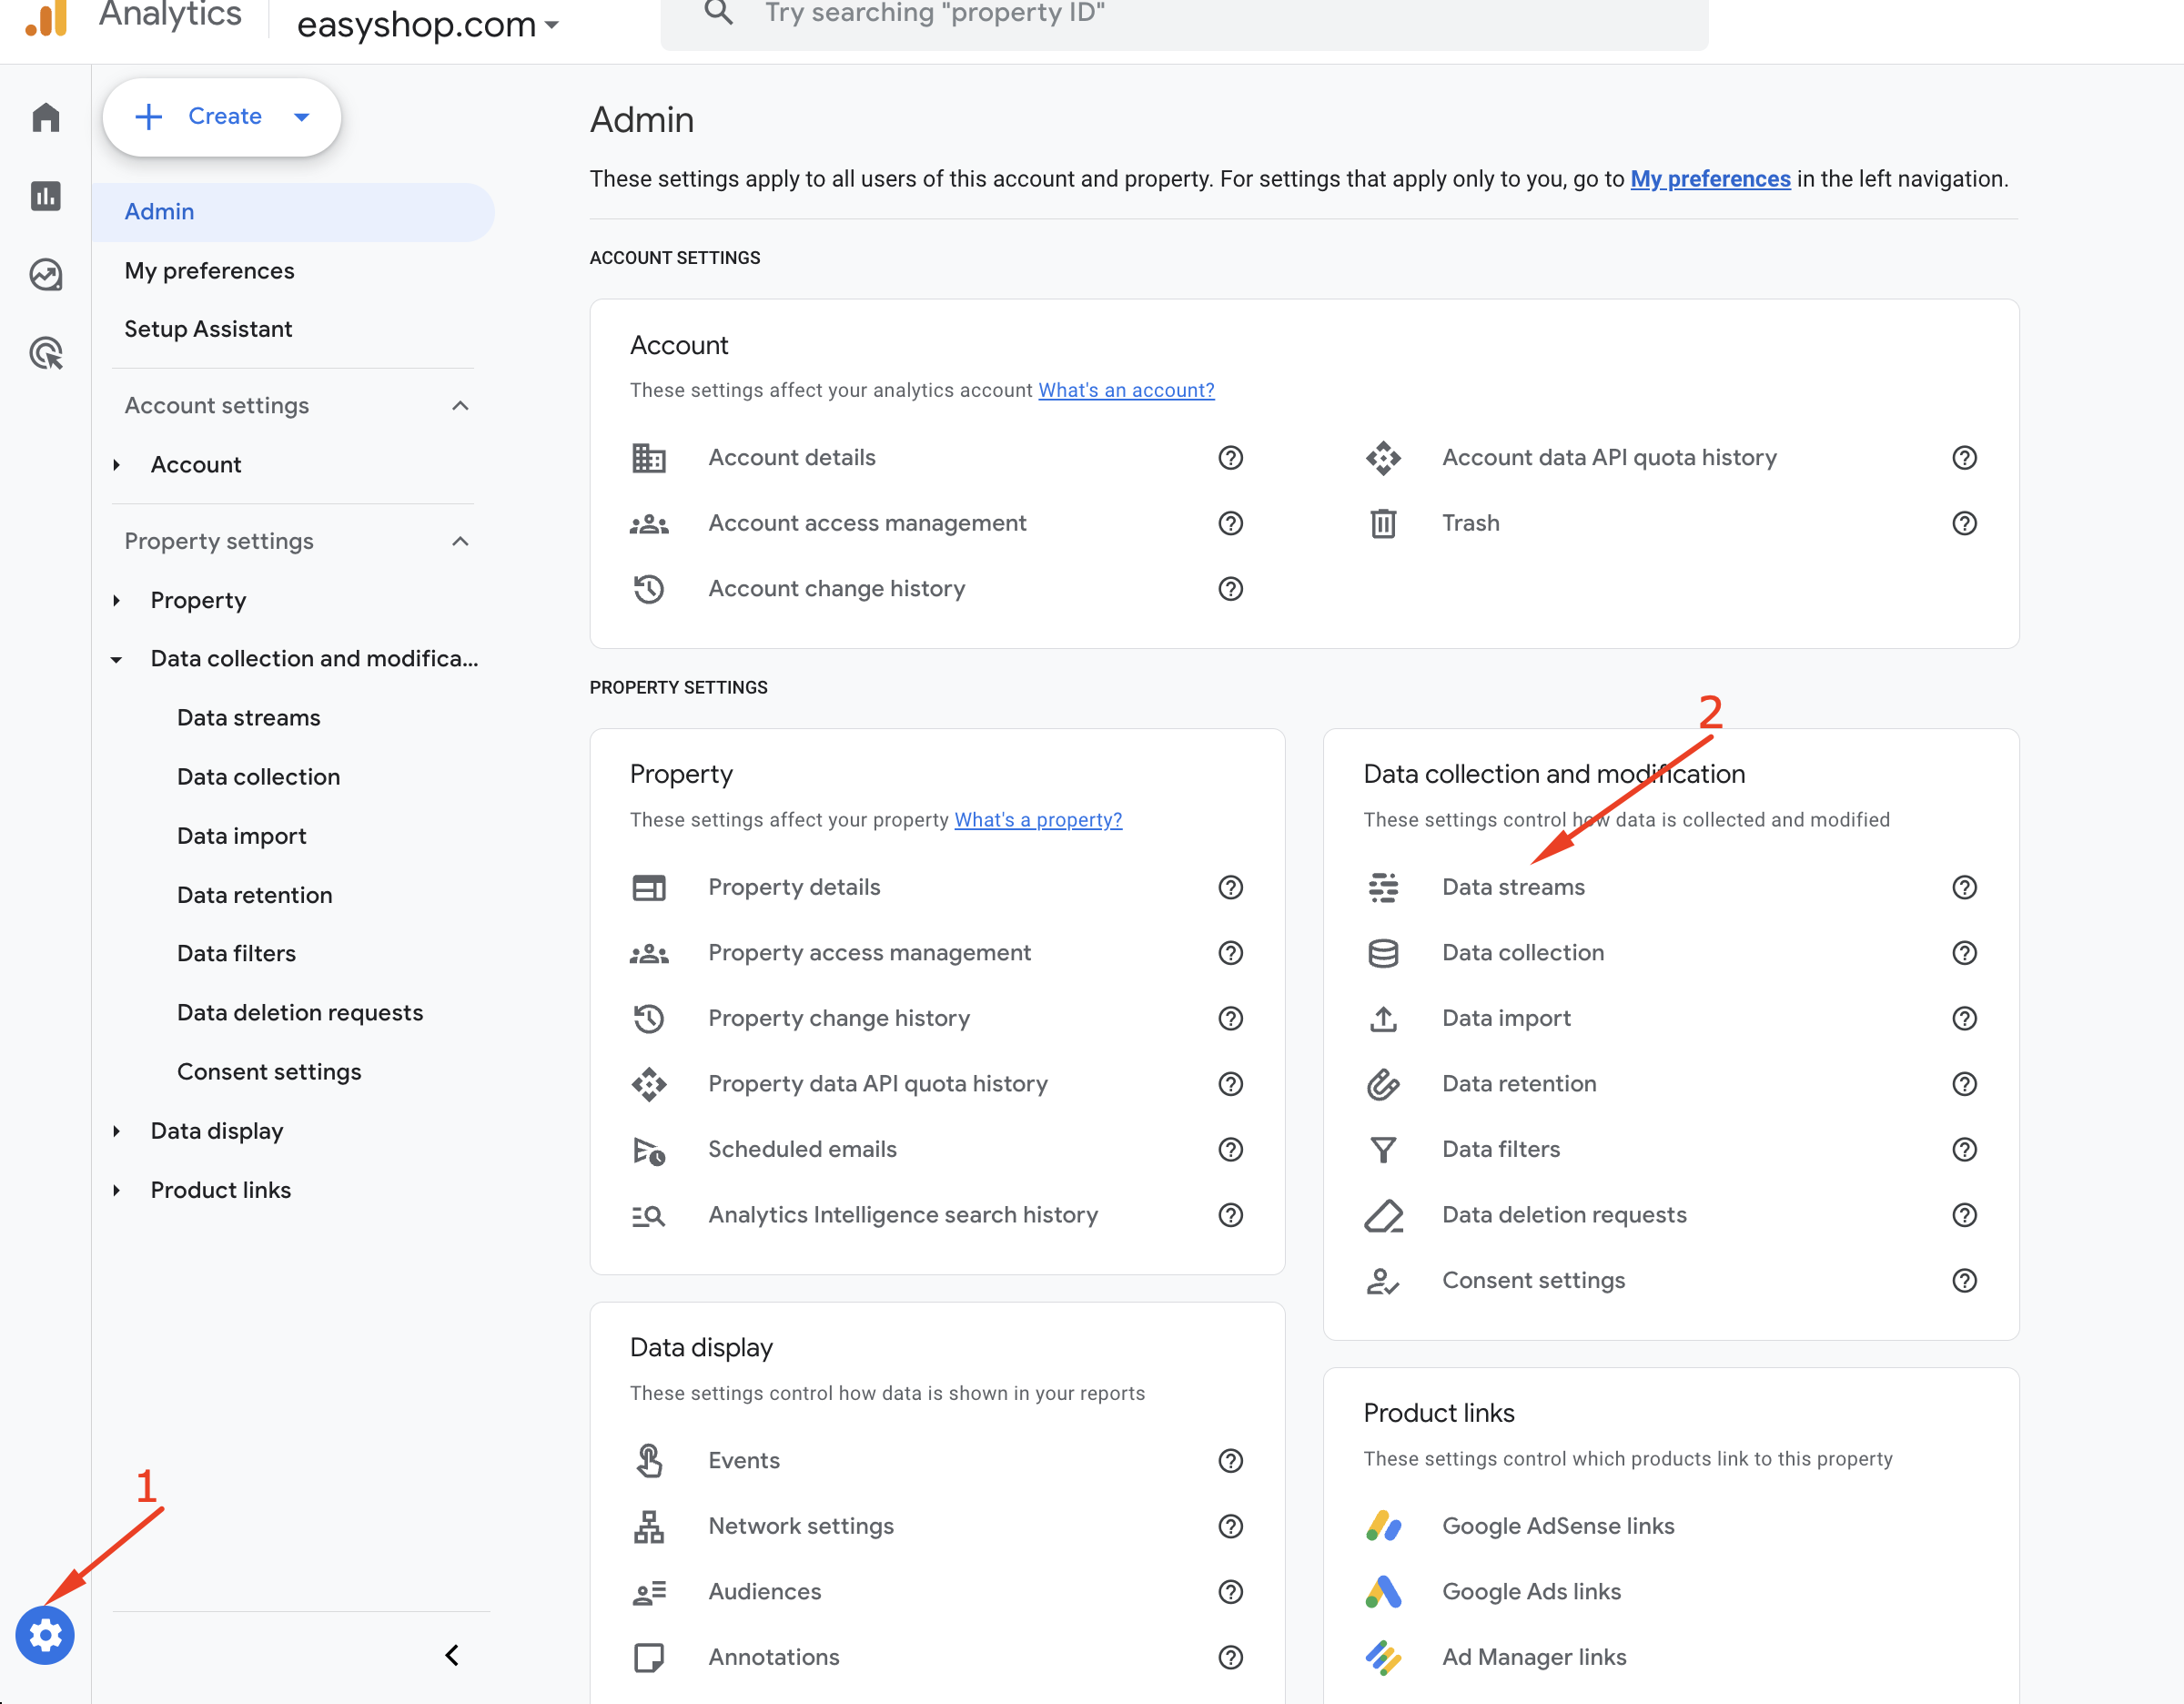
Now, open a new browser tab and go to https://analytics.google.com/ to access your Google Analytics dashboard. From the dashboard, click on the Admin gear icon at the bottom-left corner of the screen. Then, under the “Data Collection and Modification” section, click on “Data Streams.”
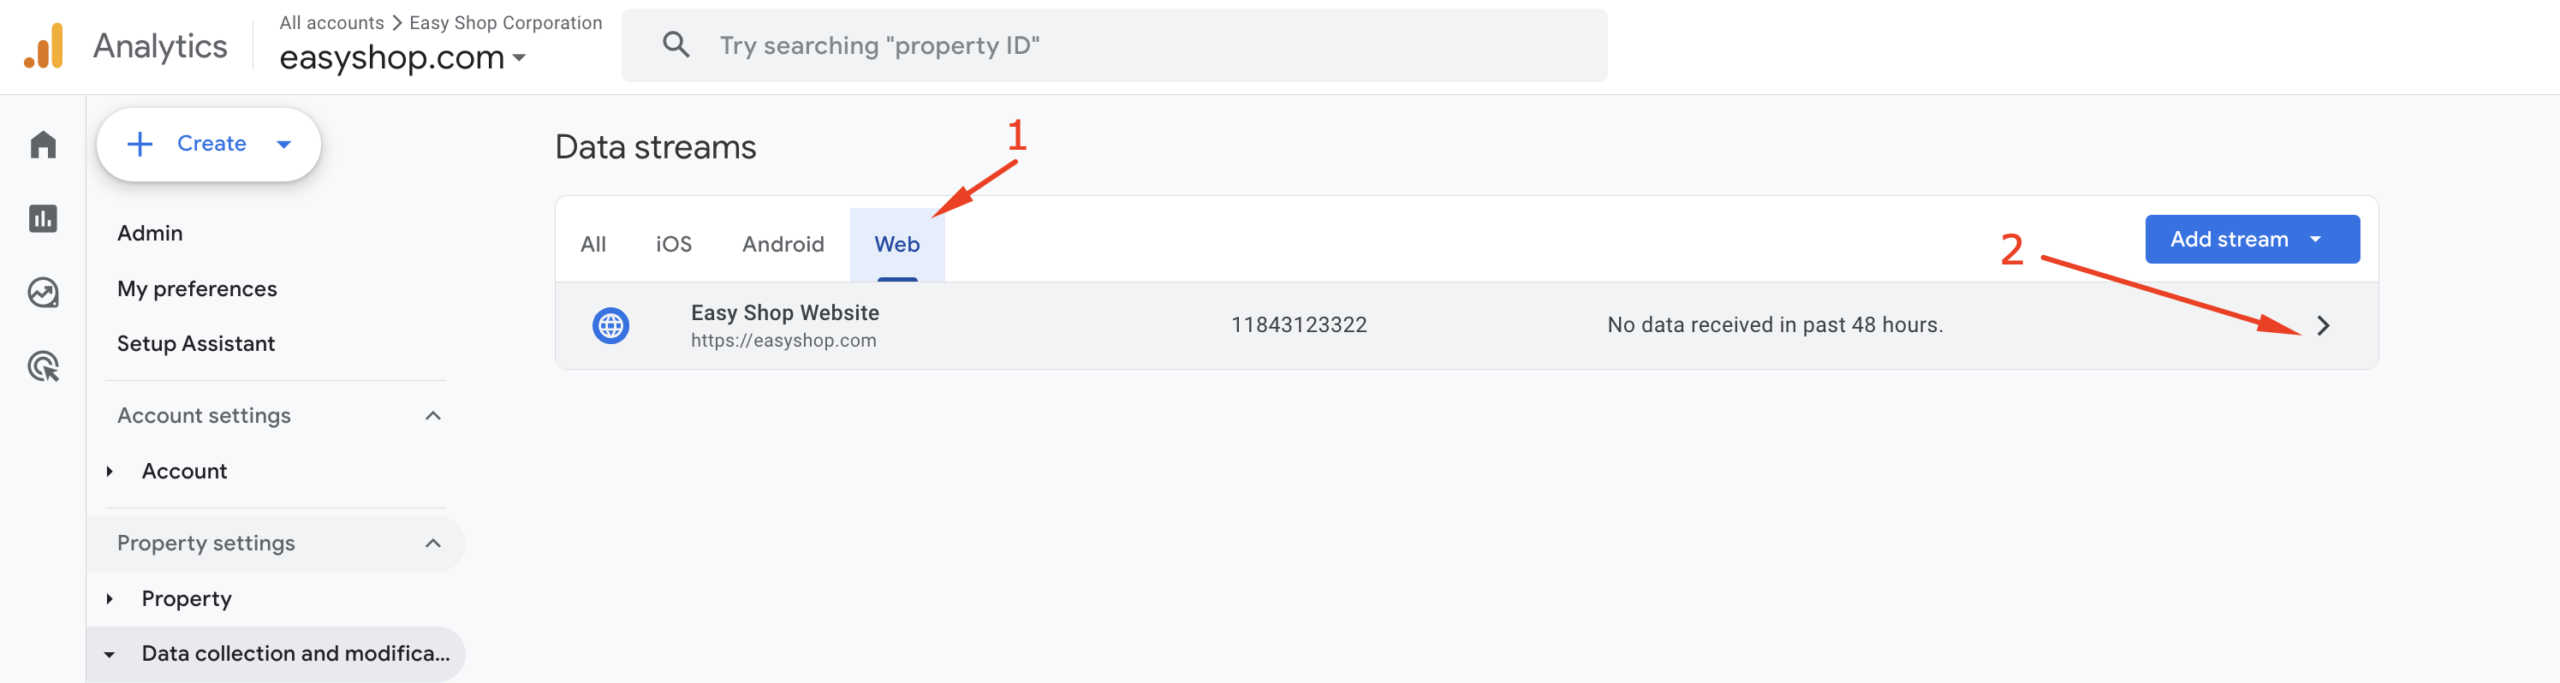
From the Data streams select Web and click the right arrow icon, like the following screenshot.
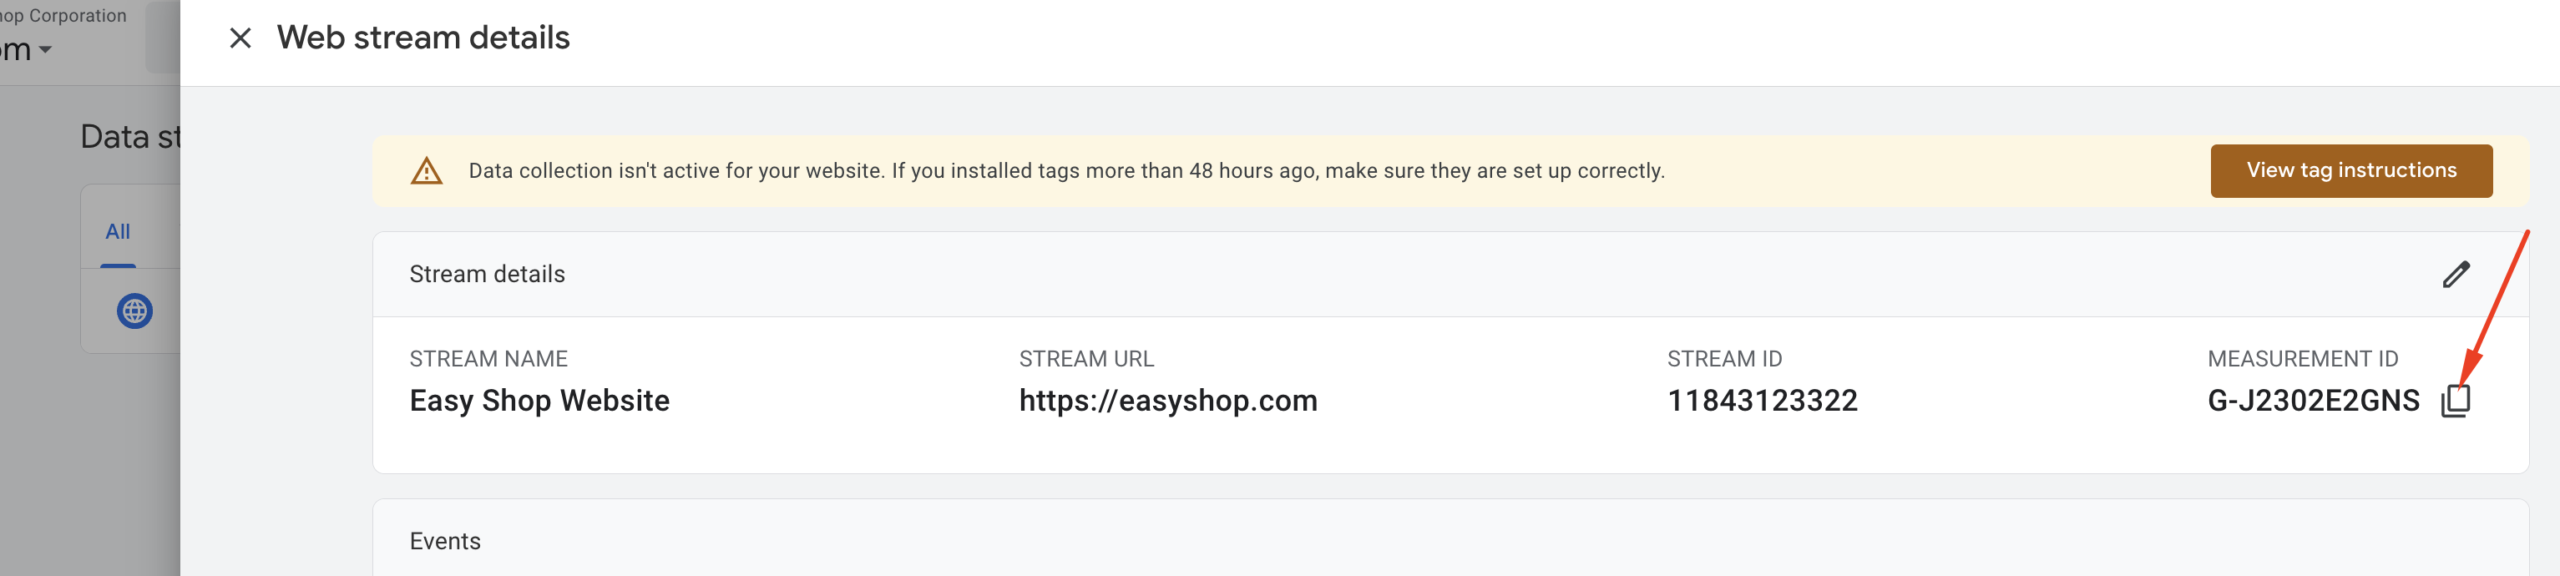
You will now see the Web Stream Details page. In the “Stream details” section, you’ll find the Measurement ID.
The GA4 Measurement ID is a unique code that starts with “G-” (e.g., G-XXXXXXXXXX) and is used to connect your website or app to a specific Google Analytics 4 property for tracking user interactions.
Click the copy icon next to the Measurement ID to copy it.
Now, go back to your Google Tag Manager tab and paste the Measurement ID into the Tag ID field.
Ensure that the Triggering section is set to “Initialization – All Pages” (this is usually pre-selected).
Finally, click the “Save” button to complete the tag setup.

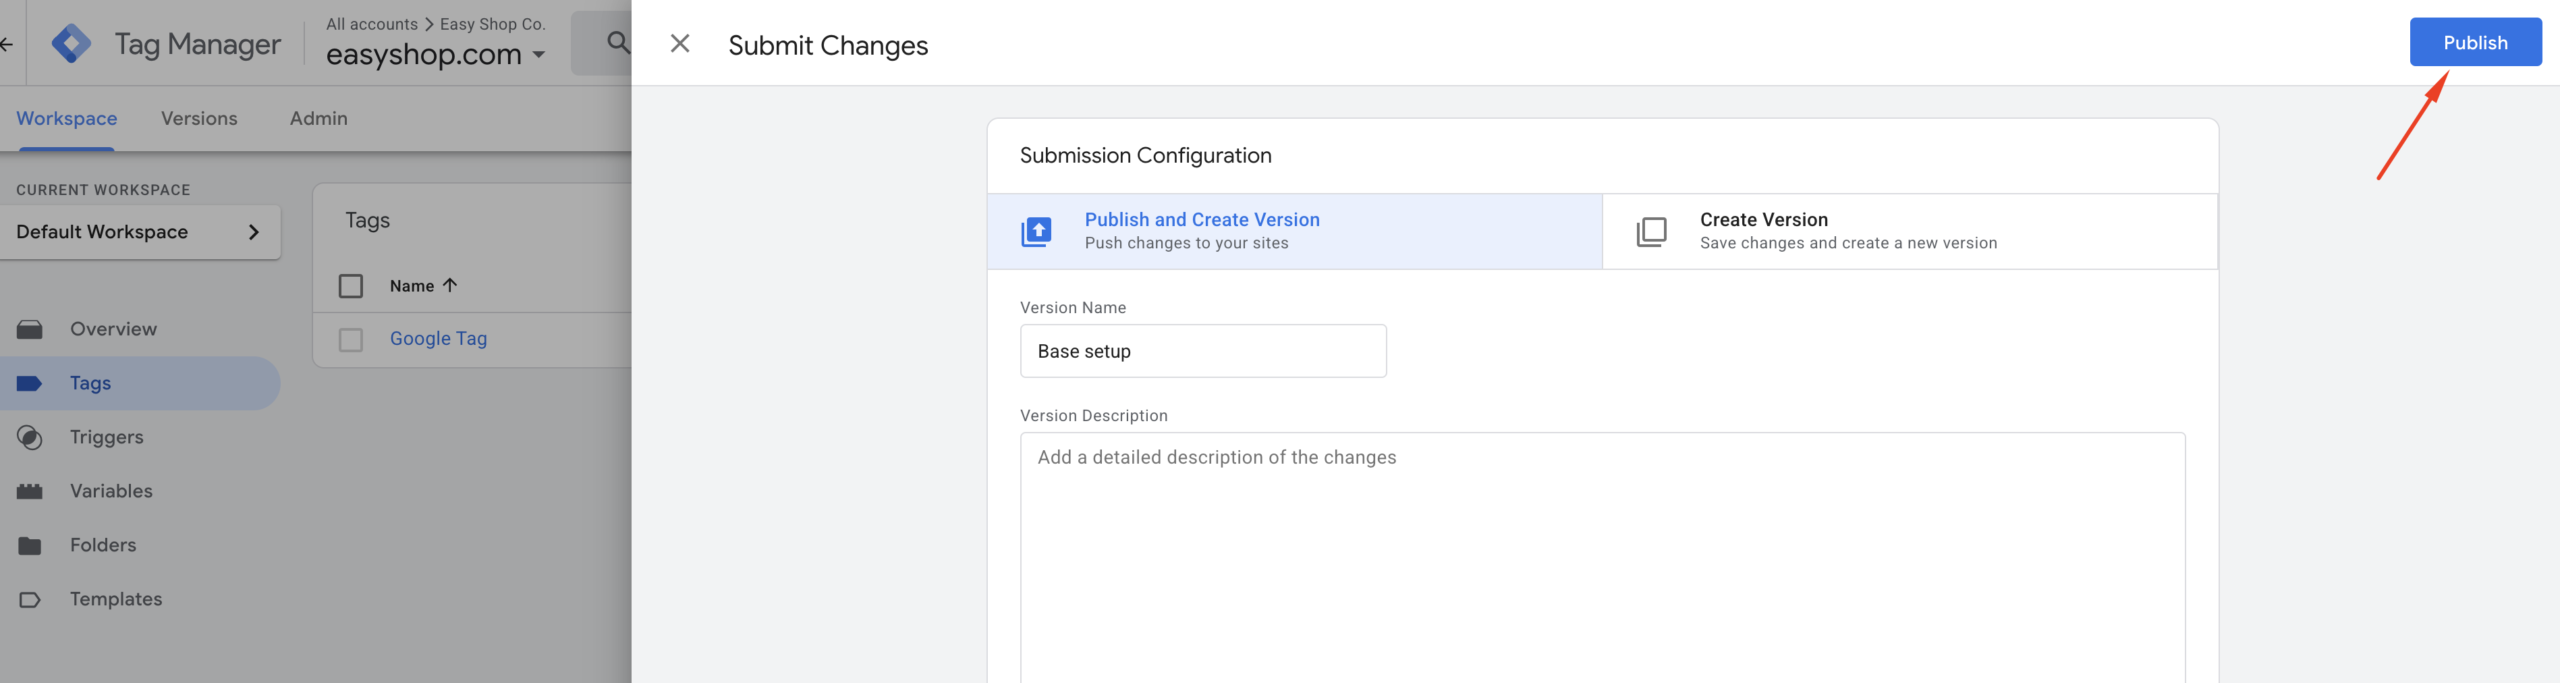
All the setup steps are now complete. It’s best practice to test your setup first to ensure everything is working correctly. Once you’ve confirmed that the tag is firing as expected, you can go ahead and publish it.
How to check if your Google Analytics setup is working properly?
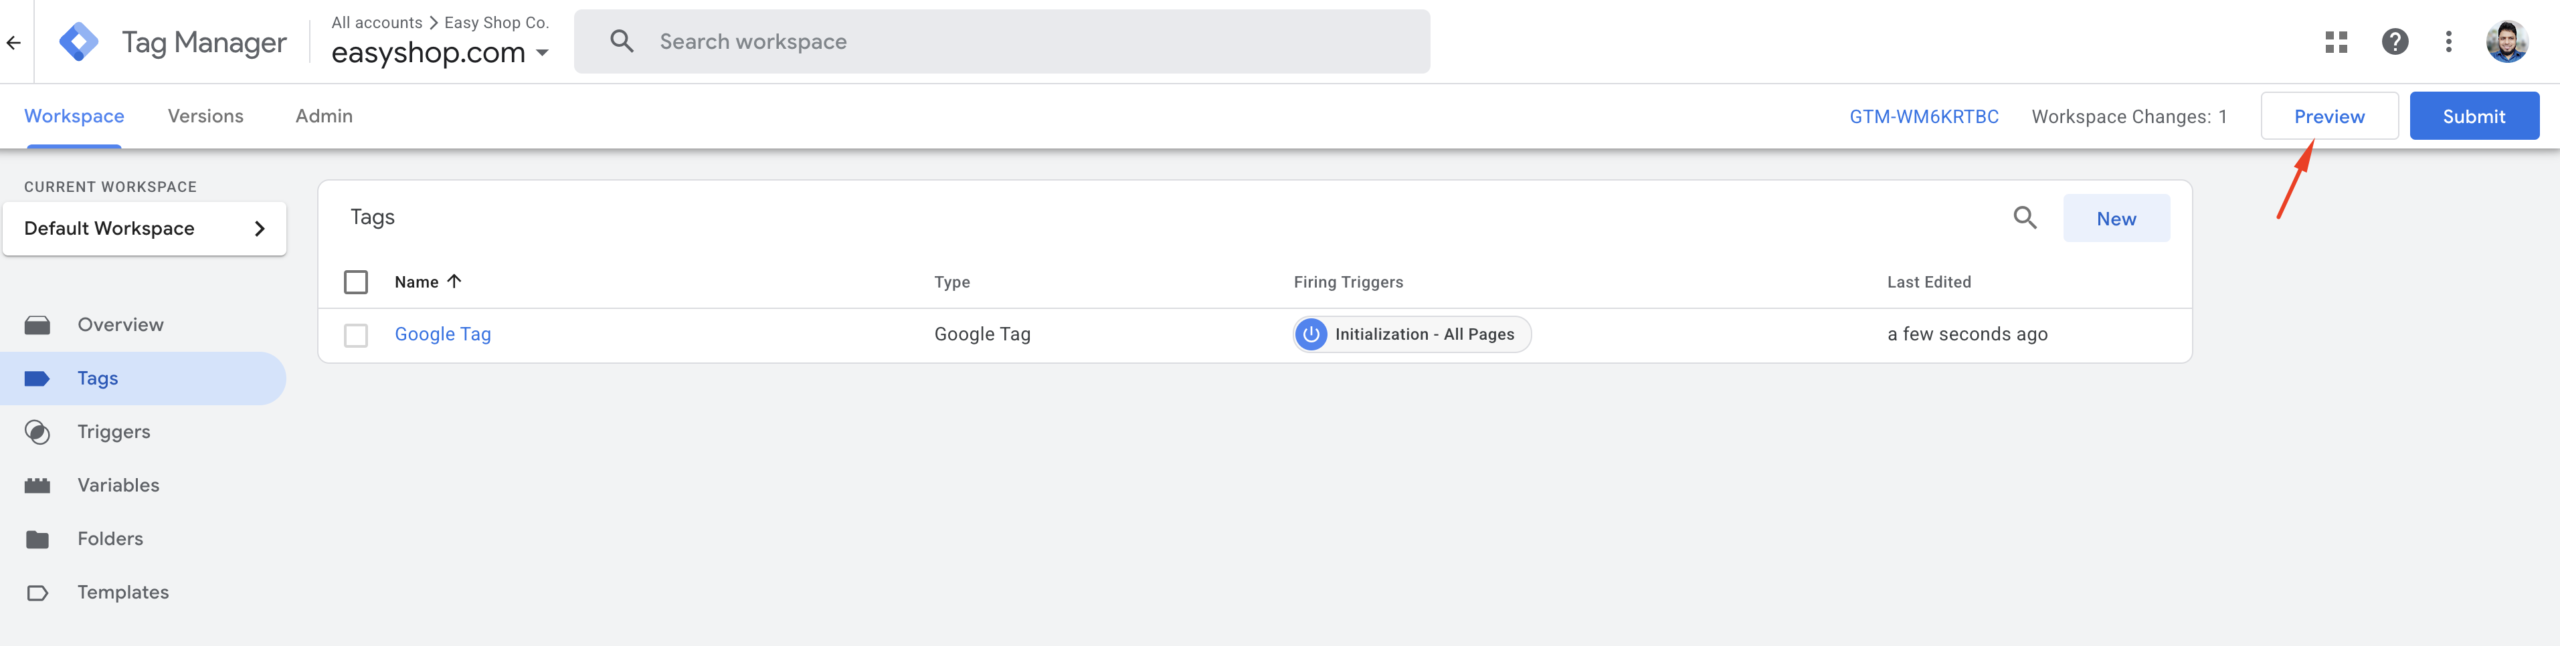
Step 1: Click the “Preview” button located in the top-right corner of the Google Tag Manager interface.
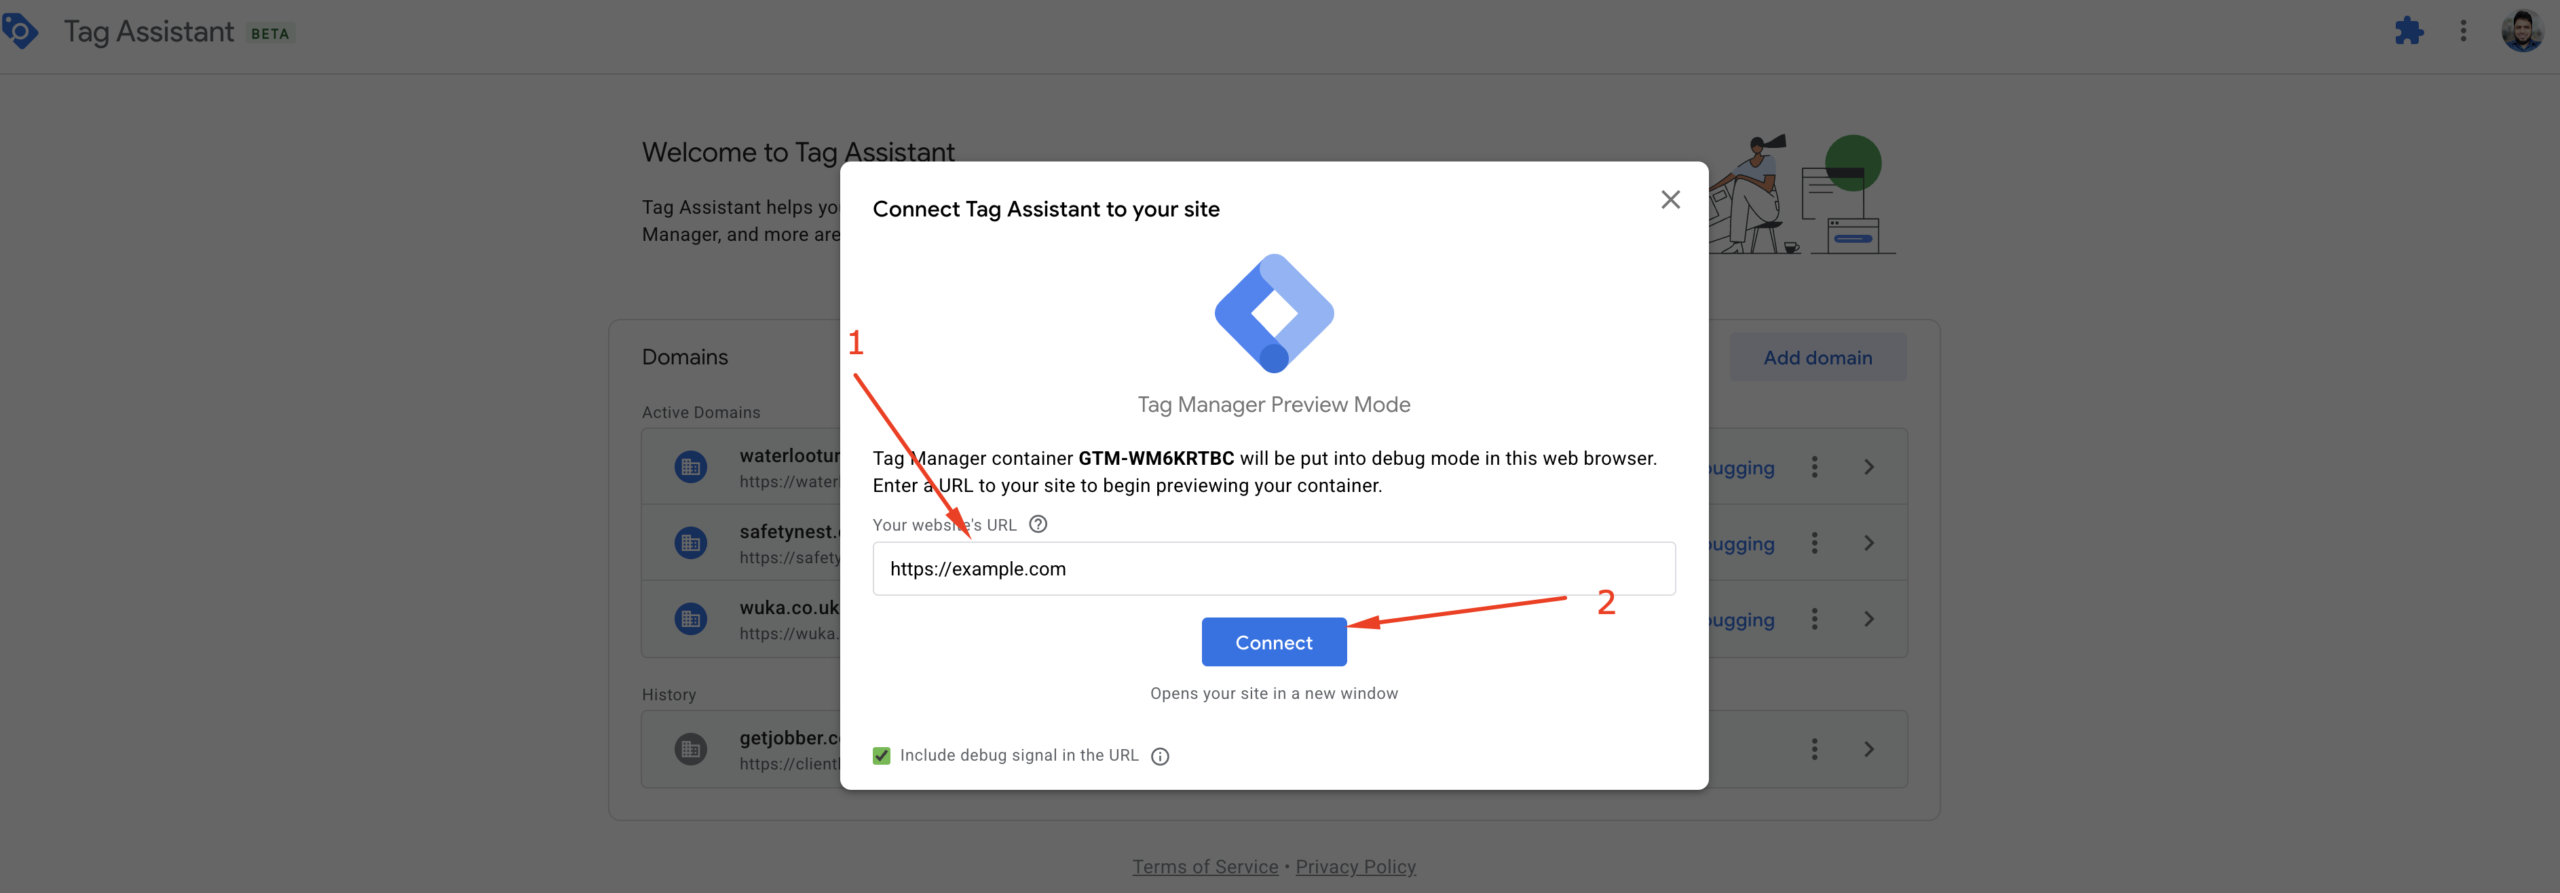
In the pop-up window, enter your website URL in the provided field, then click the “Connect” button.
If everything is set up correctly, your website will open in a new tab, and you should see the Tag Assistant info panel displayed.

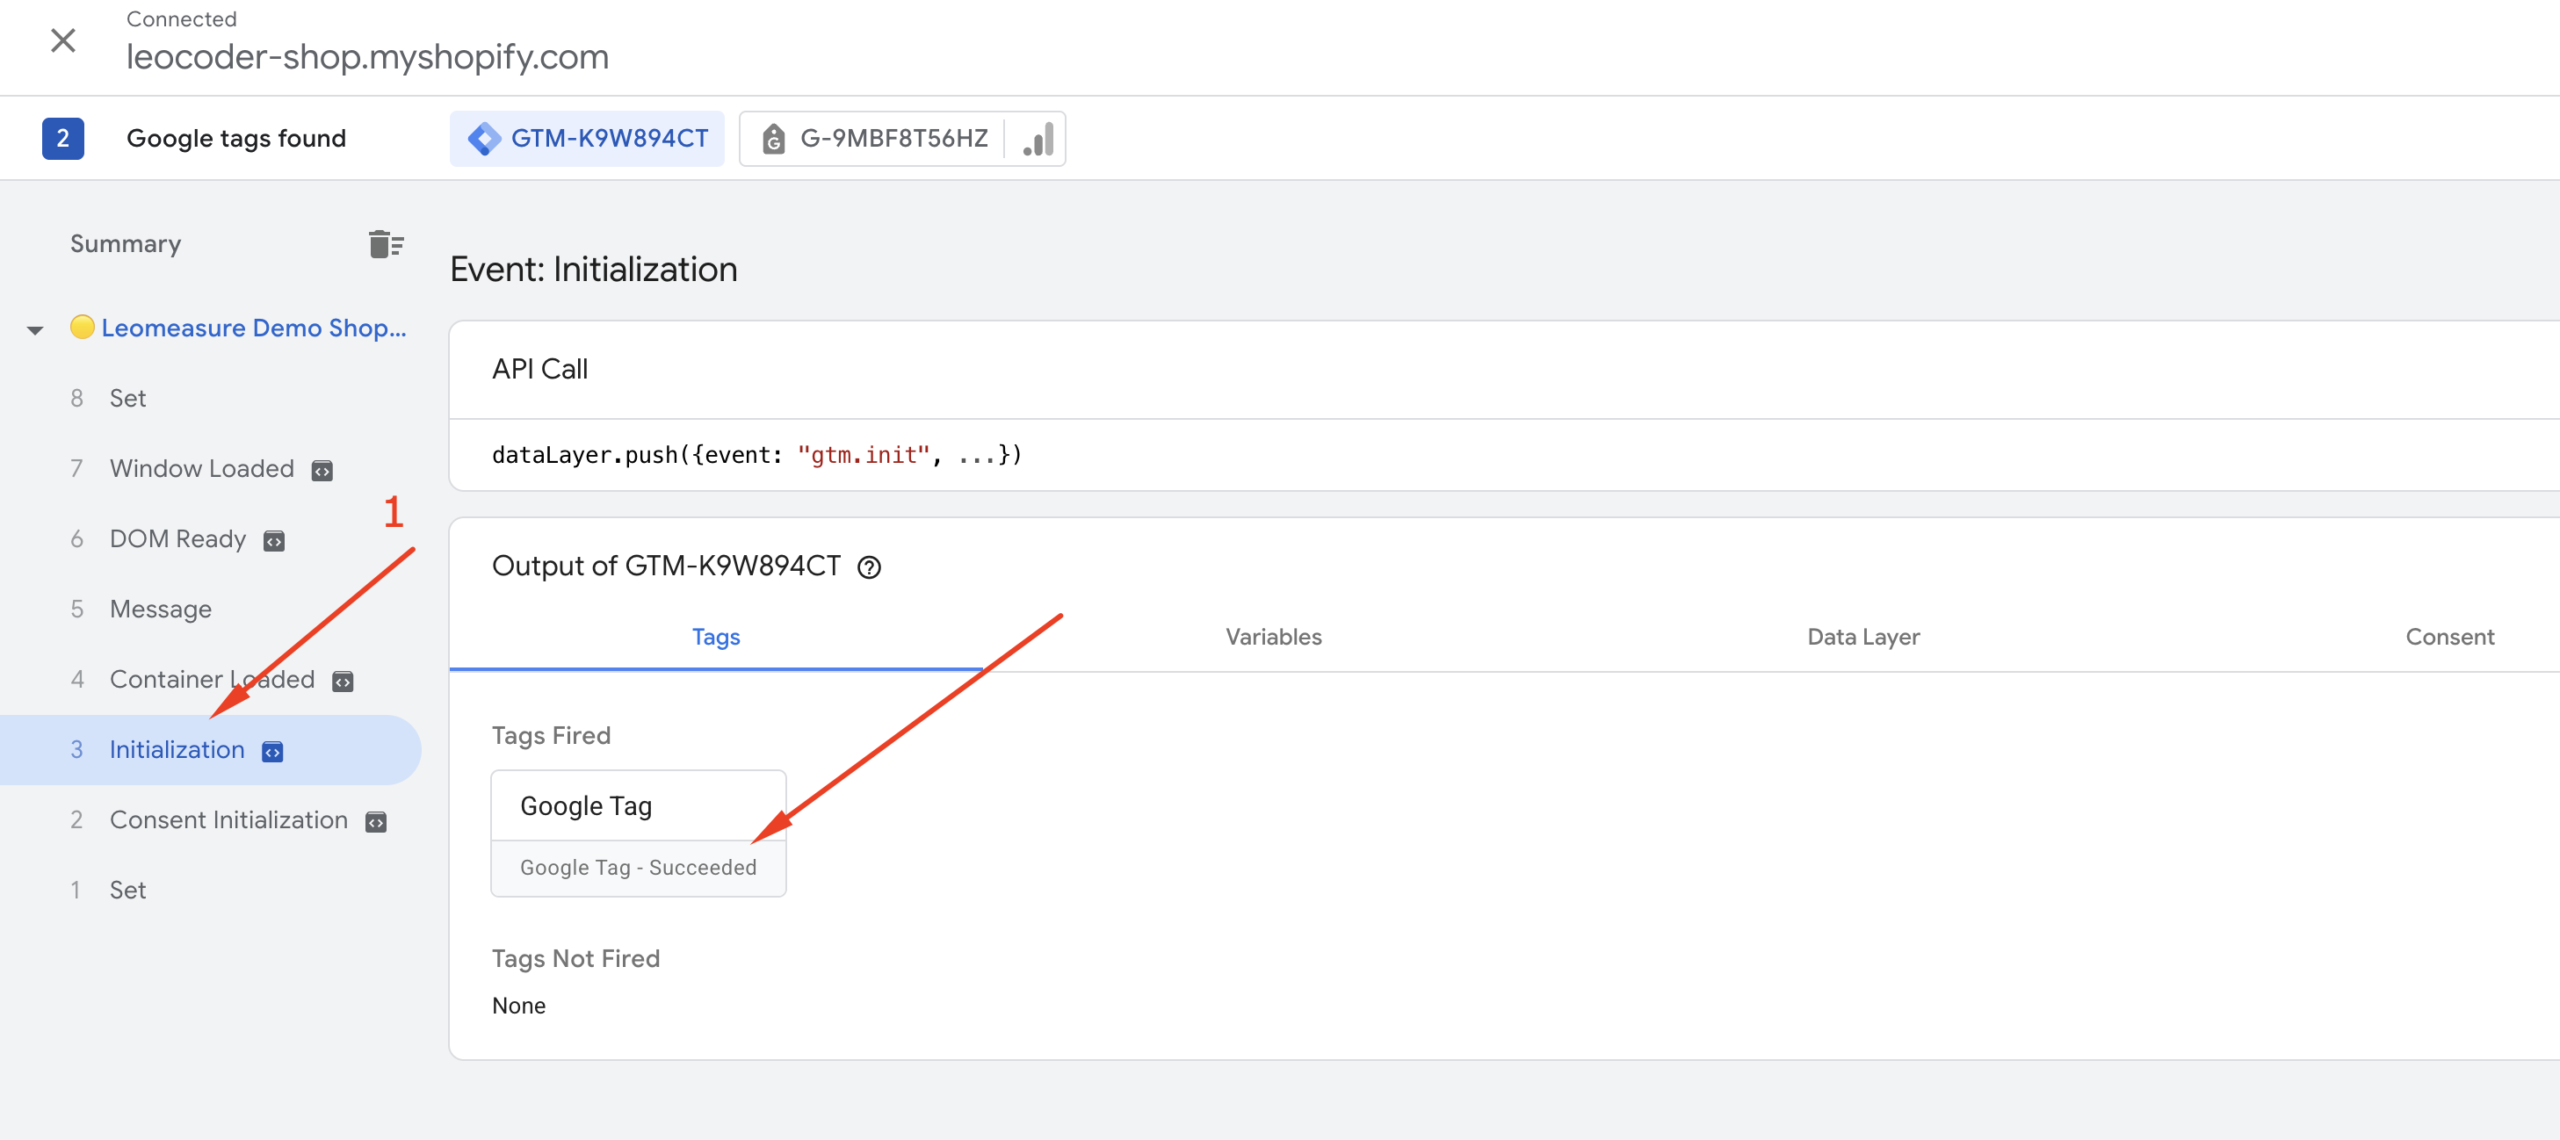
Now, switch back to the GTM Preview tab in your browser. In the sidebar, you should see a summary of the dataLayer events. Click on “Initialization” and look for “Google Tag – Succeeded”, as shown in the screenshot below.
Step 2:
Now, let’s verify that data is being sent from your website to Google Analytics.
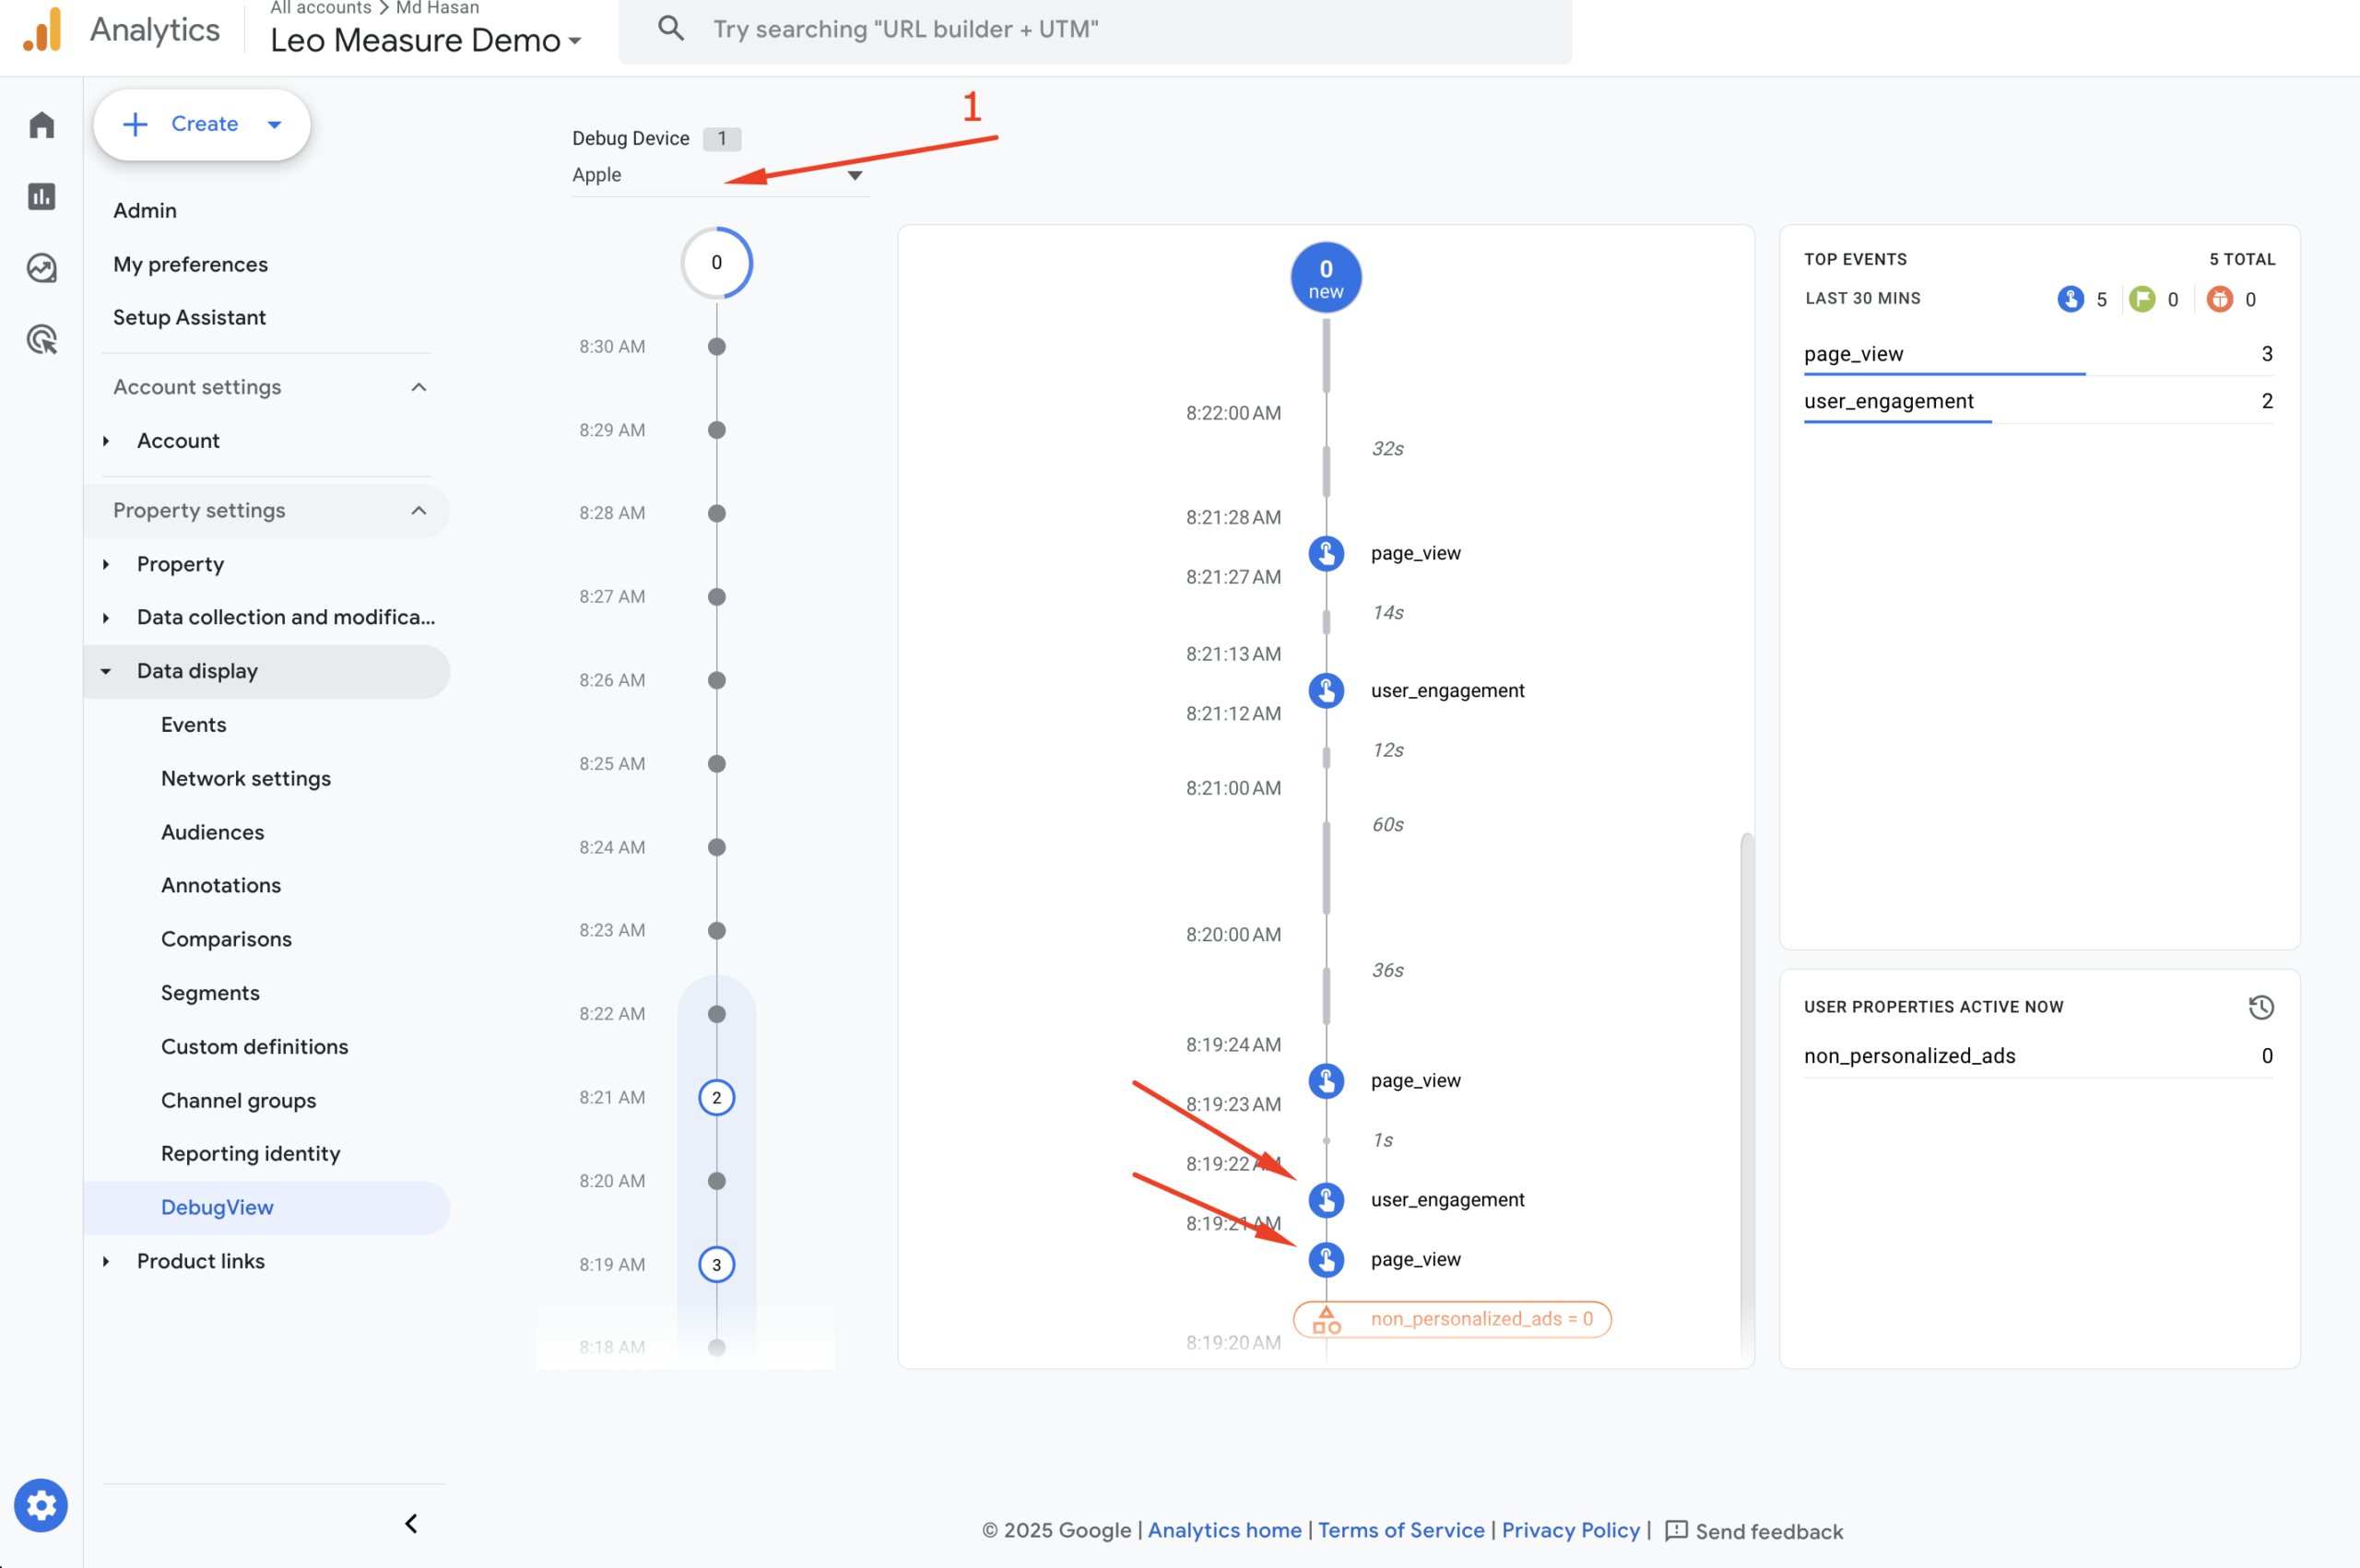
Open your Google Analytics dashboard again. From the Admin settings, click on “DebugView”, as shown in the screenshot below.

In the DebugView panel, select your device. You should see events appearing, such as page_view, user_engagement, first_visit, and others. Please note that sometimes DebugView can be slow and may take 2–3 minutes to display data.
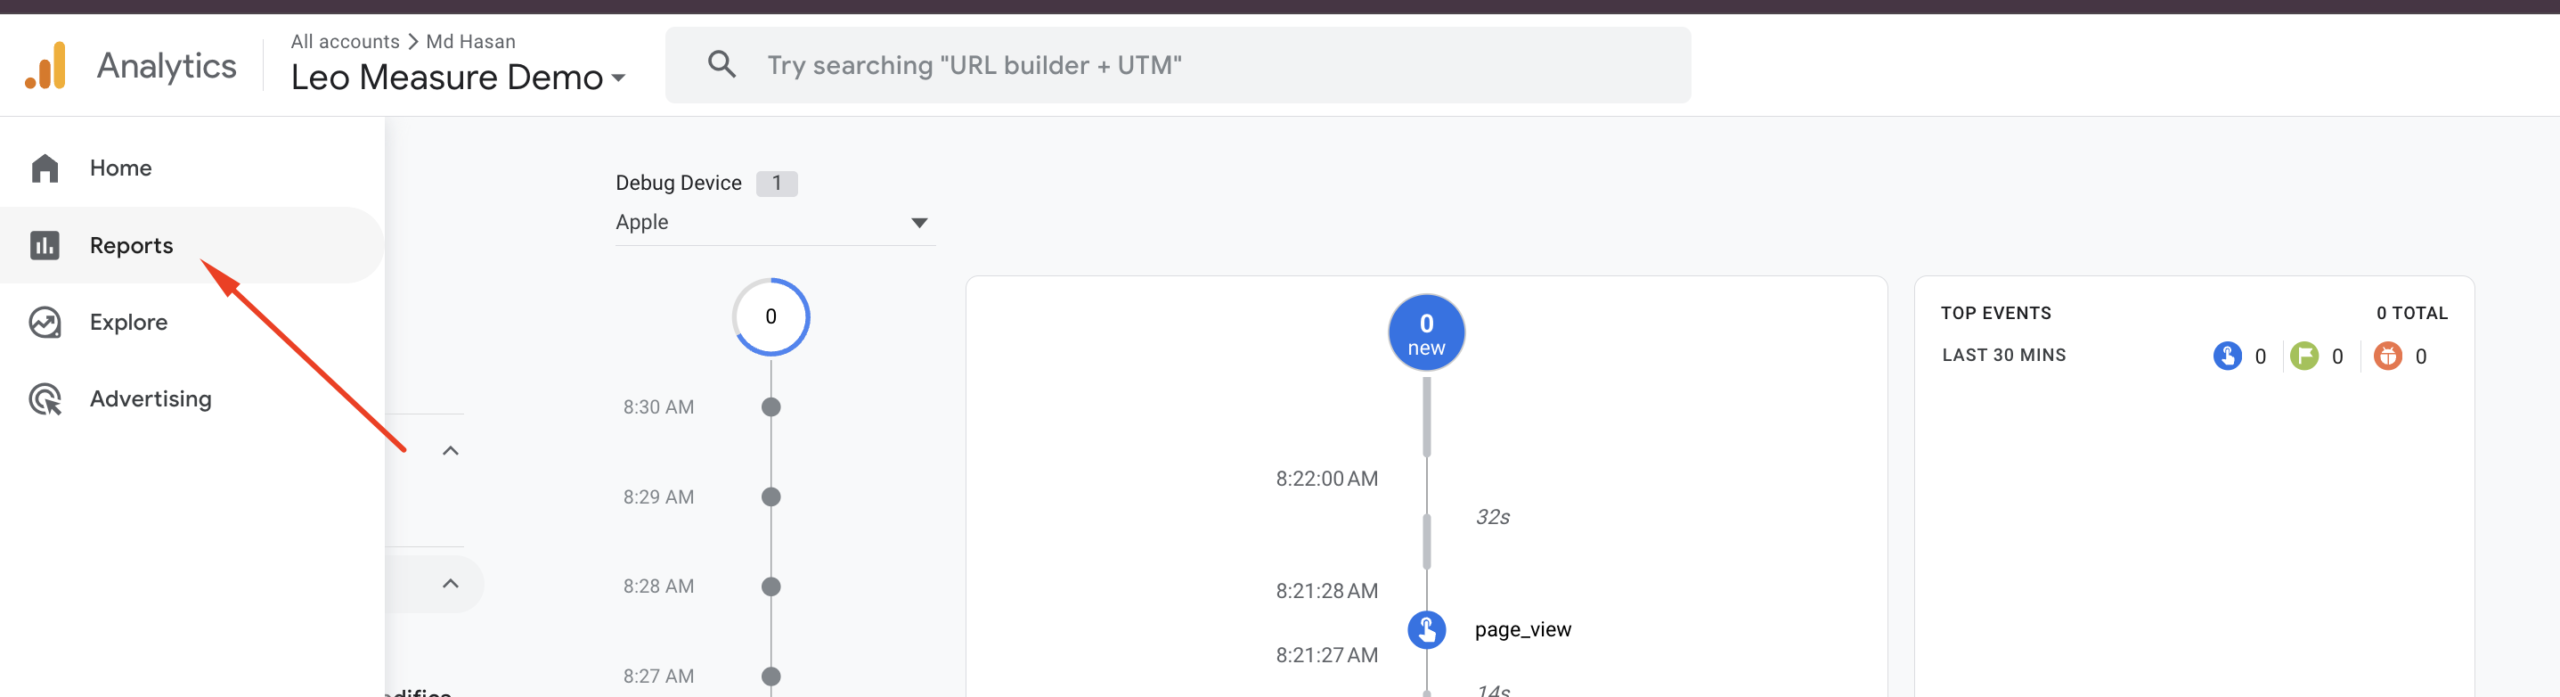
Besides DebugView, you can also check the Real-time report, as shown in the screenshot below.
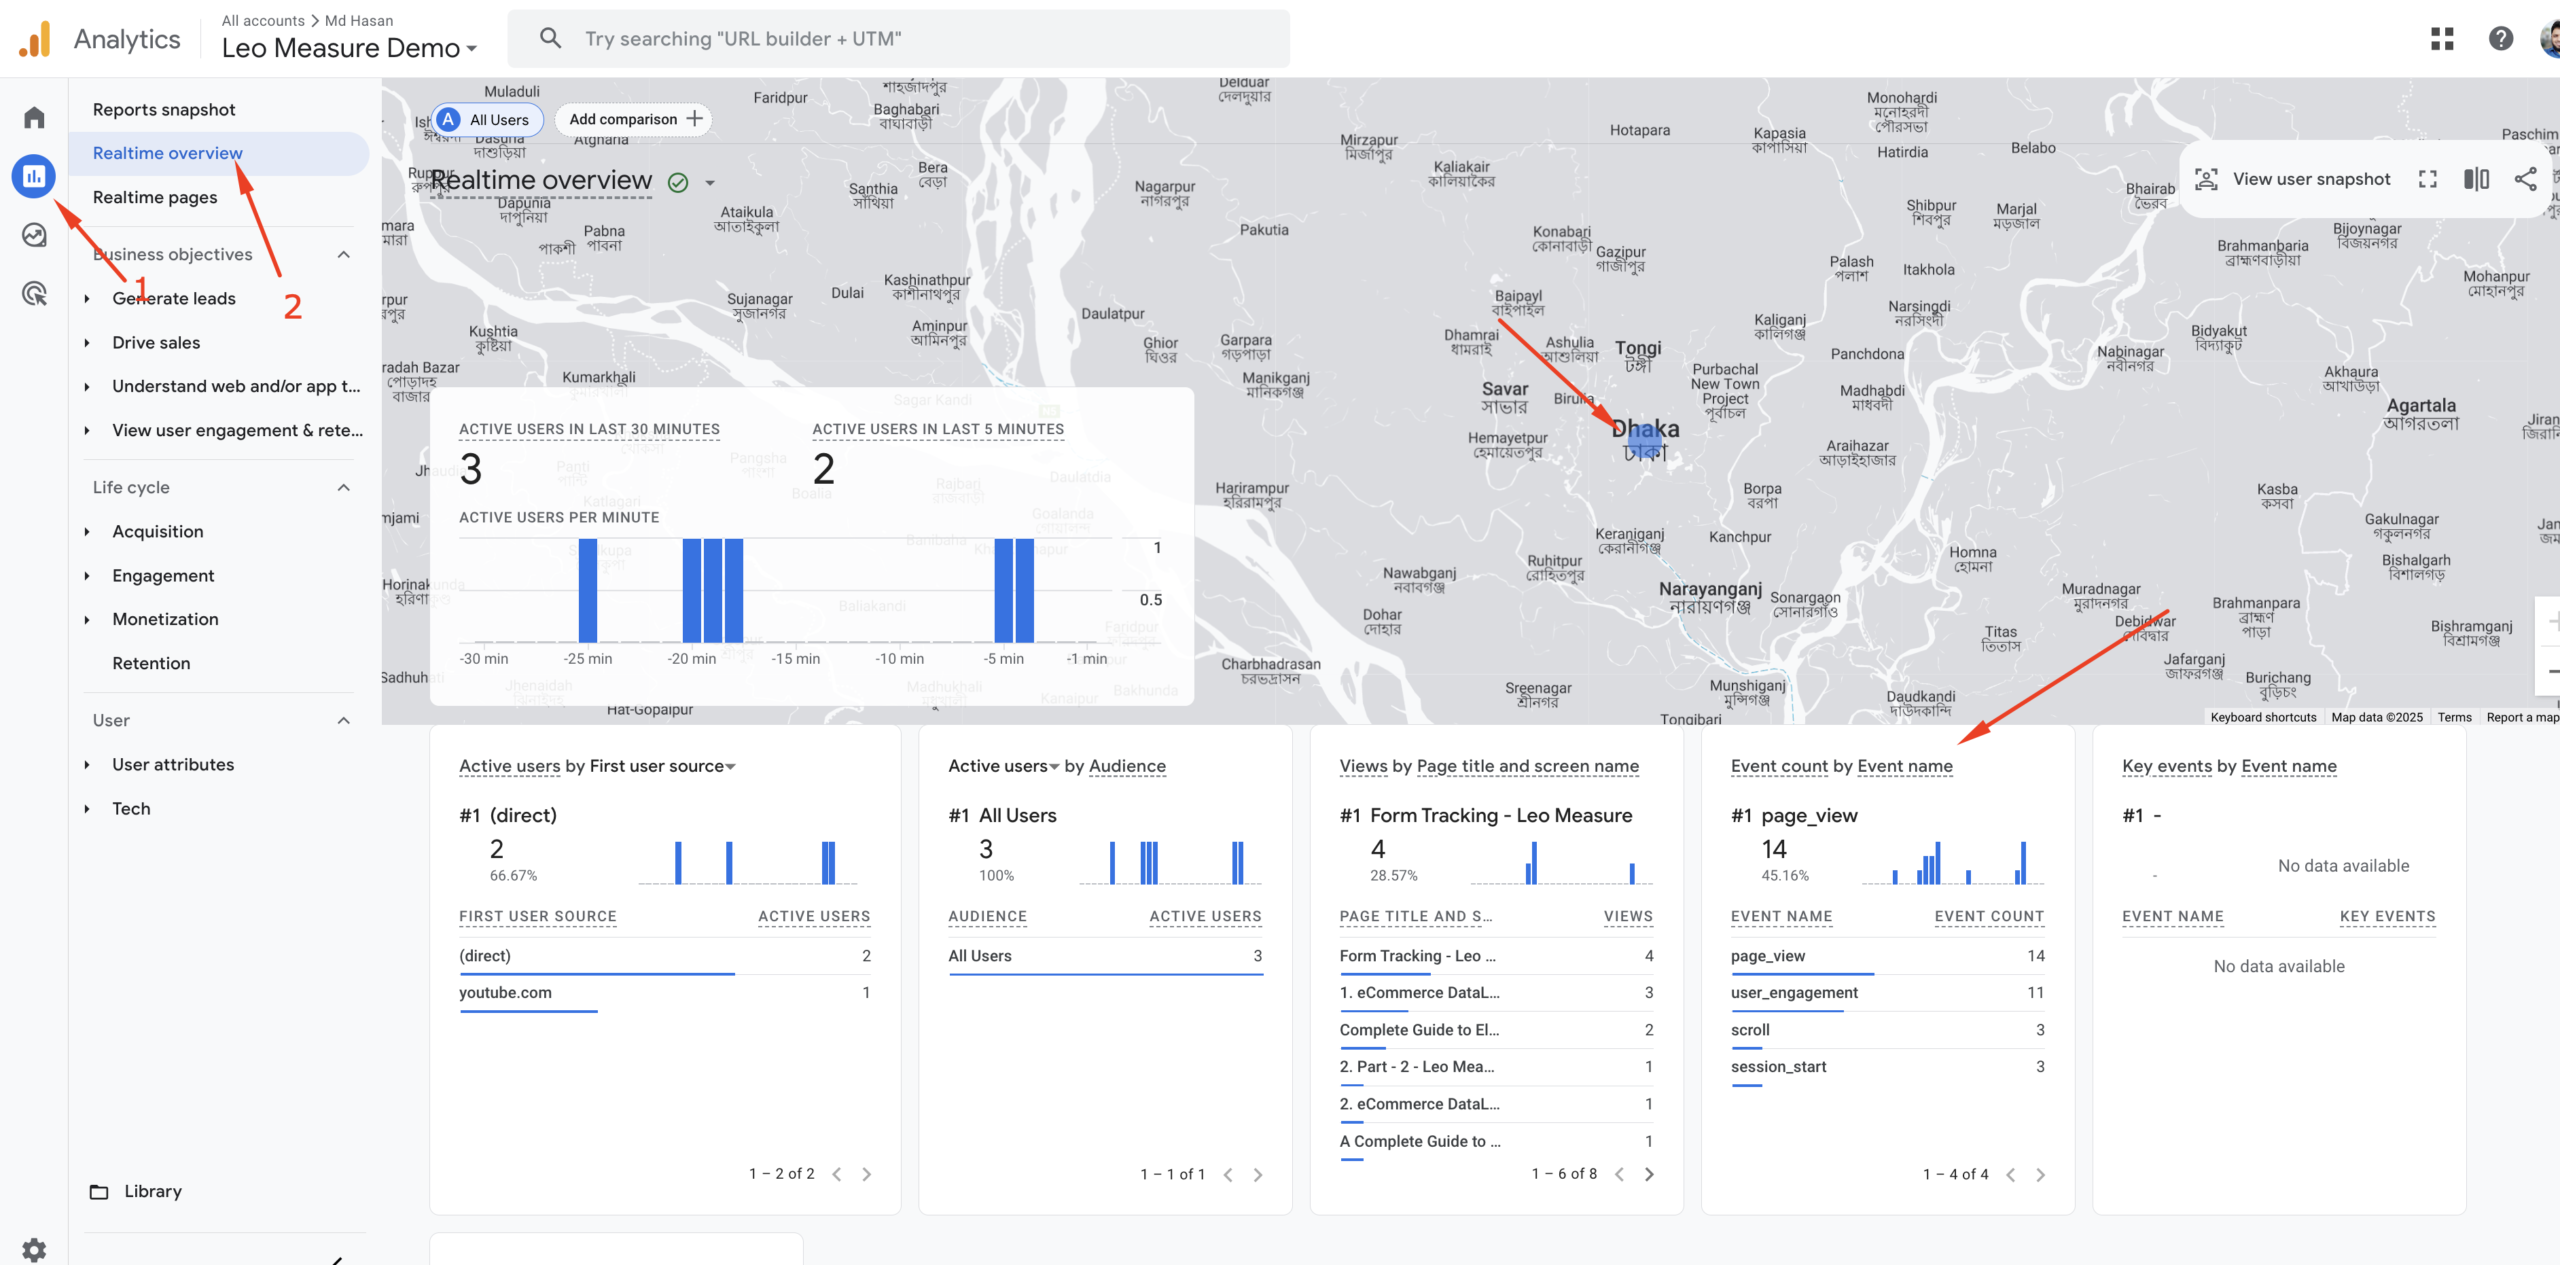
Now we have confirmed that everything is working properly and Google Analytics is successfully collecting data from your website.
Keep in mind that Google Analytics usually takes 24 to 48 hours to fully populate data in the reports. So, you can expect to start seeing detailed analytics reports within one to two days.
What’s Next?
Publish Your Google Tag: Once you’ve confirmed that everything is working correctly, it’s time to publish your tag setup—if you haven’t done so already. Publishing your tag is crucial; otherwise, Google Analytics will not receive any data from your website.

Custom Conversion Tracking:
By default, Google Analytics tracks basic user data, sessions, and standard events like session_start, page_view, and scroll To track custom events—such as button clicks or form submissions—you’ll need additional setup.
Lead Form Tracking:
For effective lead form submission tracking, check our detailed guide on form tracking.
E-commerce Tracking:
For eCommerce websites, basic tracking isn’t sufficient. To monitor purchases, product views, and checkout steps completely, you’ll need a custom tag configuration. Contact the LeoMeasure support team for help setting up comprehensive eCommerce tracking.
GDPR & Cookie Consent:
If your website serves regions with privacy regulations like GDPR, you must properly configure cookie consent and data collection settings to maintain compliance. You can check our blog posts related to cookie consent setup.
FAQ Section
Do I need both Google Analytics and Google Tag Manager?
Not always—but using both is recommended. Google Analytics (GA4) collects and reports user data.
Google Tag Manager (GTM) helps you manage and install GA4 (and other tracking tools) without needing to edit your website’s code every time.
Using them together gives you more control and flexibility.
What is the difference between GA4 and GTM?
GA4 is an analytics tool—it collects and reports user behavior on your website or app. GTM is a tag management tool. It lets you easily install and manage tracking codes (like GA4). Think of GTM as the “messenger,” and GA4 as the “reporting brain.
Can I install GA4 without using Google Tag Manager?
Yes, you can install GA4 directly by adding the tracking code to your website’s HTML.
However, using GTM is safer, more flexible, and easier to manage. Especially if you need to track custom events later.
How long does it take for Google Analytics to show data?
Basic data like real-time users appears instantly. Other detailed reports (like traffic sources or conversions) may take 24 to 48 hours to fully populate in your GA4 dashboard.
Do I need coding knowledge to use GA4 and GTM?
No coding skills are required for basic setup. Both GA4 and GTM have beginner-friendly interfaces.
However, for advanced tracking (like form submissions or custom events), a basic understanding of HTML or JavaScript can be helpful—but not mandatory.
Is GA4 free to use?
Yes, Google Analytics 4 is completely free for most users. There’s also a paid version called Google Analytics 360, which is only needed by large enterprises with very high traffic and data needs.
How do I delete a Google Analytics property?
You can’t delete a GA4 property permanently. Instead, you can remove the tracking code from your website and stop using the property. If needed, you can also disable data collection or mark the property as inactive.
Final Thoughts
This was a detailed, step-by-step tutorial on creating a Google Analytics account, setting up Google Tag Manager, and integrating them with your website.
If you get stuck or need help with Google Analytics or conversion tracking setup, feel free to explore more tutorials on the LeoMeasure Blog or contact our team directly — we’re here to help!


Hey! I know this is kinda off topic but I was wondering which blog
platform are you using for this website? I’m getting fed up of
Wordpress because I’ve had problems with hackers and I’m looking at options for another platform.
I would be fantastic if you could point me in the direction of
a good platform.
Aw, this was an exceptionally good post. Spending some time and actual
effort to make a good article… but what can I say… I hesitate a
whole lot and don’t seem to get nearly anything done.